Gateway EC14 Service Guide - Page 65
Removing the Keyboard, See Removing the Hard Disk Drive Module
 |
View all Gateway EC14 manuals
Add to My Manuals
Save this manual to your list of manuals |
Page 65 highlights
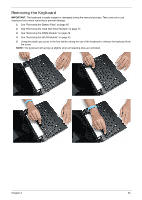
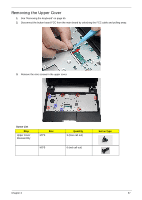
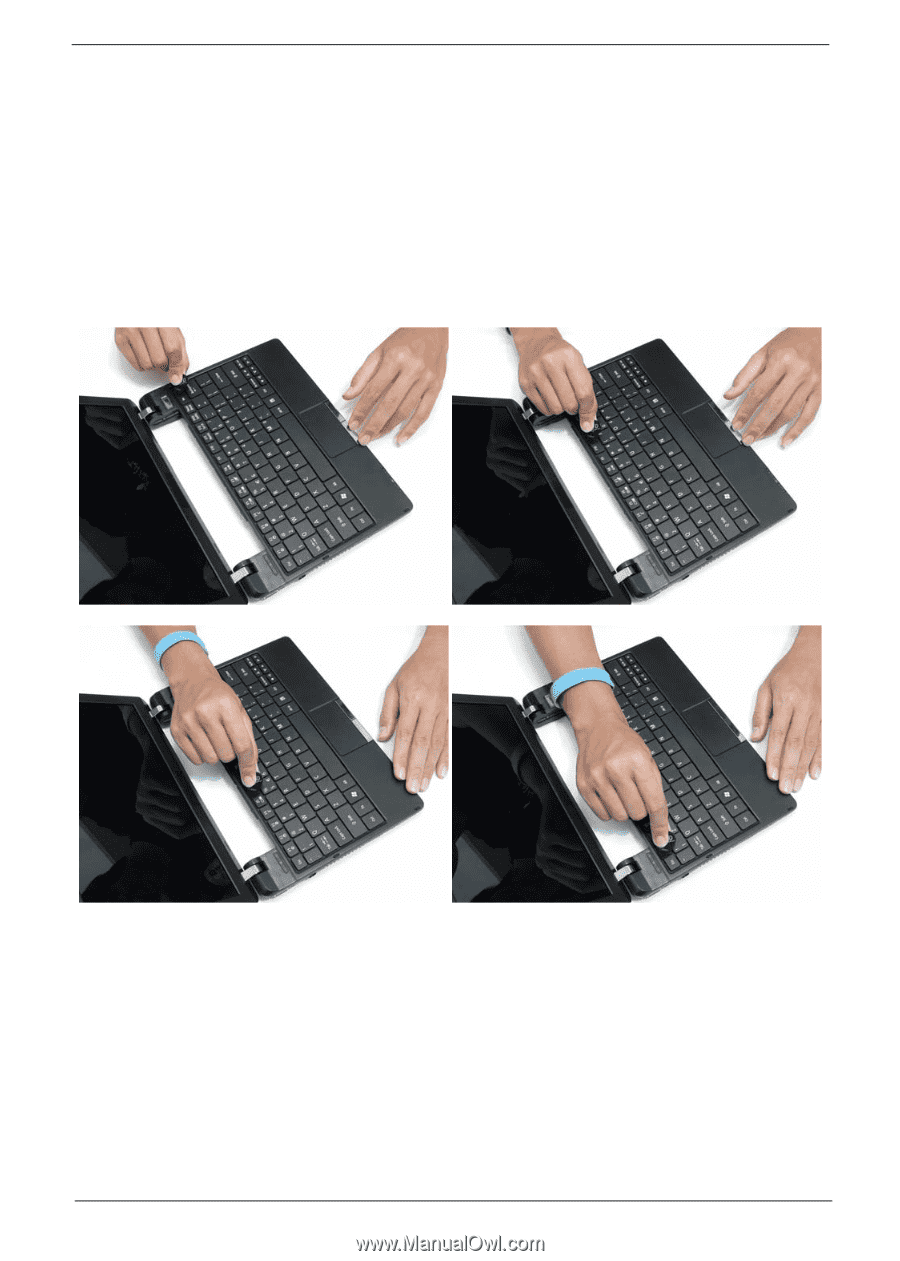
Removing the Keyboard IMPORTANT: The keyboard is easily warped or damaged during the removal process. Take care not to use excessive force when removing to prevent damage. 1. See "Removing the Battery Pack" on page 45. 2. See "Removing the Hard Disk Drive Module" on page 47. 3. See "Removing the DIMM Module" on page 49. 4. See "Removing the WLAN Module" on page 51. 5. Using the plastic pry, press in the four latches along the top of the keyboard to release the keyboard from the cover. NOTE: The keyboard will spring up slightly when all retaining clips are unlocked. Chapter 3 55
-
 1
1 -
2
-
3
-
4
-
5
-
6
-
7
-
8
-
9
-
10
-
11
-
12
-
13
-
14
-
15
-
16
-
17
-
18
-
19
-
20
-
21
-
22
-
23
-
24
-
25
-
26
-
27
-
28
-
29
-
30
-
31
-
32
-
33
-
34
-
35
-
36
-
37
-
38
-
39
-
40
-
41
-
42
-
43
-
44
-
45
-
46
-
47
-
48
-
49
-
50
-
51
-
52
-
53
-
54
-
55
-
56
-
57
-
58
-
59
-
 60
60 -
 61
61 -
 62
62 -
 63
63 -
 64
64 -
 65
65 -
 66
66 -
 67
67 -
 68
68 -
 69
69 -
 70
70 -
71
-
72
-
73
-
74
-
75
-
76
-
77
-
78
-
79
-
80
-
81
-
82
-
83
-
84
-
85
-
86
-
87
-
88
-
89
-
90
-
91
-
92
-
93
-
94
-
95
-
96
-
97
-
98
-
99
-
100
-
101
-
102
-
103
-
104
-
105
-
106
-
107
-
108
-
109
-
110
-
111
-
112
-
113
-
114
-
115
-
116
-
117
-
118
-
119
-
120
-
121
-
122
-
123
-
124
-
125
-
126
-
127
-
128
-
129
-
130
-
131
-
132
-
133
-
134
-
135
-
136
-
137
-
138
-
139
-
140
-
141
-
142
-
143
-
144
-
145
-
146
-
147
-
148
-
149
-
150
-
151
-
152
-
153
-
154
-
155
-
156
-
157
-
158
-
159
-
160
-
161
-
162
-
163
-
164
-
165
-
166
-
167
-
168
-
169
-
170
-
171
-
172
-
173
-
174
 |
 |
Chapter 3
55
Removing the Keyboard
IMPORTANT:
The keyboard is easily warped or damaged during the removal process. Take care not to use
excessive force when removing to prevent damage.
1.
See “Removing the Battery Pack” on page 45.
2.
See “Removing the Hard Disk Drive Module” on page 47.
3.
See “Removing the DIMM Module” on page 49.
4.
See “Removing the WLAN Module” on page 51.
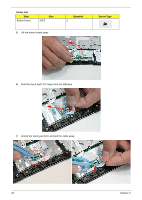
5.
Using the plastic pry, press in the four latches along the top of the keyboard to release the keyboard from
the cover.
NOTE:
The keyboard will spring up slightly when all retaining clips are unlocked.