Gateway EC14 Service Guide - Page 79
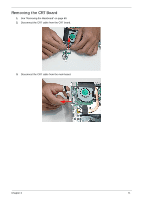
Removing the Mainboard, See Removing the I/O Board
 |
View all Gateway EC14 manuals
Add to My Manuals
Save this manual to your list of manuals |
Page 79 highlights
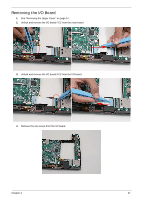
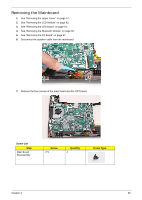
Removing the Mainboard 1. See "Removing the Upper Cover" on page 57. 2. See "Removing the LCD Module" on page 62. 3. See "Removing the LED Board" on page 64. 4. See "Removing the Bluetooth Module" on page 66. 5. See "Removing the I/O Board" on page 67. 6. Disconnect the speaker cable from the mainboard. 7. Remove the four screws of the main board and the CRT board. Screw List Step Main Board Disassembly Screw 2*3 Quantity 4 Screw Type. Chapter 3 69
-
 1
1 -
2
-
3
-
4
-
5
-
6
-
7
-
8
-
9
-
10
-
11
-
12
-
13
-
14
-
15
-
16
-
17
-
18
-
19
-
20
-
21
-
22
-
23
-
24
-
25
-
26
-
27
-
28
-
29
-
30
-
31
-
32
-
33
-
34
-
35
-
36
-
37
-
38
-
39
-
40
-
41
-
42
-
43
-
44
-
45
-
46
-
47
-
48
-
49
-
50
-
51
-
52
-
53
-
54
-
55
-
56
-
57
-
58
-
59
-
60
-
61
-
62
-
63
-
64
-
65
-
66
-
67
-
68
-
69
-
70
-
71
-
72
-
73
-
 74
74 -
 75
75 -
 76
76 -
 77
77 -
 78
78 -
 79
79 -
 80
80 -
 81
81 -
 82
82 -
 83
83 -
 84
84 -
85
-
86
-
87
-
88
-
89
-
90
-
91
-
92
-
93
-
94
-
95
-
96
-
97
-
98
-
99
-
100
-
101
-
102
-
103
-
104
-
105
-
106
-
107
-
108
-
109
-
110
-
111
-
112
-
113
-
114
-
115
-
116
-
117
-
118
-
119
-
120
-
121
-
122
-
123
-
124
-
125
-
126
-
127
-
128
-
129
-
130
-
131
-
132
-
133
-
134
-
135
-
136
-
137
-
138
-
139
-
140
-
141
-
142
-
143
-
144
-
145
-
146
-
147
-
148
-
149
-
150
-
151
-
152
-
153
-
154
-
155
-
156
-
157
-
158
-
159
-
160
-
161
-
162
-
163
-
164
-
165
-
166
-
167
-
168
-
169
-
170
-
171
-
172
-
173
-
174
 |
 |

Chapter 3
69
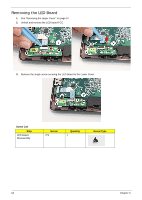
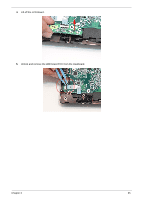
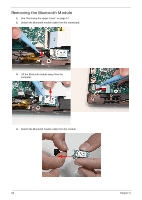
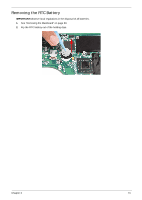
Removing the Mainboard
1.
See “Removing the Upper Cover” on page 57.
2.
See “Removing the LCD Module” on page 62.
3.
See “Removing the LED Board” on page 64.
4.
See “Removing the Bluetooth Module” on page 66.
5.
See “Removing the I/O Board” on page 67.
6.
Disconnect the speaker cable from the mainboard.
7.
Remove the four screws of the main board and the CRT board.
Screw List
Step
Screw
Quantity
Screw Type.
Main Board
Disassembly
2*3
4