Gateway GT5014H 8511124 - Gateway Canada mBTX Hardware Reference Guide - Page 22
Adding or replacing a hard drive
 |
View all Gateway GT5014H manuals
Add to My Manuals
Save this manual to your list of manuals |
Page 22 highlights
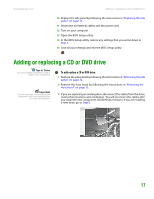
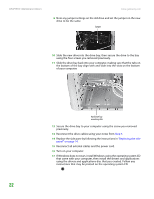
www.gateway.com Adding or replacing a hard drive 3 Remove the screws holding the card reader in the drive bay. Screws 4 Disconnect the card reader's data cable from the system board. 5 Slide the card reader out of the case. Important The color and shape of your replacement component's front cover may vary from your original component. Screws 6 Slide the new card reader into the bay from the front of the case. 7 Connect the new card reader's data cable to the system board. 8 Use the screws you removed previously to secure the card reader to the bay. 9 Reinstall the bezel by following the instructions in "Replacing the front bezel" on page 14. 10 Reinstall the computer case's side panel by following the instructions in "Replacing the side panel" on page 14. Adding or replacing a hard drive Tips & Tricks You need a Phillips screwdriver to add or replace a hard drive. To add or replace a hard drive: 1 Remove the side panel by following the instructions in "Removing the side panel" on page 12. 2 If you are adding a new drive, go to Step 4. If you are replacing an existing drive, go to the next step. 19
-
 1
1 -
2
-
3
-
4
-
5
-
6
-
7
-
8
-
9
-
10
-
11
-
12
-
13
-
14
-
15
-
16
-
 17
17 -
 18
18 -
 19
19 -
 20
20 -
 21
21 -
 22
22 -
 23
23 -
 24
24 -
 25
25 -
 26
26 -
 27
27 -
28
-
29
-
30
-
31
-
32
-
33
-
34
-
35
-
36
-
37
-
38
-
39
-
40
-
41
-
42
-
43
-
44
-
45
-
46
-
47
-
48
-
49
-
50
-
51
-
52
-
53
-
54
-
55
-
56
-
57
-
58
-
59
-
60
-
61
-
62
-
63
-
64
-
65
-
66
-
67
-
68
-
69
-
70
-
71
-
72
-
73
-
74
-
75
-
76
-
77
-
78
 |
 |
