Haier AB122MCERA Operation Manual - Page 7
Haier AB122MCERA Manual
 |
View all Haier AB122MCERA manuals
Add to My Manuals
Save this manual to your list of manuals |
Page 7 highlights
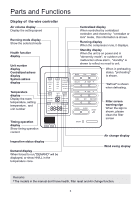
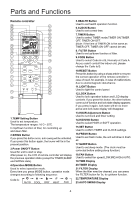
Parts and Functions 24.HIGN/SO Run Display 25.Code A of controller's state Code A is used for the units in this manual. 26.SIGNAL SENDING Display 27.Code B of controller's state 28.Fresh Display 29.Auxiliary ELECTRICAL HEATING Display 30.HEALTH Display Displays when healthy run function is set. 31.Operation MODE Disp ay AUTO RUN COOL RUN DRY RUN HEAT RUN FAN RUN V 40 a O 32.SLEEP State Display 33.LOCK State Display 34.FAN SPEED Display r LOW CodeA Il - il 'fill MID HIGH IIIII0 AUTO 35.TIMER ON Display 36.HEAT Button Used to select auxiliary heater function. Note: 1.Models in this manual have no functions ®0 O CKOCCO®0q000C:0) 2.HIGH/SO button This button is active in Cooling/Heating mode, the fan speed is in AUTO mode after pressing it and "high functon" will be automatically cancelled after 15 minutes running. Remote Controller Operation • When in use, direct signal transmission head to the receiver placed on the indoor unit. • The distance between the remote controller and the receiver should be max 7m and there should be no obstacle between them. • Do not throw the remote controller to prevent it from being damaged. • When operating the remote controller in an area where electronically controlled lights are installed or wireless handsets are used, please move closer to the indoor unit as the function of the remote controller might be affected by signals emitted by the above mentioned equipments. Battery loading Batteries are fitted as follows: Remove the battery compartment lid Slightly press and disengage the battery compartment lid marked with " 7 " and then hold the remote controller by the upper section and then remove the battery compartment lid by pressing in the direction of the arrow as shown in the figure above. Loading the battery Ensure that batteries are correctly placed in the compartment as required for positive and negative terminals. Replacing the battery compartment lid The battery compartment lid is reinstalled in the reverse sequence. Display review Press the button to see if batteries are properly fitted. If no display appears, refit the batteries. Confirming indicator If no indication is displayed after press ON/OFF button, reload the batteries. Caution: if the remote controller does not operate as designed after fitting new batteries of the same type, press the Reset button (marked 1) with a pointed article. Note: It is recommended that the batteries should be removed from the compartment if the remote controller is not used for an extended period. The remote controller is programmed for automatic test of operation mode after the batteries are replaced. When the test is conducted, all icons will appear on the screen and then disappear if the batteries are properly fitted. When throw away the waste batteries, please perform in accordance with the local regulation. Clock Set When the unit is started for the first time or after replacing batteries in remote controller, clock should be adjusted as follows: 1.Press CLOCK button, clock indication of " AM " or " PM " flashes. SU 2.Press " A " or " V " to set correct time. Each press the time will increase or decrease by 1 min. If the button is kept pressed, the time will increase or decrease quickly. 3.Press "SET" button to confirm the time setting. AM or PM stop flashing, while clock starts working. Note:AM means morning and PM means afternoon. 5
-
 1
1 -
 2
2 -
 3
3 -
 4
4 -
 5
5 -
 6
6 -
 7
7 -
 8
8 -
 9
9 -
 10
10 -
 11
11 -
 12
12 -
13
-
14
-
15
-
16
-
17
-
18
-
19
-
20
-
21
-
22
-
23
-
24
-
25
-
26
-
27
-
28
-
29
-
30
-
31
-
32
-
33
-
34
-
35
-
36
-
37
-
38
-
39
-
40
 |
 |
