HP 4200n HP stapler stacker q2442a, q2443a - Install Guide - Page 7
Odinstalace stohovače
 |
UPC - 808736313971
View all HP 4200n manuals
Add to My Manuals
Save this manual to your list of manuals |
Page 7 highlights
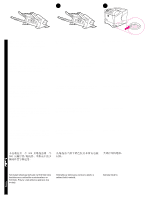
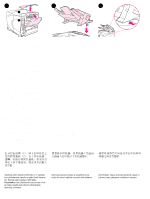
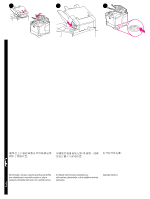
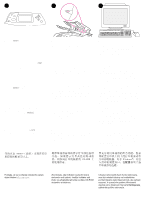
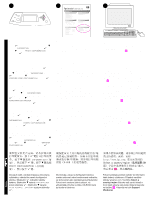
15 See the use guide on the CD-ROM that came with the printer for information about gaining access to the printer driver, setting the control panel, using the stacker, and solving problems, and for warranties and regulatory statements. To remove the stacker. Turn the printer power off. Lift the stacker upward until the metal legs are removed from the slots in the printer. Reinstall the accessory cover. Turn the printer power on. Reportez-vous au guide d'utilisation disponible sur le CD-ROM fourni avec l'imprimante pour obtenir des informations sur l'accès au pilote d'imprimante, la configuration du panneau de commande, l'utilisation du bac d'empilement, la résolution des problèmes, ainsi que pour connaître les garanties et la réglementation en vigueur. Informationen zum Zugriff auf den Druckertreiber, zum Einrichten des Bedienfeldes, zur Verwendung des Staplers, zur Fehlerbehebung sowie zu Gewährleistungserklärungen und Zulassungsbestimmungen finden Sie im Handbuch Verwendung auf der mit dem Drucker gelieferten CD-ROM. La Guida all'uso sul CD-ROM fornito con la stampante contiene informazioni su come accedere al driver della stampante, impostare il pannello di controllo, utilizzare l'impilatrice e risolvere i problemi nonché informazioni su garanzia e normative. Pour retirer le bac d'empilement. Mettez l'imprimante hors tension. Soulevez le bac d'empilement afin de retirer les pieds métalliques des logements de l'imprimante. So entfernen Sie den Stapler. Schalten Sie den Drucker aus. Heben Sie den Stapler an, bis die Metallstifte aus den Schlitzen am Drucker gleiten. Per rimuovere l'impilatrice. Spegnere la stampante. Sollevare l'impilatrice fino ad estrarre i supporti metallici dagli alloggiamenti nella stampante. Réinstallez le couvercle d'accessoire. Mettez l'imprimante sous tension. Bringen Sie die Zubehörabdeckung wieder an. Schalten Sie den Drucker ein. Reinstallare il coperchio accessorio. Accendere la stampante. Consulte la guía de uso del CD-ROM que acompaña a la impresora para obtener información sobre el acceso al controlador de la impresora, la configuración del panel de control, la utilización del apilador y la solución de problemas, así como las garantías y las declaraciones reglamentarias. Para retirar el apilador. Apague la impresora. Levante el apilador hasta que las patas metálicas salgan de las ranuras de la impresora. Vuelva a instalar la cubierta accesoria. Encienda la alimentación de la impresora. Vuživatelské příručce na disku CD-ROM dodaném s tiskárnou najdete informace o přístupu k ovladači tiskárny, o nastavení ovládacího panelu, o používání stohovače a odstraňování problémů a dále o zárukách a prohlášeních o shodě. Odinstalace stohovače: Vypněte tiskárnu. Zvedněte stohovač vzhůru, aby se kovové nožky vysunuly z otvorů na tiskárně. Nasaďte kryt příslušenství. Zapněte tiskárnu. 6
-
 1
1 -
 2
2 -
 3
3 -
 4
4 -
 5
5 -
 6
6 -
 7
7 -
 8
8 -
 9
9 -
 10
10 -
 11
11 -
 12
12 -
13
-
14
-
15
-
16
-
17
-
18
-
19
-
20
-
21
-
22
-
23
-
24
-
25
-
26
-
27
-
28
-
29
-
30
-
31
-
32
 |
 |
