HP 6125G HP 6125G & 6125G/XG Blade Switches IP Multicast Configuration - Page 315
Configuring a C-RP, Enabling embedded RP
 |
View all HP 6125G manuals
Add to My Manuals
Save this manual to your list of manuals |
Page 315 highlights
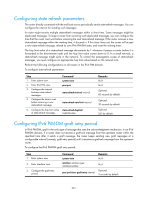
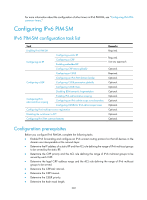
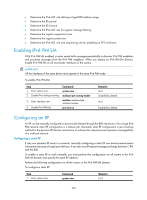
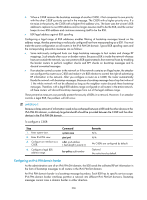
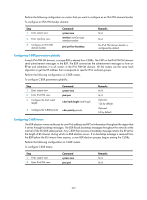
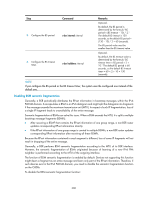
Step 2. Enter IPv6 PIM view. 3. Configure a static RP for IPv6 PIM-SM. Command pim ipv6 static-rp ipv6-rp-address [ acl6-number ] [ preferred ] Remarks N/A No static RP by default. Configuring a C-RP In an IPv6 PIM-SM domain, you can configure routers that intend to become the RP as C-RPs. The BSR collects the C-RP information by receiving the C-RP-Adv messages from C-RPs or auto-RP announcements from other routers and organizes the information into an RP-set, which is flooded throughout the entire network. Then, the other routers in the network calculate the mappings between specific group ranges and the corresponding RPs based on the RP-set. HP recommends that you configure C-RPs on backbone routers. To guard against C-RP spoofing, you need to configure a legal C-RP address range and the range of IPv6 multicast groups to be served on the BSR. In addition, because every C-BSR has a chance to become the BSR, you need to configure the same filtering policy on all C-BSRs in the IPv6 PIM-SM domain. When you configure a C-RP, ensure a relatively large bandwidth between this C-RP and the other devices in the IPv6 PIM-SM domain. To configure a C-RP: Step Command Remarks 1. Enter system view. system-view N/A 2. Enter IPv6 PIM view. pim ipv6 N/A c-rp ipv6-address [ { group-policy 3. Configure an interface to be a acl6-number | scope scope-id } | priority No C-RPs are configured by C-RP for IPv6 PIM-SM. priority | holdtime hold-interval | default. advertisement-interval adv-interval ] * 4. Configure a legal C-RP address range and the range of IPv6 multicast groups to be crp-policy acl6-number served. Optional. No restrictions by default. Enabling embedded RP With the embedded RP feature enabled, the router can resolve the RP address directly from the IPv6 multicast group address of an IPv6 multicast packets. This RP can replace the statically configured RP or the RP dynamically calculated based on the BSR mechanism. Therefore, the DR does not need to identify the RP address beforehand. Perform this configuration on all routers in the IPv6 PIM-SM domain. To enable embedded RP: Step 1. Enter system view. 2. Enter IPv6 PIM view. Command system-view pim ipv6 Remarks N/A N/A 304
-
 1
1 -
2
-
3
-
4
-
5
-
6
-
7
-
8
-
9
-
10
-
11
-
12
-
13
-
14
-
15
-
16
-
17
-
18
-
19
-
20
-
21
-
22
-
23
-
24
-
25
-
26
-
27
-
28
-
29
-
30
-
31
-
32
-
33
-
34
-
35
-
36
-
37
-
38
-
39
-
40
-
41
-
42
-
43
-
44
-
45
-
46
-
47
-
48
-
49
-
50
-
51
-
52
-
53
-
54
-
55
-
56
-
57
-
58
-
59
-
60
-
61
-
62
-
63
-
64
-
65
-
66
-
67
-
68
-
69
-
70
-
71
-
72
-
73
-
74
-
75
-
76
-
77
-
78
-
79
-
80
-
81
-
82
-
83
-
84
-
85
-
86
-
87
-
88
-
89
-
90
-
91
-
92
-
93
-
94
-
95
-
96
-
97
-
98
-
99
-
100
-
101
-
102
-
103
-
104
-
105
-
106
-
107
-
108
-
109
-
110
-
111
-
112
-
113
-
114
-
115
-
116
-
117
-
118
-
119
-
120
-
121
-
122
-
123
-
124
-
125
-
126
-
127
-
128
-
129
-
130
-
131
-
132
-
133
-
134
-
135
-
136
-
137
-
138
-
139
-
140
-
141
-
142
-
143
-
144
-
145
-
146
-
147
-
148
-
149
-
150
-
151
-
152
-
153
-
154
-
155
-
156
-
157
-
158
-
159
-
160
-
161
-
162
-
163
-
164
-
165
-
166
-
167
-
168
-
169
-
170
-
171
-
172
-
173
-
174
-
175
-
176
-
177
-
178
-
179
-
180
-
181
-
182
-
183
-
184
-
185
-
186
-
187
-
188
-
189
-
190
-
191
-
192
-
193
-
194
-
195
-
196
-
197
-
198
-
199
-
200
-
201
-
202
-
203
-
204
-
205
-
206
-
207
-
208
-
209
-
210
-
211
-
212
-
213
-
214
-
215
-
216
-
217
-
218
-
219
-
220
-
221
-
222
-
223
-
224
-
225
-
226
-
227
-
228
-
229
-
230
-
231
-
232
-
233
-
234
-
235
-
236
-
237
-
238
-
239
-
240
-
241
-
242
-
243
-
244
-
245
-
246
-
247
-
248
-
249
-
250
-
251
-
252
-
253
-
254
-
255
-
256
-
257
-
258
-
259
-
260
-
261
-
262
-
263
-
264
-
265
-
266
-
267
-
268
-
269
-
270
-
271
-
272
-
273
-
274
-
275
-
276
-
277
-
278
-
279
-
280
-
281
-
282
-
283
-
284
-
285
-
286
-
287
-
288
-
289
-
290
-
291
-
292
-
293
-
294
-
295
-
296
-
297
-
298
-
299
-
300
-
301
-
302
-
303
-
304
-
305
-
306
-
307
-
308
-
309
-
 310
310 -
 311
311 -
 312
312 -
 313
313 -
 314
314 -
 315
315 -
 316
316 -
 317
317 -
 318
318 -
 319
319 -
 320
320 -
321
-
322
-
323
-
324
-
325
-
326
-
327
-
328
-
329
-
330
-
331
-
332
-
333
-
334
-
335
-
336
-
337
-
338
-
339
-
340
-
341
-
342
-
343
-
344
-
345
-
346
-
347
-
348
-
349
-
350
-
351
-
352
-
353
-
354
-
355
-
356
-
357
-
358
-
359
-
360
-
361
-
362
-
363
-
364
-
365
-
366
-
367
-
368
-
369
-
370
-
371
-
372
-
373
-
374
-
375
-
376
-
377
-
378
-
379
 |
 |
