HP 6125G HP 6125-CMW520-R2105 Release Notes - Page 51
Table 23 Network parameter fields and shortcut keys
 |
View all HP 6125G manuals
Add to My Manuals
Save this manual to your list of manuals |
Page 51 highlights
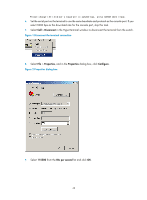
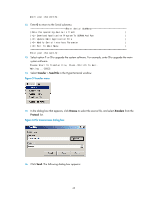
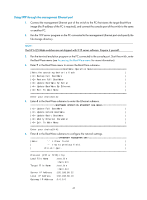
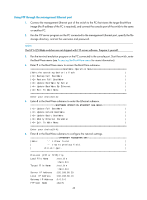
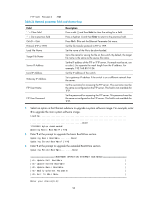
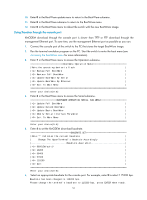
Table 23 Network parameter fields and shortcut keys Field '.' = Clear field '-' = Go to previous field Ctrl+D = Quit Protocol (FTP or TFTP) Load File Name Target File Name Server IP Address Local IP Address Gateway IP Address Description Press a dot (.) and then Enter to clear the setting for a field. Press a hyphen (-) and then Enter to return to the previous field. Press Ctrl + D to exit the Ethernet Parameter Set menu. Set the file transfer protocol to FTP or TFTP. Set the name of the file to be downloaded. Set a file name for saving the file on the switch. By default, the target file name is the same as the source file name. Set the IP address of the FTP or TFTP server. If a mask must be set, use a colon (:) to separate the mask length from the IP address. For example, 192.168.80.10:24. Set the IP address of the switch. Set a gateway IP address if the switch is on a different network than the server. 7. Select an option in the Ethernet submenu to upgrade a system software image. For example, enter 1 to upgrade the main system software image. Loading...Done! 17163940 bytes downloaded! Updating Basic BootWare? [Y/N] 8. Enter Y at the prompt to upgrade the basic BootWare section. Updating Basic BootWare.........Done! Updating Extend BootWare? [Y/N] 9. Enter Y at the prompt to upgrade the extended BootWare section. Updating Extend BootWare.........Done! BOOTWARE OPERATION ETHERNET SUB-MENU | Update Full BootWare | | Update Extend BootWare | | Update Basic BootWare | | Modify Ethernet Parameter | | Exit To Main Menu | Enter your choice(0-4): 10. Enter 0 in the BootWare update menu to return to the BootWare submenu. 11. Enter 0 in the BootWare submenu to return to the BootWare menu. 12. Enter 0 in the BootWare menu to reboot the switch with the new BootWare image. 48
-
 1
1 -
2
-
3
-
4
-
5
-
6
-
7
-
8
-
9
-
10
-
11
-
12
-
13
-
14
-
15
-
16
-
17
-
18
-
19
-
20
-
21
-
22
-
23
-
24
-
25
-
26
-
27
-
28
-
29
-
30
-
31
-
32
-
33
-
34
-
35
-
36
-
37
-
38
-
39
-
40
-
41
-
42
-
43
-
44
-
45
-
 46
46 -
 47
47 -
 48
48 -
 49
49 -
 50
50 -
 51
51 -
 52
52 -
 53
53 -
 54
54 -
 55
55 -
 56
56 -
57
-
58
-
59
 |
 |