HP 8550dn HP Color LaserJet 8550, 8550N, 8550DN, 8550GN, 8550MFP Printer - Get - Page 36
Configuring Media Type and Size
 |
UPC - 088698946428
View all HP 8550dn manuals
Add to My Manuals
Save this manual to your list of manuals |
Page 36 highlights
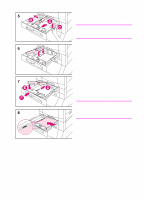
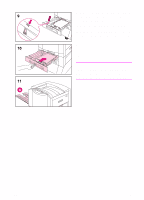
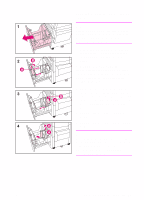
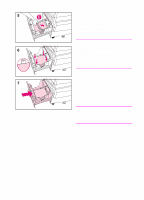
Note Note 32 Configuring Media Type and Size Configuring the media type is beneficial for several reasons: z Configuring the media type prevents printing on the wrong (and possibly more expensive) media. z If a user changes the type of media in an input tray, other users can still print on the correct media. z The printer will automatically adjust its print speed to accommodate special media (such as card stock, labels, and transparencies). These adjustments will give the highest quality output, saving time and resources. If the media type is not set correctly, then the printer might not print on the correct media or at the correct speed for the media type, which can result in poor print quality. To configure media type and size Follow the steps below to configure the media type. 1 Press MENU until PAPER HANDLING MENU appears on the printer control panel display. 2 Press ITEM until TRAY [Number] TYPE = appears on the display. 3 Press -VALUE+ until the correct media type appears on the display. 4 Press SELECT to save the selection. An asterisk (*) appears to the right of the selection. To configure the media size in tray 1, repeat steps 1-4 ("size" will replace references to "type"). Tray 2, tray 3, and the optional tray 4 automatically sense the media size. 5 Repeat steps 2 through 4 to configure media type in another tray. - Or Press GO to bring the printer online. EN
-
 1
1 -
2
-
3
-
4
-
5
-
6
-
7
-
8
-
9
-
10
-
11
-
12
-
13
-
14
-
15
-
16
-
17
-
18
-
19
-
20
-
21
-
22
-
23
-
24
-
25
-
26
-
27
-
28
-
29
-
30
-
 31
31 -
 32
32 -
 33
33 -
 34
34 -
 35
35 -
 36
36 -
 37
37 -
 38
38 -
 39
39 -
 40
40 -
 41
41 -
42
-
43
-
44
-
45
-
46
-
47
-
48
-
49
-
50
-
51
-
52
-
53
-
54
-
55
-
56
-
57
-
58
-
59
-
60
-
61
-
62
-
63
-
64
 |
 |