HP DL580 ProLiant DL580 Generation 4 Maintenance and Service Guide - Page 32
Removing a diskette, DVD, CD-RW drive or blank
 |
UPC - 882780616011
View all HP DL580 manuals
Add to My Manuals
Save this manual to your list of manuals |
Page 32 highlights
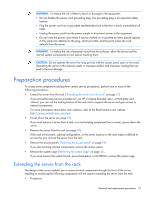
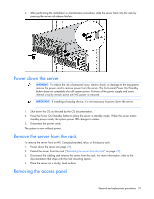
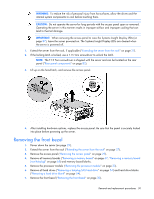
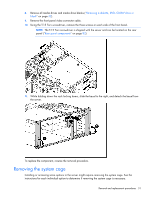
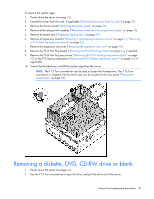
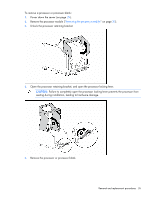
To remove the system cage: 1. Power down the server (on page 29). 2. Extend the server from the rack, if applicable ("Extending the server from the rack" on page 27). 3. Remove the access panel ("Removing the access panel" on page 29). 4. Remove all hot-plug power supplies ("Removing a redundant hot-plug power supply" on page 56). 5. Remove all system fans ("Replacing hot-plug fans" on page 57). 6. Remove all expansion boards ("Removing a non-hot-plug expansion board" on page 41, "Removing a PCI-X Hot Plug expansion board" on page 42). 7. Remove the expansion slot cover ("Removing the expansion slot cover" on page 40). 8. Remove the PCI-X Hot Plug basket ("Removing the PCI-X Hot Plug basket" on page 41), if installed. 9. Remove the PCI-X Hot Plug mezzanine ("Removing the PCI-X Hot Plug mezzanine option" on page 43) or the PCI Express mezzanine ("Removing the PCI Express mezzanine option" on page 43), if applicable. 10. Loosen the thumbscrews, and lift the system cage from the server. NOTE: The T-15 Torx screwdriver can be used to loosen the thumbscrews. The T-15 Torx screwdriver is shipped with the server and can be located on the rear panel ("Rear panel components" on page 82). Removing a diskette, DVD, CD-RW drive or blank 1. Power down the server (on page 29). 2. Use the T-15 Torx screwdriver to eject the drive, and pull the drive out of the server. Removal and replacement procedures 32
-
 1
1 -
2
-
3
-
4
-
5
-
6
-
7
-
8
-
9
-
10
-
11
-
12
-
13
-
14
-
15
-
16
-
17
-
18
-
19
-
20
-
21
-
22
-
23
-
24
-
25
-
26
-
 27
27 -
 28
28 -
 29
29 -
 30
30 -
 31
31 -
 32
32 -
 33
33 -
 34
34 -
 35
35 -
 36
36 -
 37
37 -
38
-
39
-
40
-
41
-
42
-
43
-
44
-
45
-
46
-
47
-
48
-
49
-
50
-
51
-
52
-
53
-
54
-
55
-
56
-
57
-
58
-
59
-
60
-
61
-
62
-
63
-
64
-
65
-
66
-
67
-
68
-
69
-
70
-
71
-
72
-
73
-
74
-
75
-
76
-
77
-
78
-
79
-
80
-
81
-
82
-
83
-
84
-
85
-
86
-
87
-
88
-
89
-
90
-
91
-
92
-
93
-
94
-
95
-
96
-
97
-
98
-
99
-
100
-
101
-
102
-
103
-
104
-
105
-
106
-
107
-
108
-
109
 |
 |
