HP DL580 ProLiant DL580 Generation 4 Maintenance and Service Guide - Page 33
Removing the processor module
 |
UPC - 882780616011
View all HP DL580 manuals
Add to My Manuals
Save this manual to your list of manuals |
Page 33 highlights
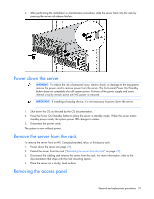
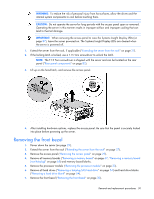
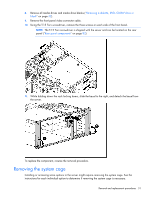
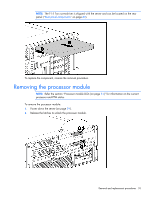
NOTE: The T-15 Torx screwdriver is shipped with the server and can be located on the rear panel ("Rear panel components" on page 82). To replace the component, reverse the removal procedure. Removing the processor module NOTE: Refer the section "Processor module LEDs (on page 81)" for information on the current processor and PPM status. To remove the processor module: 1. Power down the server (on page 29). 2. Release the latches to unlock the processor module. Removal and replacement procedures 33
-
 1
1 -
2
-
3
-
4
-
5
-
6
-
7
-
8
-
9
-
10
-
11
-
12
-
13
-
14
-
15
-
16
-
17
-
18
-
19
-
20
-
21
-
22
-
23
-
24
-
25
-
26
-
27
-
 28
28 -
 29
29 -
 30
30 -
 31
31 -
 32
32 -
 33
33 -
 34
34 -
 35
35 -
 36
36 -
 37
37 -
 38
38 -
39
-
40
-
41
-
42
-
43
-
44
-
45
-
46
-
47
-
48
-
49
-
50
-
51
-
52
-
53
-
54
-
55
-
56
-
57
-
58
-
59
-
60
-
61
-
62
-
63
-
64
-
65
-
66
-
67
-
68
-
69
-
70
-
71
-
72
-
73
-
74
-
75
-
76
-
77
-
78
-
79
-
80
-
81
-
82
-
83
-
84
-
85
-
86
-
87
-
88
-
89
-
90
-
91
-
92
-
93
-
94
-
95
-
96
-
97
-
98
-
99
-
100
-
101
-
102
-
103
-
104
-
105
-
106
-
107
-
108
-
109
 |
 |

Removal and replacement procedures
33
NOTE:
The T-15 Torx screwdriver is shipped with the server and can be located on the rear
panel ("
Rear panel components
" on page
82
).
To replace the component, reverse the removal procedure.
Removing the processor module
NOTE:
Refer the section "Processor module LEDs (on page
81
)" for information on the current
processor and PPM status.
To remove the processor module:
1.
Power down the server (on page
29
).
2.
Release the latches to unlock the processor module.