HP Dragonfly Folio 13.5 Maintenance and Service Guide - Page 41
Solid-state drive, edge of the cover and lift the tool to release the cover
 |
View all HP Dragonfly Folio 13.5 manuals
Add to My Manuals
Save this manual to your list of manuals |
Page 41 highlights
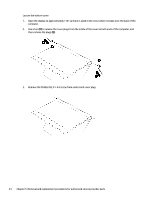
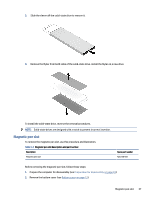
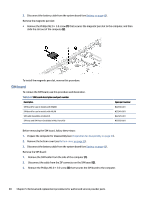
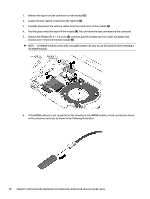
4. The leather cover extends around the back of the computer and onto the bottom cover. Push the outside edges of the leather cover at an angle from the outside toward the inside to release the sides of the cover, and then push the middle of the cover off the computer. 5. Loosen the five captive Torx T5 screws (1), and then insert a tool into one of the slots on the bottom edge of the cover and lift the tool to release the cover (2). To replace the bottom cover, reverse the removal procedures. NOTE: When replacing the bottom cover, be sure to toe the cover in at the bottom and clip it in place up the sides. Be sure all clips are reinserted before installing the screws in the sides. Solid-state drive To remove the M.2 solid-state drive, use this procedure and illustration. Table 5-2 Solid-state drive descriptions and part numbers Description 2 TB, PCIe-4 × 4, TLC 1 TB, PCIe-4 × 4, TLC Spare part number M52027-005 M16560-005 Solid-state drive 35
-
 1
1 -
2
-
3
-
4
-
5
-
6
-
7
-
8
-
9
-
10
-
11
-
12
-
13
-
14
-
15
-
16
-
17
-
18
-
19
-
20
-
21
-
22
-
23
-
24
-
25
-
26
-
27
-
28
-
29
-
30
-
31
-
32
-
33
-
34
-
35
-
 36
36 -
 37
37 -
 38
38 -
 39
39 -
 40
40 -
 41
41 -
 42
42 -
 43
43 -
 44
44 -
 45
45 -
 46
46 -
47
-
48
-
49
-
50
-
51
-
52
-
53
-
54
-
55
-
56
-
57
-
58
-
59
-
60
-
61
-
62
-
63
-
64
-
65
-
66
-
67
-
68
-
69
-
70
-
71
-
72
-
73
-
74
-
75
-
76
-
77
-
78
-
79
-
80
-
81
-
82
-
83
-
84
-
85
-
86
-
87
-
88
-
89
-
90
-
91
-
92
-
93
-
94
-
95
-
96
-
97
-
98
-
99
-
100
-
101
-
102
-
103
-
104
-
105
-
106
-
107
-
108
-
109
 |
 |
