HP Dragonfly Folio 13.5 Maintenance and Service Guide - Page 54
If a thermal pad is not present in replacement heat sink kit, reuse the old thermal pad during
 |
View all HP Dragonfly Folio 13.5 manuals
Add to My Manuals
Save this manual to your list of manuals |
Page 54 highlights
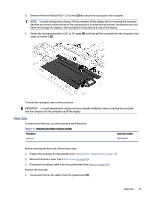
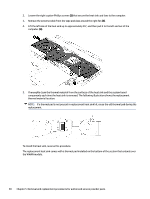
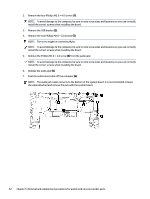
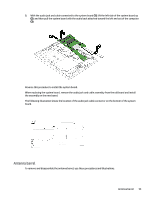
2. Loosen the eight captive Phillips screws (2) that secure the heat sink and fans to the computer. 3. Remove the antenna cable from the tape and clips around the right fan (3). 4. Lift the left side of the heat sink up to approximately 45°, and then pull it to the left and out of the computer. (4). 5. Thoroughly clean the thermal material from the surfaces of the heat sink and the system board components each time the heat sink is removed. The following illustration shows the replacement thermal material location. NOTE: If a thermal pad is not present in replacement heat sink kit, reuse the old thermal pad during the replacement. To install the heat sink, reverse this procedure. The replacement heat sink comes with a thermal pad installed on the bottom of the section that extends over the WWAN module. 48 Chapter 5 Removal and replacement procedures for authorized service provider parts
-
 1
1 -
2
-
3
-
4
-
5
-
6
-
7
-
8
-
9
-
10
-
11
-
12
-
13
-
14
-
15
-
16
-
17
-
18
-
19
-
20
-
21
-
22
-
23
-
24
-
25
-
26
-
27
-
28
-
29
-
30
-
31
-
32
-
33
-
34
-
35
-
36
-
37
-
38
-
39
-
40
-
41
-
42
-
43
-
44
-
45
-
46
-
47
-
48
-
 49
49 -
 50
50 -
 51
51 -
 52
52 -
 53
53 -
 54
54 -
 55
55 -
 56
56 -
 57
57 -
 58
58 -
 59
59 -
60
-
61
-
62
-
63
-
64
-
65
-
66
-
67
-
68
-
69
-
70
-
71
-
72
-
73
-
74
-
75
-
76
-
77
-
78
-
79
-
80
-
81
-
82
-
83
-
84
-
85
-
86
-
87
-
88
-
89
-
90
-
91
-
92
-
93
-
94
-
95
-
96
-
97
-
98
-
99
-
100
-
101
-
102
-
103
-
104
-
105
-
106
-
107
-
108
-
109
 |
 |
