HP Dragonfly Folio 13.5 Maintenance and Service Guide - Page 61
Wireless antennas and cables, Peel up the orange cable that the left antenna cable runs underneath
 |
View all HP Dragonfly Folio 13.5 manuals
Add to My Manuals
Save this manual to your list of manuals |
Page 61 highlights
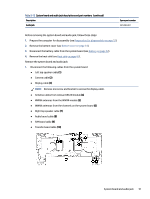
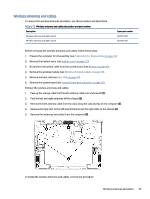
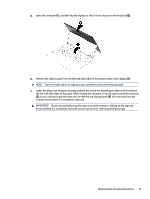
Wireless antennas and cables To remove the wireless antennas and cables, use this procedure and illustration. Table 5-15 Wireless antennas and cables description and part number Description Wireless antennas and cables (aux2) Wireless antennas and cables (aux3) Spare part number N22921-001 N22922-001 Before removing the wireless antennas and cables, follow these steps: 1. Prepare the computer for disassembly (see Preparation for disassembly on page 33). 2. Remove the bottom cover (see Bottom cover on page 33). 3. Disconnect the battery cable from the system board (see Battery on page 42). 4. Remove the wireless module (see Wireless charging module on page 41). 5. Remove the heat sink (see Heat sink on page 47). 6. Remove the system board (see System board and audio jack on page 50). Remove the wireless antennas and cables: 1. Peel up the orange cable that the left antenna cable runs underneath (1). 2. Peel the left and right antennas off the chassis (2). 3. Remove the left antenna cable from the clips along the side and top of the computer (3). 4. Remove the tape next to the SIM board that secures the right cable to the chassis (4). 5. Remove the antennas and cables from the computer (5). To install the wireless antennas and cables, reverse this procedure. Wireless antennas and cables 55
-
 1
1 -
2
-
3
-
4
-
5
-
6
-
7
-
8
-
9
-
10
-
11
-
12
-
13
-
14
-
15
-
16
-
17
-
18
-
19
-
20
-
21
-
22
-
23
-
24
-
25
-
26
-
27
-
28
-
29
-
30
-
31
-
32
-
33
-
34
-
35
-
36
-
37
-
38
-
39
-
40
-
41
-
42
-
43
-
44
-
45
-
46
-
47
-
48
-
49
-
50
-
51
-
52
-
53
-
54
-
55
-
 56
56 -
 57
57 -
 58
58 -
 59
59 -
 60
60 -
 61
61 -
 62
62 -
 63
63 -
 64
64 -
 65
65 -
 66
66 -
67
-
68
-
69
-
70
-
71
-
72
-
73
-
74
-
75
-
76
-
77
-
78
-
79
-
80
-
81
-
82
-
83
-
84
-
85
-
86
-
87
-
88
-
89
-
90
-
91
-
92
-
93
-
94
-
95
-
96
-
97
-
98
-
99
-
100
-
101
-
102
-
103
-
104
-
105
-
106
-
107
-
108
-
109
 |
 |
