HP LaserJet Pro 300 Service Manual - Page 90
CAUTION, Remove the ITB 5 of 6
 |
View all HP LaserJet Pro 300 manuals
Add to My Manuals
Save this manual to your list of manuals |
Page 90 highlights
6. To release the ITB, you might have to pen the rear door, and carefully lift up on the sheet-metal portion (callout 1). CAUTION: Avoid touching the black plastic transfer belt. Skin oils on the belt might cause printquality problems. NOTE: You might need to reach in through the front door and support the front portion of the ITB to keep it from falling back into place as you perform this step. Figure 1-96 Remove the ITB (5 of 6) 1 7. Carefully pull the ITB straight out of the product to remove it. CAUTION: Avoid touching the black plastic transfer belt. Skin oils on the belt might cause printquality problems. Handle the ITB as shown below. Figure 1-97 Remove the ITB (6 of 6) 66 Chapter 1 Removal and replacement ENWW
-
 1
1 -
2
-
3
-
4
-
5
-
6
-
7
-
8
-
9
-
10
-
11
-
12
-
13
-
14
-
15
-
16
-
17
-
18
-
19
-
20
-
21
-
22
-
23
-
24
-
25
-
26
-
27
-
28
-
29
-
30
-
31
-
32
-
33
-
34
-
35
-
36
-
37
-
38
-
39
-
40
-
41
-
42
-
43
-
44
-
45
-
46
-
47
-
48
-
49
-
50
-
51
-
52
-
53
-
54
-
55
-
56
-
57
-
58
-
59
-
60
-
61
-
62
-
63
-
64
-
65
-
66
-
67
-
68
-
69
-
70
-
71
-
72
-
73
-
74
-
75
-
76
-
77
-
78
-
79
-
80
-
81
-
82
-
83
-
84
-
 85
85 -
 86
86 -
 87
87 -
 88
88 -
 89
89 -
 90
90 -
 91
91 -
 92
92 -
 93
93 -
 94
94 -
 95
95 -
96
-
97
-
98
-
99
-
100
-
101
-
102
-
103
-
104
-
105
-
106
-
107
-
108
-
109
-
110
-
111
-
112
-
113
-
114
-
115
-
116
-
117
-
118
-
119
-
120
-
121
-
122
-
123
-
124
-
125
-
126
-
127
-
128
-
129
-
130
-
131
-
132
-
133
-
134
-
135
-
136
-
137
-
138
-
139
-
140
-
141
-
142
-
143
-
144
-
145
-
146
-
147
-
148
-
149
-
150
-
151
-
152
-
153
-
154
-
155
-
156
-
157
-
158
-
159
-
160
-
161
-
162
-
163
-
164
-
165
-
166
-
167
-
168
-
169
-
170
-
171
-
172
-
173
-
174
-
175
-
176
-
177
-
178
-
179
-
180
-
181
-
182
-
183
-
184
-
185
-
186
-
187
-
188
-
189
-
190
-
191
-
192
-
193
-
194
-
195
-
196
-
197
-
198
-
199
-
200
-
201
-
202
-
203
-
204
-
205
-
206
-
207
-
208
-
209
-
210
-
211
-
212
-
213
-
214
-
215
-
216
-
217
-
218
-
219
-
220
-
221
-
222
-
223
-
224
-
225
-
226
-
227
-
228
-
229
-
230
-
231
-
232
-
233
-
234
-
235
-
236
-
237
-
238
-
239
-
240
-
241
-
242
-
243
-
244
-
245
-
246
-
247
-
248
-
249
-
250
-
251
-
252
-
253
-
254
-
255
-
256
-
257
-
258
-
259
-
260
-
261
-
262
-
263
-
264
-
265
-
266
-
267
-
268
-
269
-
270
 |
 |

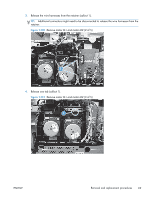
6.
To release the ITB, you might have to pen the rear door, and carefully lift up on the sheet-metal
portion (callout 1).
CAUTION:
Avoid touching the black plastic transfer belt. Skin oils on the belt might cause print-
quality problems.
NOTE:
You might need to reach in through the front door and support the front portion of the ITB
to keep it from falling back into place as you perform this step.
Figure 1-96
Remove the ITB (5 of 6)
1
7.
Carefully pull the ITB straight out of the product to remove it.
CAUTION:
Avoid touching the black plastic transfer belt. Skin oils on the belt might cause print-
quality problems. Handle the ITB as shown below.
Figure 1-97
Remove the ITB (6 of 6)
66
Chapter 1
Removal and replacement
ENWW