HP ProBook 4540s HP Notebook User Guide - Linux - Page 46
Adjusting the volume, Checking your audio functions, Computer, Control Center, Hardware, Sound
 |
View all HP ProBook 4540s manuals
Add to My Manuals
Save this manual to your list of manuals |
Page 46 highlights
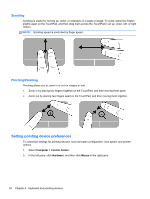
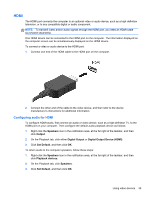
Adjusting the volume You can adjust the volume using the following: ● Volume hot keys ● Volume keys WARNING! To reduce the risk of personal injury, adjust the volume before putting on headphones, earbuds, or a headset. For additional safety information, refer to the Regulatory, Safety and Environmental Notices. NOTE: Volume can also be controlled through the operating system and some programs. NOTE: Refer to Getting to know your computer on page 4 and Keyboard and pointing devices on page 29 for information on what type of volume controls your computer has. Checking your audio functions To check the system sound on your computer, follow these steps: 1. Select Computer > Control Center. 2. In the left pane, click Hardware, and then click Sound in the right pane. 3. Click the Sound Effects tab, and then select one of the sound options under Choose an alert sound to test each sound. To check the recording functions of the computer, follow these steps: 1. Select Computer > Control Center. 2. In the left pane, click Hardware, and then click Sound in the right pane. 3. Click the Input tab, and then select Microphone or Line-in in the drop-down menu next to Connector. 4. Adjust the input volume by moving the Input volume slider to the desired setting. NOTE: For best results when recording, speak directly into the microphone and record sound in a setting free of background noise. To confirm or change the audio settings on your computer, right-click the Sound icon in the notification area, at the far right of the taskbar. 36 Chapter 5 Multimedia
-
 1
1 -
2
-
3
-
4
-
5
-
6
-
7
-
8
-
9
-
10
-
11
-
12
-
13
-
14
-
15
-
16
-
17
-
18
-
19
-
20
-
21
-
22
-
23
-
24
-
25
-
26
-
27
-
28
-
29
-
30
-
31
-
32
-
33
-
34
-
35
-
36
-
37
-
38
-
39
-
40
-
 41
41 -
 42
42 -
 43
43 -
 44
44 -
 45
45 -
 46
46 -
 47
47 -
 48
48 -
 49
49 -
 50
50 -
 51
51 -
52
-
53
-
54
-
55
-
56
-
57
-
58
-
59
-
60
-
61
-
62
-
63
-
64
-
65
-
66
-
67
-
68
-
69
-
70
-
71
-
72
-
73
-
74
-
75
-
76
-
77
-
78
-
79
-
80
-
81
-
82
-
83
-
84
-
85
-
86
-
87
-
88
-
89
-
90
-
91
-
92
-
93
-
94
-
95
-
96
-
97
-
98
-
99
-
100
-
101
-
102
-
103
-
104
-
105
-
106
-
107
-
108
-
109
-
110
 |
 |
