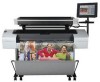
HP T1200 HP Designjet T1200 Printer - External Hard Disk Users Guide: English - Page 4
No Secure Disk Erase - designjet
 |
UPC - 884962303375
View all HP T1200 manuals
Add to My Manuals
Save this manual to your list of manuals |
Page 4 highlights
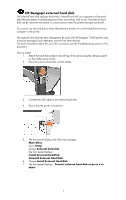
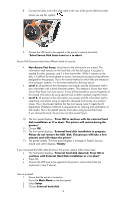
4. The front panel displays: Install External Hard Disk Uninstall External Hard Disk 5. Choose Uninstall External Hard Disk. 6. Choose the Secure Disk Erase (SDE) level for the external hard disk: O No Secure Disk Erase O Level 1 O Level 5 7. The front panel displays, "External hard disk: Press OK to continue with External Hard Disk uninstallation or x to abort. The printer will restart". 8. Press OK. 9. The front panel asks you to remove the USB: "External hard disk: Remove External Hard Disk" 10. The printer finishes the start-up process. TROUBLESHOOTING The use of the external hard disk in any device other than the HP Designjet T1200 is not supported and may cause severe damage to the hard disk, which is not covered by the warranty. • The external hard disk cannot be removed while the printer is on. If you try to remove it, the front panel displays the following error message (64:1:01): "USB HDD accessory disconnected. Please reconnect it and restart the printer". If you turn on the printer while the external hard disk is not connected, the same message is displayed. • If the external hard disk has been previously inserted into a different T1200 printer, the front panel displays, "External hard disk not valid for this machine. Power off, plug in the correct hard disk and power on again". If you use an external hard disk with one printer and then want to connect it to another: o If the printer has already had an external hard disk installed, you must first uninstall it from the first printer used and then install it on the printer you want to use. o If the printer has no external hard disk installed, the installation process starts and the contents of the external hard disk are deleted. • If the external hard disk is lost or broken, you must press "X", "OK" and "menu key" on the front panel during the printer's startup procedure, until you see the progress bar on the front panel. The front panel then displays, "Machine configured to use external hard disk. Do you want to revert the configuration to internal hard disk? Press OK to continue". Press OK. The front panel displays, "Machine reconfigured to use internal hard disk. Press OK to reboot the machine". Press OK. The printer restarts, and you can then use the printer and its internal hard drive. 3
-
 1
1 -
 2
2 -
 3
3 -
 4
4 -
 5
5 -
 6
6 -
 7
7 -
 8
8 -
 9
9 -
 10
10 -
11
-
12
-
13
-
14
-
15
-
16
-
17
-
18
-
19
-
20
-
21
-
22
-
23
-
24
-
25
-
26
-
27
-
28
-
29
-
30
-
31
-
32
-
33
-
34
-
35
-
36
-
37
-
38
-
39
-
40
-
41
-
42
-
43
-
44
-
45
-
46
-
47
-
48
-
49
-
50
-
51
-
52
-
53
-
54
-
55
-
56
-
57
-
58
-
59
-
60
-
61
-
62
-
63
-
64
-
65
-
66
-
67
-
68
-
69
-
70
-
71
-
72
-
73
-
74
-
75
-
76
-
77
-
78
-
79
-
80
-
81
-
82
-
83
-
84
-
85
-
86
-
87
-
88
-
89
-
90
-
91
-
92
-
93
-
94
-
95
-
96
-
97
-
98
-
99
-
100
-
101
-
102
-
103
-
104
-
105
-
106
-
107
-
108
-
109
-
110
-
111
-
112
-
113
-
114
-
115
-
116
-
117
-
118
-
119
-
120
-
121
-
122
-
123
-
124
-
125
-
126
-
127
-
128
 |
 |
