HP t505 Troubleshooting Guide t505 Flexible Thin Client - Page 15
Replacing the Side Access Panel
 |
View all HP t505 manuals
Add to My Manuals
Save this manual to your list of manuals |
Page 15 highlights
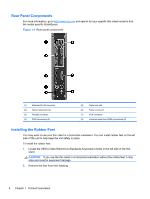
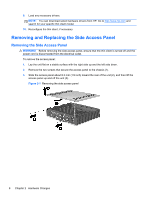
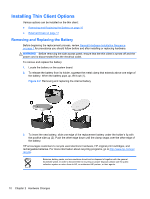
Replacing the Side Access Panel To replace the access panel: 1. Align the tabs on the access panel with the slots in the both sides of the chassis and place the access panel on the side of the unit, offset about 8.3 mm (1/3 inch) toward the top of the unit (1). 2. Slide the panel toward the front of the unit until the panel is flush with the bottom panel of the chassis (2). 3. Insert and fasten the two screws to secure the side access panel to the chassis. Removing and Replacing the Side Access Panel 9
-
 1
1 -
2
-
3
-
4
-
5
-
6
-
7
-
8
-
9
-
 10
10 -
 11
11 -
 12
12 -
 13
13 -
 14
14 -
 15
15 -
 16
16 -
 17
17 -
 18
18 -
 19
19 -
 20
20 -
21
-
22
-
23
-
24
-
25
-
26
-
27
-
28
-
29
-
30
-
31
-
32
-
33
-
34
-
35
-
36
-
37
-
38
-
39
-
40
-
41
-
42
-
43
-
44
-
45
-
46
-
47
-
48
-
49
-
50
-
51
-
52
-
53
-
54
-
55
-
56
-
57
-
58
-
59
-
60
-
61
-
62
-
63
-
64
-
65
-
66
-
67
-
68
-
69
-
70
-
71
 |
 |

Replacing the Side Access Panel
To replace the access panel:
1.
Align the tabs on the access panel with the slots in the both sides of the chassis and place the
access panel on the side of the unit, offset about 8.3 mm (1/3 inch) toward the top of the unit (1).
2.
Slide the panel toward the front of the unit until the panel is flush with the bottom panel of the
chassis (2).
3.
Insert and fasten the two screws to secure the side access panel to the chassis.
Removing and Replacing the Side Access Panel
9