HP t505 Troubleshooting Guide t505 Flexible Thin Client - Page 16
Installing Thin Client Options, Removing and Replacing the Battery
 |
View all HP t505 manuals
Add to My Manuals
Save this manual to your list of manuals |
Page 16 highlights
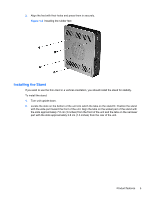
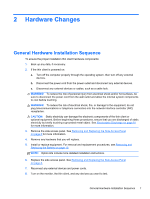
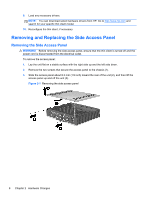
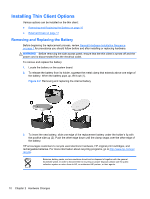
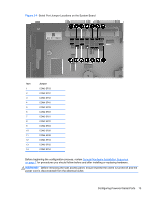
Installing Thin Client Options Various options can be installed on the thin client: ● Removing and Replacing the Battery on page 10 ● External Drives on page 11 Removing and Replacing the Battery Before beginning the replacement process, review General Hardware Installation Sequence on page 7 for procedures you should follow before and after installing or replacing hardware. WARNING! Before removing the side access panel, ensure that the thin client is turned off and the power cord is disconnected from the electrical outlet. To remove and replace the battery: 1. Locate the battery on the system board. 2. To release the battery from its holder, squeeze the metal clamp that extends above one edge of the battery. When the battery pops up, lift it out (1). Figure 2-2 Removing and replacing the internal battery 3. To insert the new battery, slide one edge of the replacement battery under the holder's lip with the positive side up (2). Push the other edge down until the clamp snaps over the other edge of the battery. HP encourages customers to recycle used electronic hardware, HP original print cartridges, and rechargeable batteries. For more information about recycling programs, go to http://www.hp.com/go/ recycle. Batteries, battery packs, and accumulators should not be disposed of together with the general household waste. In order to forward them to recycling or proper disposal, please use the public collection system or return them to HP, an authorized HP partner, or their agents. 10 Chapter 2 Hardware Changes
-
 1
1 -
2
-
3
-
4
-
5
-
6
-
7
-
8
-
9
-
10
-
 11
11 -
 12
12 -
 13
13 -
 14
14 -
 15
15 -
 16
16 -
 17
17 -
 18
18 -
 19
19 -
 20
20 -
 21
21 -
22
-
23
-
24
-
25
-
26
-
27
-
28
-
29
-
30
-
31
-
32
-
33
-
34
-
35
-
36
-
37
-
38
-
39
-
40
-
41
-
42
-
43
-
44
-
45
-
46
-
47
-
48
-
49
-
50
-
51
-
52
-
53
-
54
-
55
-
56
-
57
-
58
-
59
-
60
-
61
-
62
-
63
-
64
-
65
-
66
-
67
-
68
-
69
-
70
-
71
 |
 |
