Hitachi 42HDS69 Owners Guide
Hitachi 42HDS69 - 42" Plasma TV Manual
 |
View all Hitachi 42HDS69 manuals
Add to My Manuals
Save this manual to your list of manuals |
Hitachi 42HDS69 manual content summary:
- Hitachi 42HDS69 | Owners Guide - Page 1
PLASMA TELEVISION Operating Guide for 42HDS52, 42HDS52A and 55HDS52 IMPORTANT SAFETY INSTRUCTIONS 2-3 FIRST TIME USE ...4-20 THE REMOTE CONTROL ...21-38 ON-SCREEN DISPLAY ...39-71 USEFUL INFORMATION...72-78 END USER LICENSE AGREEMENT FOR HITACHI DTV SOFTWARE 79 APPENDIXES ...80-81 INDEX ...82 As - Hitachi 42HDS69 | Owners Guide - Page 2
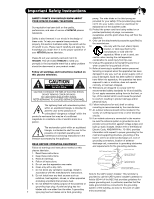
servicing to qualified service personnel. Follow all warnings and instructions marked on this plasma television. Servicing is required when the apparatus has been damaged in any way, such as power-supply (OR BACK). NO USER SERVICEABLE PARTS INSIDE. REFER SERVICING TO QUALIFIED SERVICE PERSONNEL. - Hitachi 42HDS69 | Owners Guide - Page 3
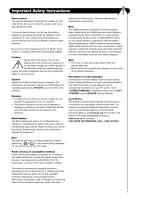
not operate properly, unplug the plasma television and call your authorized dealer or service center. Caution Adjust only those controls that are covered in the instructions, as improper changes or modifications not expressly approved by HITACHI could void the user's warranty. Warning • To reduce - Hitachi 42HDS69 | Owners Guide - Page 4
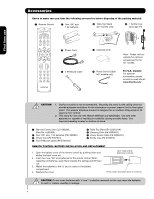
stand for use only with Hitachi 42HDS52 and 42HDS52A. Use with other apparatus is capable of resulting in instability causing possible injury. See important marking located on bottom of stand. ³ Remote Control Unit CLU-3852WL (Part No. HL02066). · Two "AA" size, 1.5V batteries (P# FQ00021). » Power - Hitachi 42HDS69 | Owners Guide - Page 5
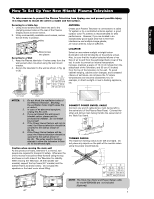
. Do not grab the speakers or the back cover when lifting. CONNECT POWER SWIVEL CABLE Connect one end of cable (Arrow mark facing left) to the swivel slot of the Plasma Rear Panel. Connect the other end (Arrow mark facing front)to the swivel slot of the Table Top Stand. TURNING RADIUS The maximum - Hitachi 42HDS69 | Owners Guide - Page 6
the receiver cabinet and as close as possible to the height of the picture screen center. For best stereo separation, place the external speakers at least four feet from the side of the TV, place the surround speakers to the side or behind the viewing area. Differences in room sizes and acoustical - Hitachi 42HDS69 | Owners Guide - Page 7
's rear jack panel and front control panel. "F" Type 75-Ohm Coaxial Antenna Connector For connecting RF signals (antenna or cable TV) to the TV to control your cable box and VCR. Power Swivel Cable (Provided in 42" models) This cable is used to connect the swivel stand to the rear panel of the Plasma - Hitachi 42HDS69 | Owners Guide - Page 8
, DVD, CBL, STB, PVR/VCR, AMP/CD) Changes the mode of the Universal Remote Control to control the device selected. ASPECT BUTTON (TV) Changes the aspect ratio of the TV. DAY/NIGHT (TV) Toggles picture mode settings between DAY and NIGHT mode. MENU BUTTON (TV, DVD, CBL, STB, PVR/VCR) Accesses the OSD - Hitachi 42HDS69 | Owners Guide - Page 9
button Press this button to turn the Plasma Television ON/OFF. It can also be turned ON/OFF by remote control. The "MAIN POWER" button must be at stand-by mode. ባ MENU/SELECT button This button allows you to enter the MENU, making it possible to set TV features to your preference without using the - Hitachi 42HDS69 | Owners Guide - Page 10
audio jack. NOTES: 1. Your HITACHI Plasma TV will appear to be turned OFF (lights orange) if there is no video input when VIDEO: 1, 2, 3, 4 and 5. Check the Power Light to make sure the Display Monitor is turned off or in Stand-by mode (lights red) when not in use. 2. Remote Control can not turn ON - Hitachi 42HDS69 | Owners Guide - Page 11
. of high-definition video and multi-channel audio in a single cable. Because digital television (DTV) signals remain in digital format, HDMI assures an the external components with your Plasma Television's remote control in TV mode. HDMI output connection. ቪ For Service Use Only HDMI, the HDMI - Hitachi 42HDS69 | Owners Guide - Page 12
is for future software upgrades. HITACHI will notify you if a software upgrade is required for your TV. In order to receive written notification, please complete and return your warranty card. CableCARD is installed ቮ To Power Swivel Connector Connects to the Power Swivel Table Top Stand. OR - Hitachi 42HDS69 | Owners Guide - Page 13
Ferrite Core (Supplied) NOTE: 1. Completely insert connection cord plugs when connecting to left side panel jacks. If you do not, the played back picture may be player, or HDTV Set Top Box to your Plasma TV is dependent on the model and features of each component. Check the owner's manual of each - Hitachi 42HDS69 | Owners Guide - Page 14
On-Screen Display The Remote Control First time use Rear Panel Connections Outside Antenna Cable TV coaxial cable 2-Way signal splitter VCR #1 ANT OUTPUT IN S-VIDEO V L R TO IR BLASTER (PROVIDED) NOTE: Cables are optional, except when specified. HDTV Set-Top Box CONNECT TO IR BLASTER 14 - Hitachi 42HDS69 | Owners Guide - Page 15
feature. • If your device has only one audio output (mono sound), connect it to the left audio jack on (L/(MONO)) the Rear Panel. • Refer to the operating guide of your other electronic equipment for additional information on connecting your hook-up cables. • A single VCR can be used for VCR #1 and - Hitachi 42HDS69 | Owners Guide - Page 16
player. 5. Select CABLE or AIR from the INPUTS menu to return to the last channel tuned. OUTPUT Back of VCR VCR NOTE: 1. Completely insert the connection cord plugs when connecting to rear panel jacks. The picture and sound that is played back will be abnormal if the connection is loose - Hitachi 42HDS69 | Owners Guide - Page 17
to view the program from the HDTV set top box or DVD player. 5. Select CABLE or AIR from the INPUTS menu to return to the last channel viewed. NOTE: 1. Completely insert the connection cord plugs when connecting to rear panel jacks. The picture and sound that is played back will be abnormal if the - Hitachi 42HDS69 | Owners Guide - Page 18
the INPUTS button, then select INPUT 4 from the INPUTS menu to view the program from the Laserdisc/DVD player or HDTV set top box. 7. Select CABLE or AIR to return to the last channel tuned. OUTPUT L R Y PB PR OR HDTV Set-Top Box OUTPUT Back of VIDEO AUDIO DVD Player PR/CR PB/CB Y L R DVD - Hitachi 42HDS69 | Owners Guide - Page 19
menu to return to the previous channel. CONNECTING AN EXTERNAL AUDIO AMPLIFIER To monitor the audio level of the Plasma TV to an external audio amplifier, connect the system as shown on the right. The "OPTICAL OUT" from the Rear Panel is a fixed output. The Volume of the amplifier is controlled - Hitachi 42HDS69 | Owners Guide - Page 20
. Video Audio Channel Manager Locks Timers Setup Power Swivel Move SEL Select Setup Menu Preference Screen Saver Set The Inputs Set AV NET Set Closed Captions Set Monitor Out Upgrades Quick Start Up Move SEL Return NOTE: 1. The Rear Panel has two IR BLASTER outputs which can control up to a total - Hitachi 42HDS69 | Owners Guide - Page 21
The Remote Control The Remote Control In addition to controlling all the functions on your HITACHI Plasma TV, the new remote control is designed to operate different types of VCRs, CATV (Cable TV) converters, set-top-box, satellite receiver, DVD players, and other audio/video equipment with one - Hitachi 42HDS69 | Owners Guide - Page 22
The Remote Control How to Use the Remote to Control Your TV ቢ POWER button ቢ Press this button to turn the TV set on or off when the remote is in TV mode. (See page 21 for ባ instructions on how to set the remote control to TV ቤ ብ mode.) ባ MODE Indicator Turns on or blinks to show remote - Hitachi 42HDS69 | Owners Guide - Page 23
Remote to Control Your TV ቧ ASPECT button Press this button to quickly change the picture format ASPECT ratio. Depending on the input signal format received, the picture format ratio (4:3) sources by linearly increasing image expansion from the center towards the edges of the display area in order - Hitachi 42HDS69 | Owners Guide - Page 24
to the Photo Input in the side panel of the Plasma TV. Day CC Off 4:3 Expanded NOTE: 1. 2. The Sleep Timer info will show momentarily after releasing INFO button. The Aspect setting will not be shown if the channel is locked. ቭ EXIT button This button will exit all On-Screen Displays. 24 - Hitachi 42HDS69 | Owners Guide - Page 25
First time use The Remote Control How to Use the Remote to Control Your TV PHOTO INPUT This feature is useful for viewing digital still pictures from your digital camera, USB Drive or memory cards USB drive using the Photo Input in the left side panel of the TV. 1. Press the INPUTS button to cycle - Hitachi 42HDS69 | Owners Guide - Page 26
The Remote Control How to Use the Remote to Control Your TV ROTATE Select this menu item to rotate selected photos either clockwise (CURSOR PAD ̈) and counterclockwise (CURSOR PAD ̇). ̇ ̈ SLIDESHOW Select this menu item to start a slideshow of the digital photos. While the Interval sub menu is - Hitachi 42HDS69 | Owners Guide - Page 27
The Remote Control How to Use the Remote to Control Your TV ቱ LAST CHANNEL (LAST CH) button Press this button to toggle between the current and last channel viewed. 68). When the TV power is turned off at a volume level 31 or greater, the volume level will default to 30 when the TV is turned on. - Hitachi 42HDS69 | Owners Guide - Page 28
The Remote Control Picture-in-Picture (PIP) Your HITACHI Plasma TV incorporates Two Tuner technology designed for improved viewing enjoyment. This Two Tuner feature allows you to view antenna inputs on both the main picture and sub picture simultaneously, with separate tuning control for each. When - Hitachi 42HDS69 | Owners Guide - Page 29
The Remote Control Picture-In-Picture (PIP) PIP MODE PICTURE-IN-PICTURE Select AIR from the INPUTS menu. Select a channel that has a 1080i signal. To prevent a pattern burn, occasionally move the sub-picture using the CURSOR PAD. SURF MODE PICTURE-IN-PICTURE Surf Mode PIP automatically scans all - Hitachi 42HDS69 | Owners Guide - Page 30
The Remote Control Picture-In-Picture (PIP) ባ PAUSE button If you wish to freeze the sub-picture, press the PAUSE button. This is convenient when trying to write - Hitachi 42HDS69 | Owners Guide - Page 31
are removed from the from the remote control. After replacing the batteries repeat the entire programming procedure as stated above. ቢ PRECODED CABLE BOX buttons These buttons transmit the chosen precoded cable codes. MY CABLE BOX CODE IS: NOTE: Refer to instruction manual of the Cable Box for - Hitachi 42HDS69 | Owners Guide - Page 32
. 5. Aim the remote at the set-top-box/satellite receiver and press the POWER button. The remote will turn off your remote control. After replacing the batteries repeat the entire programming procedure as stated above. MY Satellite RECEIVER/ SET-TOP-BOX CODE IS: NOTE: Refer to instruction manual - Hitachi 42HDS69 | Owners Guide - Page 33
operating guide. 3. The remote control will remember the codes you have programmed until the batteries are removed from the from the remote control. After replacing the batteries repeat the entire programming procedure as stated above. MY DVD PLAYER CODE IS: NOTE: Refer to instruction manual of - Hitachi 42HDS69 | Owners Guide - Page 34
are removed from the from the remote control. After replacing the batteries repeat the entire programming procedure as stated above. ቢ PRECODED VCR/PVR Buttons These buttons transmit the chosen precoded VCR/PVR codes. MY VCR/PVR CODE IS: NOTE: Refer to instruction manual of the VCR/PVR for - Hitachi 42HDS69 | Owners Guide - Page 35
operating guide. 3. The remote control will remember the codes you have programmed until the batteries are removed from the from the remote control. After replacing the batteries repeat the entire programming procedure as stated above. MY AUDIO COMPONENT CODE IS: NOTE: Refer to instruction manual - Hitachi 42HDS69 | Owners Guide - Page 36
How to Use the ENT Button INPUT ACCESS This optional feature allows the user of the remote control to setup it's ENTER (ENT) button to access the specified input of the TV. Setup for this feature is applicable to the remote control's normal mode only and only applies to the DVD, CBL, STB, PVR and - Hitachi 42HDS69 | Owners Guide - Page 37
Remote Control Codes The Remote Control 1972 Hitachi 0000, 0041, 0042, 0105 Howard Computers............1972 Hughes Network Systems 0042 iBuy Power 1972 Marantz 0081, 0035 Marta 0037 Matsushita ....0035, 0162, 1162 Media Center PC 1972 Memorex ......0035, 0162, 0037, ..........0048, 0039, 0047 - Hitachi 42HDS69 | Owners Guide - Page 38
Remote Control Codes The Remote Control ....0877, 0008 0017, 0477, 1877 Signal 0015, 0040 Signature 0011 Sony 1006 Capetronic 0095 Century 0856 Channel Master ......0018, 0212 Chapparral Kardon ......0891, 0110, 0189 Hewlett Packard 1181 Hitachi 0228 Integra 0135 JBL 0110 JVC 0074, 1263 - Hitachi 42HDS69 | Owners Guide - Page 39
1. Press MENU on the remote control to display the different features on your HITACHI Plasma TV. 2. Use the CURSOR PAD (buttons ̆, ̄, ̇ and ̈) or CHANNEL WHEEL to navigate to a different menu item. 3. Press EXIT on the remote control to quickly exit from a menu. This part of the screen shows which - Hitachi 42HDS69 | Owners Guide - Page 40
Monitor Out source. Select to upgrade TV software. Select the TV Quick Start Up options. PoPwoewr eSrwSivweilvel Unlocked Power Swivel enabled. Control the motorized Table Top Stand Locked Power Swivel disabled. NOTE: 1. The Signal Meter feature of the Channel Manager OSD is only available - Hitachi 42HDS69 | Owners Guide - Page 41
to return to main menu. 5. Press EXIT to quit menu. Contrast Use this function to change the contrast between black and white levels in the picture. Brightness Use this function to adjust overall picture brightness. Video Audio Channel Manager Locks Timers Setup Power Swivel Move SEL Select Color - Hitachi 42HDS69 | Owners Guide - Page 42
AUTO MOVIE MODE is turned ON from the VIDEO menu, your Hitachi Plasma Television will activate the circuitry for this special 480p signal. Adjustable range is -10 (video center is toward bottom of screen) to +10 (video is toward top of screen). 1. Use the CURSOR PAD ̆ or ̄ to to select menu item - Hitachi 42HDS69 | Owners Guide - Page 43
Press EXIT to quit menu or select SET BLACK SIDE PANEL to return to the previous menu. Set Black Side Panel Next On/Off Off SEL Return Set Black Side Panel Next On/Off On SEL Return NOTE: To prevent screen damage when watching 4:3 signal, turn off the BLACK SIDE PANEL. It is recommended to - Hitachi 42HDS69 | Owners Guide - Page 44
will control the left to right balance of the Plasma TV internal speakers. SRS Based on the principles of the human hearing system, SRS technology delivers and exciting and realistic 3D Sound experience from just two external speakers (or) the two internal speakers of your HITACHI Television - Hitachi 42HDS69 | Owners Guide - Page 45
speakers from a separate stereo system. The TV's speakers will work as the center speaker. Select this feature if you prefer to use only speakers from a separate stereo system. Auto Noise Cancel This function eliminates the noise between stations. If a channel when the TV is connected Speakers TV - Hitachi 42HDS69 | Owners Guide - Page 46
button or CURSOR PAD ̈ to select. Video Audio Channel Manager Locks Timers Setup Power Swivel Move SEL Select Channel Manager Signal Meter or Auto Channel Scan Channel List Move SEL Select On-Screen Display Signal Meter Select SIGNAL METER when using an indoor or outdoor antenna. This - Hitachi 42HDS69 | Owners Guide - Page 47
NOTE: 1. 2. When a CableCARD is installed, the Channel List will be dependent on channels agreed upon by you and your cable operator. The Channel List cannot be u pdated by only changing the cable source. Auto Channel Scan must be performed for the Channel List to be updated. On-Screen Display 47 - Hitachi 42HDS69 | Owners Guide - Page 48
Engage Lock Movie Ratings TV Ratings Canadian Ratings(Eng) Canadian Ratings(Frn) factory preset (0000). Move SEL Select 2. Enter a new four digit number. 3. Press EXIT to quit the menu. Engage Lock When ENGAGE LOCK is selected, SET CHANNEL LOCK and SET FRONT PANEL LOCK can be set individually - Hitachi 42HDS69 | Owners Guide - Page 49
the CURSOR PAD ̆, ̄ or CHANNEL WHEEL to select the MOVIE RATING menu or select MOVIE RATING to return to the previous menu. Locks Change Access Code Engage Lock Movie Ratings TV TV will not block it. 2. Blocking NOT RATED programs may block emergency programming, sports, news, public service - Hitachi 42HDS69 | Owners Guide - Page 50
) Canadian Ratings(Frn) Move SEL Select Locks TV Ratings Status TV-Y TV-Y7 TV-G TV-PG TV-14 TV-MA Sub Rating D L S V FV Move SEL Return TV Parental Guide Ratings Table TV-Y All children. The themes and elements in this program are specifically designed for a very young audience, including - Hitachi 42HDS69 | Owners Guide - Page 51
the CURSOR PAD ̆, ̄ or CHANNEL WHEEL to select the CANADIAN RATINGS (ENG) Change Access Code Engage Lock Movie Ratings TV Ratings Canadian Ratings(Eng) Canadian Ratings( to quit the menu or select CANADIAN RATINGS (ENG) to return to the previous menu. Locks Canadian Ratings Screen Display 51 - Hitachi 42HDS69 | Owners Guide - Page 52
be inappropriate in its content. 1. Use the CURSOR PAD ̆, ̄ or CHANNEL WHEEL to select the CANADIAN RATINGS (FRN) category that you want to the menu or select CANADIAN RATINGS (FRN) to return to the previous menu. Locks Change Access Code Engage Lock Movie Ratings TV Ratings On-Screen Display 52 - Hitachi 42HDS69 | Owners Guide - Page 53
Video Audio Channel Manager Locks Timers Setup Power Swivel Move PAD or CHANNEL WHEEL to the CURSOR PAD or CHANNEL WHEEL to highlight the CURRENT menu or select SET THE CLOCK to return to the previous menu. NOTE: 1. When AUTOMATICALLY ADJUST CLOCK FOR DAYLIGHT SAVING CHANGES is checked ■✔, the TV - Hitachi 42HDS69 | Owners Guide - Page 54
to activate and set your TV's DAY/NIGHT PICTURE MODE menu. Timers Set The Clock Set Sleep Timer Set Day/Night Timer Set Event Timer Move SEL Select -- : -- PST 0:00 Not Set Not Set Timers Set Day/Night Timer ❑ Activate Day Mode On : Day Mode Off : 06:00 AM 06:00 PM Move SEL Return On-Screen - Hitachi 42HDS69 | Owners Guide - Page 55
The OFF TIMER will only activate if the TV was turned on by the ON TIMER and no channel selection was made after this time. If you change the channel after the ON TIMER has been activated, the OFF TIMER will deactivate. 3. If no remote control button is pressed after viewing reservation is activated - Hitachi 42HDS69 | Owners Guide - Page 56
2. Press EXIT to quit menu or select MENU PREFERENCE to return to previous menu. Video Audio Channel Manager Locks Timers Setup or Power Swivel Move SEL Select Setup Menu Preference Screen Saver Set The Inputs Set AV NET Set Closed Captions Set Monitor Out Upgrades Quick Start Up Move SEL - Hitachi 42HDS69 | Owners Guide - Page 57
, and other fixed (non-moving) patterns can cause permanent damage to the Plasma Television. Use the SCREEN SAVER feature to hide screen burn. 1. Use CURSOR PAD ̆ or ̄ to highlight Screen Saver's Main Picture Moving and Image Power options. 2. Use the CURSOR PAD ̇ or ̈ to select your choices. Option - Hitachi 42HDS69 | Owners Guide - Page 58
Use this feature to control your external Audio/Video equipment using your HITACHI Plasma TV Remote Control. The IR mouse cable must be properly connected for the AV NET feature to work. 1. Press the MENU button. Video Audio Channel Manager Locks Timers Setup Power Swivel Move SEL Select 2. Use - Hitachi 42HDS69 | Owners Guide - Page 59
NEXT, then press the SELECT button to move on to the next SETUP screen. AV Net Setup Wizard Welcome to the AV Net Setup Wizard. Before starting Hitachi (44/54) 1 (1/12) Learning Mode POWER SOURCE 1 VOL ̆ Move Change IR Code Back Next 11. Use the CURSOR PAD ̇ or ̈ to select the TV - Hitachi 42HDS69 | Owners Guide - Page 60
Code Set TV Input Hitachi (44/54) 3 (3/12) Hitachi Monitor Out Settings If you connect the Monitor out or Optical out to an A/V Receiver, please select an A/V Receiver Source. Monitor Out Optical Out Not Connected Not Connected Back Move Change Source SEL Select Next On-Screen Display - Hitachi 42HDS69 | Owners Guide - Page 61
, then press the SELECT button to move on to the next SETUP screen. AV Net Setup Wizard : Device Settings DVD Settings Brand Name Hitachi (31/77) IR Code Set 1 (1/5) Transmission Test Test Button POWER ̈ CH ̆ Move Back Change Brand Name Next 13. Use the CURSOR PAD ̇ or ̈ to select - Hitachi 42HDS69 | Owners Guide - Page 62
AV NET allows the user to use equipment that is not supported by the AV/NET codes. After programming your equipment to the AV NET and the Soft Keys do not work, you can manually "LEARN" each one by completing the Learning Mode. The Learning Mode will transfer any remote control button IR code of - Hitachi 42HDS69 | Owners Guide - Page 63
Back Done 8. Press and hold the VOL ̆ button of your A/V Receiver remote control while pointing directly at the learning AV NET sensor of the Plasma TV (located at the lower right corner of the screen Select the A/V Receiver softkey to learn? TV Softkeys POWER CH̆ VOL̆ MUTE CH̄ VOL̄ AUDIO - Hitachi 42HDS69 | Owners Guide - Page 64
highlight NEXT, then press the SELECT button to move on to the next SETUP screen. AV Net Setup Wizard : A/V Receiver Setup Select the Test button. If device POWER SOURCE 1 VOL ̆ Move SEL IR Out Back Next AV Net Setup Wizard : A/V Receiver Setup Brand Name IR Code Set Other Other TV Input - Hitachi 42HDS69 | Owners Guide - Page 65
TV Input Monitor Out Optical Out Other Other Not Connected Not Connected Not Connected All settings are complete! Move SEL Select Back on to the next SETUP screen. AV Net Setup Wizard : A/V Receiver Setup Do you want to use an A/V Receiver. Yes No Move SEL Select Back Next 5. CURSOR PAD - Hitachi 42HDS69 | Owners Guide - Page 66
to learn? TV Softkeys POWER ̇̇ ̈̈ MENU ̇̇ ̈ ̈̈ SELECT ̆ ̈ EXIT ̄ ̇ Move SEL Select Back Done 11. Press and hold the ̈ "Play button" of the DVD remote control while pointing directly at the learning AV NET sensor of the Plasma TV (located at the lower right corner of the screen) at - Hitachi 42HDS69 | Owners Guide - Page 67
device? Move No thanks, I'm done. SEL Select Yes NOTE: 1. After a successful A/V NET setup to a chosen TV Input, the user can access soft key controls by selecting the device in the inputs menu. 2. Each Device and Custom setting only accepts one device at a time. The second device/custom setup - Hitachi 42HDS69 | Owners Guide - Page 68
. Your local TV program guide denotes these programs as or . 1. Use the CURSOR PAD ̇, ̈, ̆ and ̄ to highlight and select the function to change. 2. Press EXIT to quit menu or select SET CLOSED CAPTION to return to the previous menu. Setup Menu Preference Screen Saver Set The Inputs Set AV NET Set - Hitachi 42HDS69 | Owners Guide - Page 69
to a VCR or other A/V device. Setup Menu Preference Screen Saver Set The Inputs Set AV NET Set Closed Captions Set Monitor Out Upgrades Set Stand-by Mode Move SEL Select TV Tuner Out: Select TV TUNER OUT to output the audio Setup Set Monitor Out and video signals of the last watched Antenna OR - Hitachi 42HDS69 | Owners Guide - Page 70
power interruption during the upgrade process will cancel the upgrade. When this happens, repeat the upgrade procedure. Setup Menu Preference Screen Saver Set The Inputs Set AV NET Set Closed Captions Set Monitor Out Upgrades Set Stand-by Mode Move SEL Select Setup Upgrades OR Software Version - Hitachi 42HDS69 | Owners Guide - Page 71
to have the TV tune channels quickly at 1st turn on. Select OFF to save electricity Off On Move SEL Select Power Swivel This feature controls the motorized stand. It allows the customer to turn the plasma display left or right Video Audio Channel Manager using the remote control. This feature - Hitachi 42HDS69 | Owners Guide - Page 72
again. 3. If there is still no power, unplug the power cord from the wall. Wait 30 seconds and plug the power cord back in. Press the POWER SWITCH again. This protective technology should provide for years of lasting entertainment from your HITACHI Plasma Television. SYMPTOMS No Picture, no sound - Hitachi 42HDS69 | Owners Guide - Page 73
, neon lamps, electrical drills, ghosting of the image and weak signals. BLACK SCREEN: When using an antenna, weak signals will display a black screen. It may be necessary to upgrade your antenna. Useful Information NOTE: The TV set can generate sound distortion in external devices such as a radio - Hitachi 42HDS69 | Owners Guide - Page 74
Troubleshooting No. Items Notes 1 Buzzing sound display panel. from Plasma A buzzing sound may be heard when the plasma television is turned on in a very quiet room. This is due to the plasma panel 5˚F to 140˚F 12 Power ON or OFF Repeatedly turning the plasma television Power ON and OFF at - Hitachi 42HDS69 | Owners Guide - Page 75
This Plasma Part instructions Hitachi Home Electronics (America), Inc. may void the user 's warranty. Cables Connections to this device must be made with shielded cables with metallic RFI/EMI connector hoods to maintain compliance with FCC Rules and Regulations. Any cables that are supplied - Hitachi 42HDS69 | Owners Guide - Page 76
Features and Specifications Features: • New Easy-to-Use On-Screen Menu Control (3 Language) • New AV Network System Control Control up to 4 components with one remote 2 IR Mouse cables included • Illuminated and Preprogrammed Remote Control • Power Management: ON/OFF via signal detection • - Hitachi 42HDS69 | Owners Guide - Page 77
Set Dimensions 42 Inch Models (Includes Table Top Stand) Weight (lbs./kg): 98/44.5 55 Inch Models (Plasma Television Only) Weight (lbs./kg): 135.6/61.5 77 Useful Information - Hitachi 42HDS69 | Owners Guide - Page 78
, 24 hours a day 1-800-HITACHI (1-800-448-2244) HITACHI AMERICA, LTD. HOME ELECTRONICS DIVISION HITACHI has made every effort to assure you hours of trouble free operation from your unit. However, should you require service, a network of HITACHI Authorized Service Facilities has been established in - Hitachi 42HDS69 | Owners Guide - Page 79
User License Agreement for HITACHI DTV Software END USER LICENSE AGREEMENT FOR HITACHI DTV SOFTWARE IMPORTANT - READ CAREFULLY: This End User License Agreement for HITACHI DTV Software (this "Agreement") is a legal agreement between you ("you" or "your"), in your capacity as the owner of a HITACHI - Hitachi 42HDS69 | Owners Guide - Page 80
16:9 3S-Video = Not available in INPUT 3 & 4 VIDEO ID 16:9 16:9 16:9 AUTO ASPECT On On On Appendix D: INPUT Air or Cable (Digital Channels) INPUT 1 & 2 INPUT 3 & 4 TYPE -- HDMI Y-PbPr IMAGE INPUT FORMAT ASPECT 1080i 16:9 1080i/720p 16:9 1080i/720p 16:9 VIDEO ID -- --- AUTO ASPECT On/Off - Hitachi 42HDS69 | Owners Guide - Page 81
the Remote Control to access the Main Menu screen. THINGS TO CHECK WHEN USING THE CableCARD / CableCARD Services 1. Check that the CableCARD is properly inserted in the CableCARD slot. 2. Remove the CableCARD by pressing the eject button and pull the CableCARD straight out. Video Audio TV Guide On - Hitachi 42HDS69 | Owners Guide - Page 82
41 Contrast 41 Contrast Mode 42 E Event Timer 55 External Video Source 13-19 Remote Control Functions 21-38 Programming Codes 37-38 Installing Batteries 4 S Screen Saver 57 Sharpness 41 Speakers 45 Connecting External Speakers 19 Internal 45 Split Mode 29 T F Favorite Channel 27 - Hitachi 42HDS69 | Owners Guide - Page 83
Notes 83 - Hitachi 42HDS69 | Owners Guide - Page 84
Notes 84 - Hitachi 42HDS69 | Owners Guide - Page 85
Notes 85 - Hitachi 42HDS69 | Owners Guide - Page 86
Notes 86 - Hitachi 42HDS69 | Owners Guide - Page 87
Notes 87 - Hitachi 42HDS69 | Owners Guide - Page 88
QR64864
-
 1
1 -
 2
2 -
 3
3 -
 4
4 -
 5
5 -
 6
6 -
 7
7 -
8
-
9
-
10
-
11
-
12
-
13
-
14
-
15
-
16
-
17
-
18
-
19
-
20
-
21
-
22
-
23
-
24
-
25
-
26
-
27
-
28
-
29
-
30
-
31
-
32
-
33
-
34
-
35
-
36
-
37
-
38
-
39
-
40
-
41
-
42
-
43
-
44
-
45
-
46
-
47
-
48
-
49
-
50
-
51
-
52
-
53
-
54
-
55
-
56
-
57
-
58
-
59
-
60
-
61
-
62
-
63
-
64
-
65
-
66
-
67
-
68
-
69
-
70
-
71
-
72
-
73
-
74
-
75
-
76
-
77
-
78
-
79
-
80
-
81
-
82
-
83
-
84
-
85
-
86
-
87
-
88
 |
 |

PLASMA TELEVISION
Operating Guide for
42HDS52, 42HDS52A and
55HDS52
IMPORTANT SAFETY INSTRUCTIONS
.......................................................................................
2-3
FIRST TIME USE
.......................................................................................................................
4-20
THE REMOTE CONTROL
........................................................................................................
21-38
ON-SCREEN DISPLAY
............................................................................................................
39-71
USEFUL INFORMATION
..........................................................................................................
72-78
END USER LICENSE AGREEMENT FOR HITACHI DTV SOFTWARE
...........................................
79
APPENDIXES
............................................................................................................................
80-81
INDEX
.............................................................................................................................................
82
As an Energy Star
®
Partner,
Hitachi, Ltd. has determined
that this product meets the
Energy Star
®
guidelines for
energy efficiency.