Hitachi 55HDS52 Owners Guide
Hitachi 55HDS52 - 55" Plasma TV Manual
 |
View all Hitachi 55HDS52 manuals
Add to My Manuals
Save this manual to your list of manuals |
Hitachi 55HDS52 manual content summary:
- Hitachi 55HDS52 | Owners Guide - Page 1
PLASMA TELEVISION Operating Guide for 42HDS52, 42HDS52A and 55HDS52 IMPORTANT SAFETY INSTRUCTIONS 2-3 FIRST TIME USE ...4-20 THE REMOTE CONTROL ...21-38 ON-SCREEN DISPLAY ...39-71 USEFUL INFORMATION...72-78 END USER LICENSE AGREEMENT FOR HITACHI DTV SOFTWARE 79 APPENDIXES ...80-81 INDEX ...82 As - Hitachi 55HDS52 | Owners Guide - Page 2
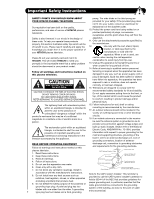
for long periods of time. 14. Refer all servicing to qualified service personnel. Follow all warnings and instructions marked on this plasma television. Servicing is required when the apparatus has been damaged in any way, such as power-supply cord or plug is damaged, liquid has been spilled - Hitachi 55HDS52 | Owners Guide - Page 3
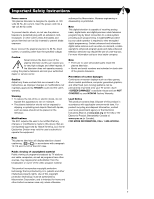
digital cable services such as video-on-demand, a cable operator's enhanced program guide and data-enhanced television services may require the use of a set-top box. For more information call your local cable company. Note • There are no user serviceable parts inside the plasma television - Hitachi 55HDS52 | Owners Guide - Page 4
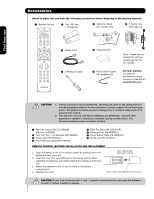
stand for use only with Hitachi 42HDS52 and 42HDS52A. Use with other apparatus is capable of resulting in instability causing possible injury. See important marking located on bottom of stand. ³ Remote Control Unit CLU-3852WL (Part No. HL02066). · Two "AA" size, 1.5V batteries (P# FQ00021). » Power - Hitachi 55HDS52 | Owners Guide - Page 5
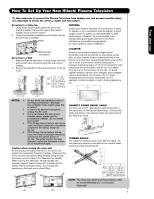
First time use How To Set Up Your New Hitachi Plasma Television To take measures to prevent the Plasma Television from tipping over and prevent possible injury it is important to mount the unit in a stable and flat surface. Securing to a table-top 1. Using wood screws (two) fasten the set to the - Hitachi 55HDS52 | Owners Guide - Page 6
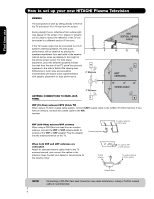
to set up your new HITACHI Plasma Television VIEWING The best picture is seen by sitting directly in front of the TV and about 10 to 18 optional antenna cable mixer to the TV antenna terminal, and connect the cables to the antenna mixer. Consult your dealer or service store for the antenna mixer. - Hitachi 55HDS52 | Owners Guide - Page 7
devices such as Set-Top-Boxes or DVD players equipped with an HDMI output connection to the TV's HDMI input. Stereo Cable (3.8mm plug to 3.5mm plug) Used on all standard video and audio cable which connect to inputs and outputs located on the rear jack panel and front control panel. USB Cable This - Hitachi 55HDS52 | Owners Guide - Page 8
AMP/CD) Used to manually enter the TV channel, and used for numeric entry when navigating through the OSD, INPUTS, and AV NET menu systems. (-) BUTTON (TV,STB) The (-) button is used when the remote is in Set-Top-Box (STB) mode or when the TV uses a digital input. DVD/VCR CONTROL BUTTONS (DVD, PVR - Hitachi 55HDS52 | Owners Guide - Page 9
button Press this button to turn the Plasma Television ON/OFF. It can also be turned ON/OFF by remote control. The "MAIN POWER" button must be at stand-by mode. ባ MENU/SELECT button This button allows you to enter the MENU, making it possible to set TV features to your preference without using the - Hitachi 55HDS52 | Owners Guide - Page 10
1. Your HITACHI Plasma TV will appear to be turned OFF (lights orange) if there is no video input when VIDEO: 1, 2, 3, 4 and 5. Check the Power Light to make sure the Display Monitor is turned off or in Stand-by mode (lights red) when not in use. 2. Remote Control can not turn ON/OFF the "MAIN POWER - Hitachi 55HDS52 | Owners Guide - Page 11
will allow you to control Use the HDMI input for your external devices such as Set-Top-Boxes or DVD players equipped with an the external components with your Plasma Television's remote control in TV mode. HDMI output connection. ቪ For Service Use Only HDMI, the HDMI logo and High-Definition - Hitachi 55HDS52 | Owners Guide - Page 12
software upgrades. HITACHI will notify you if a software upgrade is required for your TV. In order to receive written notification, please complete and return your warranty card. CableCARD is installed ቮ To Power Swivel Connector Connects to the Power Swivel Table Top Stand. OR ቯ CableCARD - Hitachi 55HDS52 | Owners Guide - Page 13
the VCR, camcorder, laserdisc player, DVD player, or HDTV Set Top Box to your Plasma TV is dependent on the model and features of each component. Check the owner's manual of each component for the location of video and audio inputs and outputs. The following connection diagrams are offered as - Hitachi 55HDS52 | Owners Guide - Page 14
The Remote Control First time use Rear Panel Connections Outside Antenna Cable TV coaxial cable 2-Way signal splitter VCR #1 ANT OUTPUT IN S-VIDEO V L R Optional DIGITAL OUTPUT CAPABILITY DIGITAL OUTPUT AUDIO OUT DVI to HDMI OUTPUT Y PB/CB PR/CR L R Optional S-VIDEO V L R INPUT S-VIDEO - Hitachi 55HDS52 | Owners Guide - Page 15
the input is of S-VIDEO type. • When using a HDMI input from a Set-Top-Box, it is recommended to use a 1080i or 720p input signal. MACROVISION NOTES: 1. Video signals fed through a VCR may be affected by copyright protection systems and the picture will be distorted on the television. 2. Connecting - Hitachi 55HDS52 | Owners Guide - Page 16
to your VCR operating guide for more information on line inputoutput connections. 3. When INPUT 3 or 4 are used, it is necessary to connect the video output of the device to the Y/VIDEO input jack of the TV. CONNECTING AN S-VIDEO AND STEREO AUDIO SOURCE TO INPUT 1, 2 AND 5 1. Connect the cable - Hitachi 55HDS52 | Owners Guide - Page 17
device user settings determines final video appearance. 5. When using a DVI to HDMI cable, connect the Audio Out L and R cables at the same INPUT (1 or 2) as your HDMI INPUT (1 or 2). HDMI input DVI to HDMI Input or or HDMI Cable DIGITAL OUTPUT Back of HDTV Set-Top-Box or DVD Player HDTV Set-Top - Hitachi 55HDS52 | Owners Guide - Page 18
the Y OUT of the NOTE: 1. Completely insert the connection cord Laserdisc/DVD player or HDTV set top box to plugs when connecting to rear panel jacks. the INPUT (Y) jack, as shown on the Rear The picture and sound that is played back panel below. will be abnormal if the connection is loose - Hitachi 55HDS52 | Owners Guide - Page 19
Plasma TV to an external audio amplifier, connect the system as shown on the right. The "OPTICAL OUT" from the Rear Panel is a fixed output. The Volume of the amplifier is controlled by the amplifier, not by the Plasma Television jack on the TV Rear Panel. Optional R L V S-VIDEO INPUT VCR or other - Hitachi 55HDS52 | Owners Guide - Page 20
Top Box, DVD, etc.). Once this is setup, it allows your IR Mouse connector to control your equipment using your HITACHI Plasma TV Remote Control. You can use your HITACHI remote control to control the Audio/Video equipment command without the equipment's remote control. The Plasma Television Rear - Hitachi 55HDS52 | Owners Guide - Page 21
one area. To operate your Plasma TV, point the remote control at the remote sensor of the Television and select the TV by pressing the ̇ or ̈ button of the Source Access on the remote. The TV mode indicator will blink, indicating that the remote will now control your television. To operate your VCR - Hitachi 55HDS52 | Owners Guide - Page 22
The Remote Control How to Use the Remote to Control Your TV ቢ POWER button ቢ Press this button to turn the TV set on or off when the remote is in TV mode. (See page 21 for ባ instructions on how to set the remote control to TV ቤ ብ mode.) ባ MODE Indicator Turns on or blinks to show remote - Hitachi 55HDS52 | Owners Guide - Page 23
16:9 sources like HDTV and DVD's preserving the original 16:9 aspect ratio. 16:9 ZOOM Use this aspect to Zoom-in once while in 16:9 aspect. Note: Please see Appendix A on page 80. The Remote Control • Antenna-Digital (4:3) • S-Video/Video 4:3/Letter Input (Auto Aspect: On) • HDMI-480i/480p - Hitachi 55HDS52 | Owners Guide - Page 24
Satellite Receiver (SAT)/Set-Top-Box (STB) mode only] The use of this button is only applicable when the remote control is in (CBL) and (SAT/STB) mode. Press this button to access the Channel Guide of the (CBL), and (SAT/STB). ተ INPUTS button When the remote control is in TV mode, press this button - Hitachi 55HDS52 | Owners Guide - Page 25
First time use The Remote Control How to Use the Remote to Control Your TV PHOTO INPUT This feature is useful for viewing digital still pictures from your digital camera, USB Drive or memory cards USB drive using the Photo Input in the left side panel of the TV. 1. Press the INPUTS button to cycle - Hitachi 55HDS52 | Owners Guide - Page 26
then should be placed on a main directory with a "dcim" file name format. 3. Supported image types are up to 3072 x 2304; JPEG format should conform with DCF Standard (Design rule for Camera File System). 4. This TV set displays only digital pictures from digital cameras which meet DCF Standard - Hitachi 55HDS52 | Owners Guide - Page 27
use The Remote Control How to Use the Remote to Control Your TV ቱ LAST CHANNEL (LAST CH) button Press this button to toggle between the current and last channel viewed. ቲ VOLUME (VOL) WHEEL, MUTE button Use the VOL WHEEL (̆ or ̄) until you obtain the desired sound level. To reduce the sound to one - Hitachi 55HDS52 | Owners Guide - Page 28
The Remote Control Picture-in-Picture (PIP) Your HITACHI Plasma TV incorporates Two Tuner technology designed for improved viewing enjoyment. This Two Tuner feature allows you to view antenna inputs on both the main picture and sub picture simultaneously, with separate tuning control for each. - Hitachi 55HDS52 | Owners Guide - Page 29
The Remote Control Picture-In-Picture (PIP) PIP MODE PICTURE-IN-PICTURE Select AIR from the INPUTS menu. Select a channel that has a 1080i signal. To prevent a pattern burn, occasionally move the sub-picture using the CURSOR PAD. SURF MODE PICTURE-IN-PICTURE Surf Mode PIP automatically scans all - Hitachi 55HDS52 | Owners Guide - Page 30
The Remote Control Picture-In-Picture (PIP) ባ PAUSE button If you wish to freeze the sub-picture, press the PAUSE button. This is convenient when trying to write down the address for a mail order company, recording statistics for a sporting event, etc. To return the picture to motion, press the - Hitachi 55HDS52 | Owners Guide - Page 31
are removed from the from the remote control. After replacing the batteries repeat the entire programming procedure as stated above. ቢ PRECODED CABLE BOX buttons These buttons transmit the chosen precoded cable codes. MY CABLE BOX CODE IS: NOTE: Refer to instruction manual of the Cable Box for - Hitachi 55HDS52 | Owners Guide - Page 32
programmed until the batteries are removed from the from the remote control. After replacing the batteries repeat the entire programming procedure as stated above. MY Satellite RECEIVER/ SET-TOP-BOX CODE IS: NOTE: Refer to instruction manual of the Set-TopBox/Satellite Receiver for operation of the - Hitachi 55HDS52 | Owners Guide - Page 33
operating guide. 3. The remote control will remember the codes you have programmed until the batteries are removed from the from the remote control. After replacing the batteries repeat the entire programming procedure as stated above. MY DVD PLAYER CODE IS: NOTE: Refer to instruction manual of - Hitachi 55HDS52 | Owners Guide - Page 34
are removed from the from the remote control. After replacing the batteries repeat the entire programming procedure as stated above. ቢ PRECODED VCR/PVR Buttons These buttons transmit the chosen precoded VCR/PVR codes. MY VCR/PVR CODE IS: NOTE: Refer to instruction manual of the VCR/PVR for - Hitachi 55HDS52 | Owners Guide - Page 35
operating guide. 3. The remote control will remember the codes you have programmed until the batteries are removed from the from the remote control. After replacing the batteries repeat the entire programming procedure as stated above. MY AUDIO COMPONENT CODE IS: NOTE: Refer to instruction manual - Hitachi 55HDS52 | Owners Guide - Page 36
How to Use the ENT Button INPUT ACCESS This optional feature allows the user of the remote control to setup it's ENTER (ENT) button to access the specified input of the TV. Setup for this feature is applicable to the remote control's normal mode only and only applies to the DVD, CBL, STB, PVR - Hitachi 55HDS52 | Owners Guide - Page 37
Remote Control Codes The Remote Control VCR BRAND CODE 1972 Hitachi 0000, 0041, 0042, 0105 Howard Computers............1972 Hughes Network Systems 0042 iBuy Power 1972 0675 Symphonic 0675 TYT 0705 Teac 0790 Technics 0490 Theta Digital 0571 Tivo 1996 Toshiba ........0503, 0695, 1045 1988, - Hitachi 55HDS52 | Owners Guide - Page 38
Remote Control Codes The Remote Control Jasco /Kardon ......0891, 0110, 0189 Hewlett Packard 1181 Hitachi 0228 Integra 0135 JBL 0110 JVC 0074, 1263 KLH Pictures 0317, 0351 RCA 0056 SSI 0317 Sansui 0325 Schneider 0376 Sony 0010, 0576 Soundesign 0376 Yorx 0376 SET TOP BOX BRAND ..CODE - Hitachi 55HDS52 | Owners Guide - Page 39
1. Press MENU on the remote control to display the different features on your HITACHI Plasma TV. 2. Use the CURSOR PAD (buttons ̆, ̄, ̇ and ̈) or CHANNEL WHEEL to navigate to a different menu item. 3. Press EXIT on the remote control to quickly exit from a menu. This part of the screen shows which - Hitachi 55HDS52 | Owners Guide - Page 40
Code Change Lock access code. Engage Lock Choose to lock channel, video input, and/or front panel. Movie Ratings Block various types of movies and video types based on motion picture ratings. TV Ratings Block various types of movies and television programming based on a parental guide - Hitachi 55HDS52 | Owners Guide - Page 41
MENU to return to main menu. 5. Press EXIT to quit menu. Contrast Use this function to change the contrast between black and white levels in the picture. Brightness Use this function to adjust overall picture brightness. Video Audio Channel Manager Locks Timers Setup Power Swivel Move SEL Select - Hitachi 55HDS52 | Owners Guide - Page 42
known as 3:2 pulldown. When AUTO MOVIE MODE is turned ON from the VIDEO menu, your Hitachi Plasma Television will activate the circuitry for this special feature to improve video performance when watching film based sources. NOTE: 1. When using Progressive Scan Component (Ex. 480p, 720p, 1080i - Hitachi 55HDS52 | Owners Guide - Page 43
High Dynamic Low Off Off Cable Video Reset Video Settings Select "Reset" to return the video menu settings on this Input to the original factory settings. Reset Select "Yes" to fix the Video Menu Settings to the original factory Settings on all modes after power "ON". No Yes Move SEL - Hitachi 55HDS52 | Owners Guide - Page 44
will control the left to right balance of the Plasma TV internal speakers. SRS Based on the principles of the human hearing system, SRS technology delivers and exciting and realistic 3D Sound experience from just two external speakers (or) the two internal speakers of your HITACHI Television. If - Hitachi 55HDS52 | Owners Guide - Page 45
-Channel Television Sound will allow you to select STEREO (a stereo broadcast), MONO (monaural sound) used Digital Output and DRC are only available when viewing digital programs. Use the functions at right if your TV is connected to an amplifier/receiver with optical digital input with Dolby Digital - Hitachi 55HDS52 | Owners Guide - Page 46
PAD ̈ to select. Video Audio Channel Manager Locks Timers Setup Power Swivel Move SEL Select feature will automatically store active Analog and Digital channels in Auto Channel Scan memory. 1. will not be available since channels will be fixed based on what was agreed upon by you and your cable - Hitachi 55HDS52 | Owners Guide - Page 47
Channel List This function allows you to review which channels are labeled (CH ID), or OFF on the SCAN and LOCK columns. 3. To select LOCK column, input the access code. (Default access code: 0000) or 4. Press the FAV button to set or remove the FAVORITE List to be updated. On-Screen Display 47 - Hitachi 55HDS52 | Owners Guide - Page 48
the picture and sound of the selected channel or video input. It can also be used to keep the TV from being viewed for a scheduled time period that you set. Video Audio Channel Manager Locks Timers Setup Power Swivel Move SEL Select The code to enter the Locks feature is a four digit access code - Hitachi 55HDS52 | Owners Guide - Page 49
Ratings(Eng) Canadian Ratings(Frn) Move SEL Select Locks Movie Ratings or Status Not Rated G PG PG-13 R NC-17 X Move SEL Return Motion Picture Ratings Table NOT RATED Contains no rating. Not Rated (NR) and Not Applicable (NA) programs. Movie has not been rated or ratings do not apply - Hitachi 55HDS52 | Owners Guide - Page 50
menu. Locks Change Access Code Engage Lock Movie Ratings TV Ratings Canadian Ratings(Eng) Canadian Ratings(Frn) Move SEL Select Locks TV Ratings Status TV-Y TV-Y7 TV-G TV-PG TV-14 TV-MA Sub Rating D L S V FV Move SEL Return TV Parental Guide Ratings Table TV-Y All children. The themes - Hitachi 55HDS52 | Owners Guide - Page 51
to block. Locks Change Access Code Engage Lock Movie Ratings TV Ratings Canadian Ratings(Eng) Canadian Ratings(Frn) Move SEL Select 2. Press SELECT to block the CANADIAN RATINGS (ENG) that you have selected. Once rating is selected, for example C8+, all movies and television programs rated C8+ and - Hitachi 55HDS52 | Owners Guide - Page 52
Once rating is selected, for example 8 ANS+, all movies and television programs rated 8 ANS+ and higher will be blocked automatically. 3. Press ) to return to the previous menu. Locks Change Access Code Engage Lock Movie Ratings TV Ratings Canadian Ratings(Eng) Canadian Ratings(Frn) Move SEL Select - Hitachi 55HDS52 | Owners Guide - Page 53
to be adjusted. 2. Press the SELECT button to select. Video Audio Channel Manager Locks Timers Setup Power Swivel Move SEL Select Timers Set The Clock -- : -- used, the TV will SET THE CLOCK automatically. 3. The TV counts electrical pulses for regulating the TIMERS. When the power cord is - Hitachi 55HDS52 | Owners Guide - Page 54
Event Timer Move SEL Set -- : -- AM PST 0:00 Not Set Not Set Set Day/Night Timer Select this feature to activate and set your TV's DAY/NIGHT PICTURE MODE automatically. This feature is not available until the clock is set. 1. Use the CURSOR PADS to highlight SET DAY/NIGHT TIMER settings. 2. Press - Hitachi 55HDS52 | Owners Guide - Page 55
the Plasma TV viewing PAD ̈, ̆ or ̄ or NUMBER buttons to set the channel the TV will tune into. A Ȟ✔ in the box means it is enabled. control your television with the remote control. CAUTION: Do not use your TV as a deterrent when away from home by using the ON and OFF TIMERS. For safety, the TV - Hitachi 55HDS52 | Owners Guide - Page 56
when setting your TV up for the first time. 1. Use the CURSOR PAD to select the sub-menu of your choice. 2. Press the SELECT button to select. Video Audio Channel Manager Locks Timers Setup or Power Swivel Move SEL Select Setup Menu Preference or Screen Saver Set The Inputs Set AV - Hitachi 55HDS52 | Owners Guide - Page 57
as video games, stock market quotations, computer generated graphics, and other fixed (non-moving) patterns can cause permanent damage to the Plasma Television. Use the SCREEN SAVER feature to hide screen burn. 1. Use CURSOR PAD ̆ or ̄ to highlight Screen Saver's Main Picture Moving and Image Power - Hitachi 55HDS52 | Owners Guide - Page 58
Use this feature to control your external Audio/Video equipment using your HITACHI Plasma TV Remote Control. The IR mouse cable must be properly connected for the AV NET feature to work. 1. Press the MENU button. Video Audio Channel Manager Locks Timers Setup Power Swivel Move SEL Select 2. Use - Hitachi 55HDS52 | Owners Guide - Page 59
" and proceed to the Learning mode. Brand Name IR Code Set Test Button Hitachi (44/54) 1 (1/12) Learning Mode POWER SOURCE 1 VOL ̆ Move Change IR Code Back Next 11. Use the CURSOR PAD ̇ or ̈ to select the TV Input that connects to the video and audio output of the A/V Receiver. 12. Use - Hitachi 55HDS52 | Owners Guide - Page 60
press the SELECT button to move on to the next SETUP screen. AV Net Setup Wizard : A/V Receiver Setup Brand Name IR Code Set TV Input Hitachi (44/54) 3 (3/12) Hitachi Monitor Out Settings If you connect the Monitor out or Optical out to an A/V Receiver, please select an A/V Receiver Source - Hitachi 55HDS52 | Owners Guide - Page 61
Setup Wizard : Device Settings DVD Settings Brand Name Hitachi (31/77) IR Code Set 1 (1/5) Transmission Test Test Button POWER ̈ CH ̆ Move Back Change Brand Name Next 13. Use the CURSOR PAD ̇ or ̈ to select the TV Input that connects to the video and audio output of the DVD. 14. Use - Hitachi 55HDS52 | Owners Guide - Page 62
NET allows the user to use equipment that is not supported by the AV/NET codes. After programming your equipment to the AV NET and the Soft Keys do not work, you can manually "LEARN" each one by completing the Learning Mode. The Learning Mode will transfer any remote control button IR code of your - Hitachi 55HDS52 | Owners Guide - Page 63
your A/V Receiver remote control while pointing directly at the learning AV NET sensor of the Plasma TV (located at the SEL Select Cancel OK 10. If the IR code transfer was successful, the screen on the Select the A/V Receiver softkey to learn? TV Softkeys POWER CH̆ VOL̆ MUTE CH̄ VOL̄ AUDIO - Hitachi 55HDS52 | Owners Guide - Page 64
Other Learning Mode POWER SOURCE 1 VOL ̆ Move SEL IR Out Back Next AV Net Setup Wizard : A/V Receiver Setup Brand Name IR Code Set Other Other TV Input Settings If you connect the video or audio output of the A/V Receiver to this TV, please select a TV Input. TV Input Not Connected - Hitachi 55HDS52 | Owners Guide - Page 65
setup another device or select "No, thanks, I'm done" to exit the AV Net setup. AV Net Setup Wizard : A/V Receiver Setup Brand Name IR Code Set TV Input Monitor Out Optical Out Other Other Not Connected Not Connected Not Connected All settings are complete! Move SEL Select Back Next AV Net - Hitachi 55HDS52 | Owners Guide - Page 66
Select the DVD3 softkey to learn? TV Softkeys POWER ̇̇ ̈̈ MENU ̇̇ ̈ ̈̈ SELECT ̆ ̈ EXIT ̄ ̇ Move SEL Select Back Done 11. Press and hold the ̈ "Play button" of the DVD remote control while pointing directly at the learning AV NET sensor of the Plasma TV (located at the lower right - Hitachi 55HDS52 | Owners Guide - Page 67
Code Set Custom Transmission Test Test Button POWER Move SEL IR Out ̈ CH ̆ Back Next 16. Use the CURSOR PAD ̇ or ̈ to select the TV Input that connects to the video setup to a chosen TV Input, the user can access soft key controls by selecting the device in the inputs menu. 2. Each Device - Hitachi 55HDS52 | Owners Guide - Page 68
and/or sound effects of a television program or home video which are displayed on the TV screen. Your local TV program guide denotes these digital closed captions will not work with this TV. 2. Caption Display will not work when viewing a 480p, 720p, or 1080i input via the COMPONENT: Y-PBPR inputs - Hitachi 55HDS52 | Owners Guide - Page 69
volume. Variable Select AUDIO OUT VARIABLE to have Audio volume that can be controlled by the Plasma TV Volume Up/Down. Video Out Monitor Monitor Audio Out Fixed Variable TV Tuner Out Fixed Use To record currently viewed Video and Audio. When an external device like a monitor or Hi-Fi audio - Hitachi 55HDS52 | Owners Guide - Page 70
Monitor Out Signals Input Mode Monitor Out (TV Tuner Out) S-Video Video L/R HiFi ANT Digital No Macrovision S-Video YES YES YES YES (Air or Channel ANT ANT ANT ANT Cable) Macrovision S-Video - - - YES ANT Analog Channel Video - YES YES YES ANT ANT ANT Input 1 HDMI_1 Y-PbPr YES - Hitachi 55HDS52 | Owners Guide - Page 71
Off On Move SEL Select Power Swivel This feature controls the motorized stand. It allows the customer to turn the plasma display left or right Video Audio Channel Manager using the remote control. This feature is only Locks Timers available when the Table Top Stand is connected. Setup or - Hitachi 55HDS52 | Owners Guide - Page 72
cord from the wall. Wait 30 seconds and plug the power cord back in. Press the POWER SWITCH again. This protective technology should provide for years of lasting entertainment from your HITACHI Plasma Television. SYMPTOMS No Picture, no sound Sound OK, picture poor © Picture OK, sound poor - Hitachi 55HDS52 | Owners Guide - Page 73
influences Radio receivers by turning off all other equipment other than the television. If you find a problem receiving Radio when using the television, check the instructions mentioned above. BLOCK NOISE (DIGITAL INPUT): Fuzzy blocks may appear in some area or the whole area of the screen - Hitachi 55HDS52 | Owners Guide - Page 74
Troubleshooting No. Items Notes 1 Buzzing sound display panel. from Plasma A buzzing sound may be heard when the plasma television is turned on in a very quiet room. This is due to the plasma panel drive circuit when it is functioning. The buzzing sound is normal and is not a malfunction. 2 - Hitachi 55HDS52 | Owners Guide - Page 75
. This Class B digital apparatus complies with Canadian ICES-003. Cet appareil numérique de la classe B est conforme à la norme NMB-003 du Canada. Cable Compatible Television Apparatus- Tèlèvision câblocompatible, Canada. This Plasma Television receiver will display television closed captioning - Hitachi 55HDS52 | Owners Guide - Page 76
and Preprogrammed Remote Control • Power Management: ON/OFF via signal detection • Picture Enhancement • Input Signal Identification • CableCARD compatible - Contact your local cable operator for more information • HDMI (High Definition Multimedia Interface)(High Bandwidth Digital Content - Hitachi 55HDS52 | Owners Guide - Page 77
Set Dimensions 42 Inch Models (Includes Table Top Stand) Weight (lbs./kg): 98/44.5 55 Inch Models (Plasma Television Only) Weight (lbs./kg): 135.6/61.5 77 Useful Information - Hitachi 55HDS52 | Owners Guide - Page 78
warranty card or operating guide. Should you have any questions regarding warranty, service, operation, or technical assistance, please contact: Hitachi America, LTD. Home Electronics Division 900 Hitachi Way Chula Vista, CA 91914-3556 HITACHI CANADA, LTD. DIGITAL MEDIA DIVISION Should you have - Hitachi 55HDS52 | Owners Guide - Page 79
User License Agreement for HITACHI DTV Software (this "Agreement") is a legal agreement between you ("you" or "your"), in your capacity as the owner of a HITACHI brand digital television (the "DTV"), and HITACHI America, Ltd., Home Electronics Division ("HITACHI goods or services, or expenditures - Hitachi 55HDS52 | Owners Guide - Page 80
INPUT INPUT TYPE FORMAT ASPECT INPUT 1 & 2 HDMI 480i/480p 16:9 INPUT 1-5 S-Video3 NTSC 16:9 Video INPUT 3 & 4 Y-PbPr 480i/480p 16:9 3S-Video = Not available in INPUT 3 & 4 VIDEO ID 16:9 16:9 16:9 AUTO ASPECT On On On Appendix D: INPUT Air or Cable (Digital Channels) INPUT 1 & 2 INPUT - Hitachi 55HDS52 | Owners Guide - Page 81
the Remote Control to access the Main Menu screen. THINGS TO CHECK WHEN USING THE CableCARD / CableCARD Services 1. Check that the CableCARD is properly inserted in the CableCARD slot. 2. Remove the CableCARD by pressing the eject button and pull the CableCARD straight out. Video Audio TV Guide On - Hitachi 55HDS52 | Owners Guide - Page 82
Favorite Channel 27 Freeze 8, 30 H Timers 53-55 Tint 41 Treble 44 V HDMI 17 Video Settings 41-43 I Input Setup 58 L Language Menu Language 56 Locks Change Access Code 48 Channel Lock 48 Front Panel Lock 48 Movie Ratings 49 TV Ratings 50 TV Ratings (Canadian - English 51 82 Index - Hitachi 55HDS52 | Owners Guide - Page 83
Notes 83 - Hitachi 55HDS52 | Owners Guide - Page 84
Notes 84 - Hitachi 55HDS52 | Owners Guide - Page 85
Notes 85 - Hitachi 55HDS52 | Owners Guide - Page 86
Notes 86 - Hitachi 55HDS52 | Owners Guide - Page 87
Notes 87 - Hitachi 55HDS52 | Owners Guide - Page 88
QR64864
-
 1
1 -
 2
2 -
 3
3 -
 4
4 -
 5
5 -
 6
6 -
 7
7 -
8
-
9
-
10
-
11
-
12
-
13
-
14
-
15
-
16
-
17
-
18
-
19
-
20
-
21
-
22
-
23
-
24
-
25
-
26
-
27
-
28
-
29
-
30
-
31
-
32
-
33
-
34
-
35
-
36
-
37
-
38
-
39
-
40
-
41
-
42
-
43
-
44
-
45
-
46
-
47
-
48
-
49
-
50
-
51
-
52
-
53
-
54
-
55
-
56
-
57
-
58
-
59
-
60
-
61
-
62
-
63
-
64
-
65
-
66
-
67
-
68
-
69
-
70
-
71
-
72
-
73
-
74
-
75
-
76
-
77
-
78
-
79
-
80
-
81
-
82
-
83
-
84
-
85
-
86
-
87
-
88
 |
 |

PLASMA TELEVISION
Operating Guide for
42HDS52, 42HDS52A and
55HDS52
IMPORTANT SAFETY INSTRUCTIONS
.......................................................................................
2-3
FIRST TIME USE
.......................................................................................................................
4-20
THE REMOTE CONTROL
........................................................................................................
21-38
ON-SCREEN DISPLAY
............................................................................................................
39-71
USEFUL INFORMATION
..........................................................................................................
72-78
END USER LICENSE AGREEMENT FOR HITACHI DTV SOFTWARE
...........................................
79
APPENDIXES
............................................................................................................................
80-81
INDEX
.............................................................................................................................................
82
As an Energy Star
®
Partner,
Hitachi, Ltd. has determined
that this product meets the
Energy Star
®
guidelines for
energy efficiency.