Honeywell 3800G14E User Manual
Honeywell 3800G14E Manual
 |
View all Honeywell 3800G14E manuals
Add to My Manuals
Save this manual to your list of manuals |
Honeywell 3800G14E manual content summary:
- Honeywell 3800G14E | User Manual - Page 1
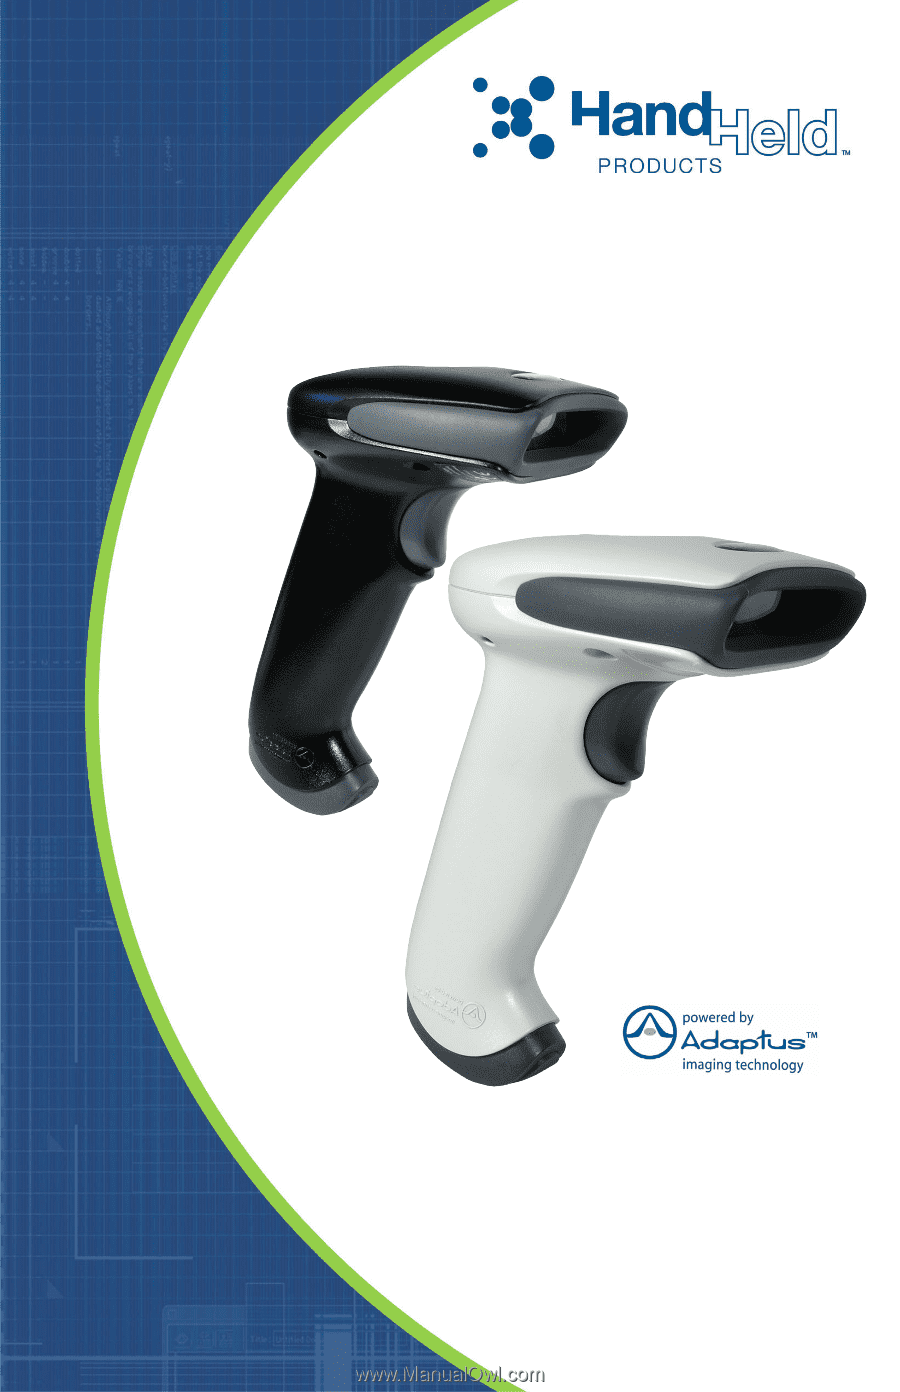
3800g Retail/Commercial Handheld Linear Imager ™ User's Guide - Honeywell 3800G14E | User Manual - Page 2
this publication does not represent a commitment on the part of Hand Held Products. Hand Held Products shall not be liable for technical or editorial errors without the prior written consent of Hand Held Products. ©2006 Hand Held Products, Inc. All rights reserved. Web Address: www.handheld.com - Honeywell 3800G14E | User Manual - Page 3
device that are not expressly approved by Hand Held Products, Inc. may void the user's authority to operate the equipment. Note: To maintain compliance with FCC Rules and Regulations, cables connected to this device must be shielded cables, in which the cable shield wire(s) have been grounded (tied - Honeywell 3800G14E | User Manual - Page 4
Compatibility Directive and the 73/23/EEC Low Voltage Directive. For CE-related inquiries, please contact: Hand Held Products, Inc. Nijverheidsweg 9 5627 BT Eindhoven The Netherlands Hand Held Products shall not be liable for use of our product with equipment (i.e., power supplies, personal - Honeywell 3800G14E | User Manual - Page 5
3800g Imager Identification 3800gXXX XXXXXXXXXX XXXXXXXXXX - Honeywell 3800G14E | User Manual - Page 6
- Honeywell 3800G14E | User Manual - Page 7
Chapter 1 - Getting Started About This Manual 1-1 Unpacking the Imager 1-1 3800g Models 1-1 Connecting the Imager with USB 1-2 USB PC or Macintosh Keyboard 1-2 IBM SurePos 1-3 USB HID 1-3 USB Com Port Emulation 1-3 Plug and Play 1-4 Connecting the Imager When Powered by Host (Keyboard Wedge - Honeywell 3800G14E | User Manual - Page 8
Specified Good Read Delay 3-3 Trigger Modes 3-3 Manual/Serial Trigger 3-3 Automatic Trigger 3-4 Presentation Mode 3-4 Continuous Illumination Mode 3-4 Hands Free Time-Out 3-5 Reread Delay 3-5 User-Specified Reread Delay 3-6 Centering Window 3-6 Output Sequence Overview 3-8 Output Sequence - Honeywell 3800G14E | User Manual - Page 9
, and Intermessage Delays ....... 4-4 Intercharacter Delay 4-5 User Specified Intercharacter Delay 4-5 Interfunction Delay 4-6 Intermessage Delay Interface 6-1 Secondary RS-232 Connection 6-1 Secondary Trigger Mode 6-2 Hands Free Time-Out 6-3 Chapter 7 - Symbologies Introduction 7-1 Message - Honeywell 3800G14E | User Manual - Page 10
Code 39 7-5 Code 39 Start/Stop Characters 7-5 Code 39 Check Character 7-6 Code 39 Message Length 7-6 Code 39 Append 7-7 Full ASCII 7-8 Code 39 Code Page 7-9 Interleaved 2 of 5 7-9 Check Digit 7-9 Interleaved 2 of 5 Message Length 7-10 Code 93 7-11 Code 93 Message Length 7-11 Code 93 Code - Honeywell 3800G14E | User Manual - Page 11
UPC E0 and UPC E1 7-20 UPC E0 and UPC E1 Expand 7-21 UPC E0 and UPC E1 Addenda Required 7-21 UPC E0 and UPC E1 Addenda Separator 7-21 UPC E0 Check Digit 7-21 UPC E0 Number System 7-22 UPC E0 Addenda 7-22 EAN/JAN 13 7-22 EAN/JAN 13 Check Digit 7-23 EAN/JAN 13 Addenda 7-23 EAN/JAN 13 Addenda - Honeywell 3800G14E | User Manual - Page 12
Chapter 8 - Interface Keys Keyboard Function Relationships 8-1 Supported Interface Keys 8-3 Chapter 9 - Utilities To Add a Test Code I.D. Prefix to All Symbologies 9-1 Show Software Revision 9-1 Show Data Format 9-1 Resetting the Standard Product Defaults 9-1 Temporary Visual - Honeywell 3800G14E | User Manual - Page 13
Maintenance 13-1 Cleaning the Scanner's Window 13-1 Inspecting Cords and Connectors 13-1 Replacing the Interface Cable 13-2 Troubleshooting 13-2 Chapter 14 - Customer Support Product Service and Repair 14-1 Online Product Service and Repair Assistance 14-2 Technical Assistance 14-2 Online - Honeywell 3800G14E | User Manual - Page 14
viii - Honeywell 3800G14E | User Manual - Page 15
1 Getting Started About This Manual This User's Guide provides installation and programming instructions for the 3800g. Product specifications, dimensions, warranty, and customer support information are also included. Hand Held Products bar code imagers are factory programmed for the most common - Honeywell 3800G14E | User Manual - Page 16
Symbols in the back of this manual. For additional USB programming and technical information, refer to the Hand Held Products "USB Application Note," available at www.handheld.com. USB PC or Macintosh Keyboard The 3800g imagers are factory programmed for a USB interface. If this is your interface - Honeywell 3800G14E | User Manual - Page 17
PC, you will need to download a driver from the Hand Held Products website (www.handheld.com). The driver will use the next available Com Port number. Apple® Macintosh computers recognize the imager as a USB CDC class device and automatically uses a class driver. Scanning the code below changes the - Honeywell 3800G14E | User Manual - Page 18
ACK/NAK Mode On * Off Plug and Play Plug and Play bar codes provide instant imager set up for commonly used interfaces. Note: After you scan one of the codes, power cycle the host terminal to have the interface in effect. 1 - 4 3800g User's Guide - Honeywell 3800G14E | User Manual - Page 19
the imager operation by scanning a bar code from the Sample Symbols in the back of this manual. The imager beeps once. Keyboard Wedge Connection Scanning the bar code below allows operation of the 3800g as a keyboard wedge interface to an IBM PC AT with a U. S. keyboard. 3800g User's Guide 1 - 5 - Honeywell 3800G14E | User Manual - Page 20
of the imager in cable to the imager. Note: For the imager to work properly, you must have the correct cable for your type of terminal/computer. 3. Plug the serial connector into the serial port on your computer. Tighten the two screws to secure the connector to the port. 1 - 6 3800g User's Guide - Honeywell 3800G14E | User Manual - Page 21
the 3800g is factory defaulted to a USB connection. You must scan the RS-232 Interface bar code below to enable RS-232 ability. All communication parameters between the imager and terminal must match for correct data Port 9B HHBCR-2 Interface IBM 4683 Port 17 Interface 3800g User's Guide 1 - 7 - Honeywell 3800G14E | User Manual - Page 22
or multiple bar codes (on a page or on an object), hold the imager at an appropriate distance from the target, pull the trigger, and center the aiming beam on the bar code. Resetting the Standard Product Defaults If (indicated by an asterisk (*) on the programming pages). 1 - 8 3800g User's Guide - Honeywell 3800G14E | User Manual - Page 23
below, then scan the numeric bar code(s) from the Programming Chart inside the back cover of this manual to program the imager for your terminal ID. Scan Save to save your selection. For example, an IBM AT terminal one of these codes, you must power cycle your computer. 3800g User's Guide 2 - 1 - Honeywell 3800G14E | User Manual - Page 24
Supported Terminals Terminal DEC DEC Esprit 3472 3196, 3197, 3476, 3477, 3486, 3482, 3488 3180 3180 data entry keyboard PC & Workstation USB Handheld Imager USB Tabletop Imager 360 CSE, 340, 750 365, 755CV 2676D, 2677C, 2677D 9271 IIS 98XX Series M19, M200 005 025 112 045 2 - 2 3800g User's Guide - Honeywell 3800G14E | User Manual - Page 25
Supported Terminals (Continued) Terminal Telex 122 key USB PC Keyboard USB Mac Keyboard USB Com Port USB HIDPOS * Factory default setting Model(s) 078, 078A, 79, 80, 191, 196, 1191,1192, 1471, 1472, 1476, 1477, 1482, 1483 Terminal ID 046 124 * 125 130 131 3800g User's Guide 2 - 3 - Honeywell 3800G14E | User Manual - Page 26
Country Scan the appropriate country code below to program the keyboard for your country. As a general rule, the following characters are supported, but need special care for countries other than the United States * United States Denmark France Great Britain Norway Switzerland Belgium Finland - Honeywell 3800G14E | User Manual - Page 27
Please refer to Hand Held Products website ( www.handheld.com) for complete keyboard country support information and applicable interfaces. If you need to program a keyboard for a country other than key to retrieve the current state of the Caps Lock. Autocaps via NumLock 3800g User's Guide 2 - 5 - Honeywell 3800G14E | User Manual - Page 28
ASCII Values. Default = Off Control + ASCII Mode On * Control + ASCII Mode Off Turbo Mode: The imager sends characters to a terminal faster. If the terminal drops characters, do not use Turbo Mode. Default = Default = Off Numeric Keypad Mode On * Numeric Keypad Mode Off 2 - 6 3800g User's Guide - Honeywell 3800G14E | User Manual - Page 29
dropping characters. Default = Off Automatic Direct Connect Mode On * Automatic Direct Connect Mode Off RS-232 Baud Rate Baud Rate sends the data from the imager to the terminal at the specified rate. The host terminal must be set for the same baud rate as the - Honeywell 3800G14E | User Manual - Page 30
8 Data, 1 Stop, Parity Even 8 Data, 1 Stop, Parity Odd 7 Data, 1 Stop, Parity None 7 Data, 2 Stop, Parity Even 7 Data, 2 Stop, Parity Odd * 8 Data, 1 Stop, Parity None 2 - 8 3800g User's Guide - Honeywell 3800G14E | User Manual - Page 31
RS-232 Handshaking RS-232 handshaking is a set of rules concerning the exchange of data between serially communicating devices. Default = RTS/CTS, XON/XOFF and ACK/ NAK Off. RTS/CTS On XON/XOFF On ACK/NAK On * RTS/CTS Off * XON/OFF Off * ACK/NAK Off 3800g User's Guide 2 - 9 - Honeywell 3800G14E | User Manual - Page 32
2 - 10 3800g User's Guide - Honeywell 3800G14E | User Manual - Page 33
and menu beeps are still audible. Default = On. * On Off Beeper Volume - Good Read The beeper volume codes modify the volume of the beep the imager emits on a good read. Default = High for the 3800g, Low Medium *High Off Beeper Pitch - Good Read The beeper pitch codes modify the pitch (frequency - Honeywell 3800G14E | User Manual - Page 34
Beeper Duration - Good Read The beeper duration codes modify the length of the beep the imager emits on a good read. Default = Normal. * Normal Beep Short Beep LED - bar code on the Programming Chart inside the back cover of this manual. Default = One. Number of Pulses 3 - 2 3800g User's Guide - Honeywell 3800G14E | User Manual - Page 35
. When in serial mode, the imager scans until a bar code has been read or until the deactivate command is sent. In serial mode, the imager can also be set to turn itself off after a specified time has elapsed (see Read Time-Out, which follows). * Manual/Serial Trigger 3800g User's Guide 3 - 3 - Honeywell 3800G14E | User Manual - Page 36
program the imager for this capability. Once you have the aiming beam over the correct bar code, pull the trigger to read the code. Scan the Continuous Illumination Off bar code to turn off this feature. Continuous Illumination Mode On * Continuous Illumination Mode Off 3 - 4 3800g User's Guide - Honeywell 3800G14E | User Manual - Page 37
"hands free" modes. If the imager's trigger is pulled when using a hands free mode, the imager changes to manual trigger mode. You can set the time the imager should remain in manual trigger mode by setting the Hands ) Long (1000 ms) * Medium (750 ms) Extra Long (2000 ms) 3800g User's Guide 3 - 5 - Honeywell 3800G14E | User Manual - Page 38
bar codes. Then scan the percent you want to shift the centering window using digits on the inside back cover of this manual. Scan Save. Default Centering = 40% for Left, 60% for Right. Centering On Left of Centering Window * Centering Off Right of Centering Window 3 - 6 3800g User's Guide - Honeywell 3800G14E | User Manual - Page 39
from 1 to 100%. 10% 20% 30% 40% 0% 60% 70% 80% 90% 100% Example: If you have two bar codes next to one another and the centering window is set to 40% left edge and 60% right edge, only the bar code that intersects that window will be decoded. Decoded bar code - Honeywell 3800G14E | User Manual - Page 40
of the order in which the bar codes are scanned. Reading the Default Sequence symbol programs the imager to the Universal values, shown below. These are the defaults. Be certain you want to delete Output Sequence for an additional symbology, or Save to save your entries. 3 - 8 3800g User's Guide - Honeywell 3800G14E | User Manual - Page 41
imager will not transmit the output data to the host device. When it's On/Not Required, the imager will attempt to get the output data to conform to an edited sequence, but if it cannot, the imager to the host as the imager decodes it. Note: This imager to output Code 39 1st, Code 128 2nd, - Honeywell 3800G14E | User Manual - Page 42
. If you use the example on page 3-9, but assume a suffix and specific code lengths, you would use the following command line: SEQBLK62001141FF6A001242FF69001143FF 3 - 10 3800g User's Guide - Honeywell 3800G14E | User Manual - Page 43
pull of the imager's trigger. If you press and hold the trigger, aiming the imager at a series of imager attempts to find and decode new symbols as long as the trigger is pulled. When this programming selection is turned Off, the imager With No Read turned On, the imager sends an "NR" to the host - Honeywell 3800G14E | User Manual - Page 44
message using the Data Formatter (page 5-5). The hex code for the No Read symbol is 9C. Video Reverse Video Reverse is used to allow the imager to read bar codes that are inverted. The "Off" bar code below is an example of this type of bar code. Note: If additional menuing - Honeywell 3800G14E | User Manual - Page 45
data. This group of bar code data and additional, user-defined data is called a "message string." The selections in this section are used to build the user-defined data into the message string. Prefix and Suffix order in which you want them to appear on the output. 3800g User's Guide 4 - 1 - Honeywell 3800G14E | User Manual - Page 46
Programming Chart inside the back cover of this manual or scan 9, 9 for all symbologies. Step from the Programming Chart inside the back cover of this manual. Step 6. Repeat Steps 4 and 5 for every prefix Programming Chart inside the back cover of this manual. Step 4. Determine the hex value from - Honeywell 3800G14E | User Manual - Page 47
suffix. Step 3. Scan the 2 digit hex value from the Programming Chart inside the back cover of this manual or scan 9, 9 for all symbologies. Your change is automatically saved. To Add a Carriage Return Suffix to Symbologies Add Prefix Clear All Prefixes Clear One Prefix 3800g User's Guide 4 - 3 - Honeywell 3800G14E | User Manual - Page 48
within the scanned data, the imager transmits the function code to the terminal. Charts of these function codes are provided in Supported Interface Keys starting on page 8-3. When the imager is in keyboard wedge mode, up to 99 steps (of 5 ms each) for a range of 0-495 ms. 4 - 4 3800g User's Guide - Honeywell 3800G14E | User Manual - Page 49
using the Programming Chart inside the back cover of this manual. Note: Intercharacter delays are not supported in USB serial emulation. User Specified Intercharacter Delay An intercharacter delay of up to 495 the Programming Chart inside the back cover of this manual. 3800g User's Guide 4 - 5 - Honeywell 3800G14E | User Manual - Page 50
to 0. Scan the SAVE bar code using the Programming Chart inside the back cover of this manual. Intermessage Delay An intermessage delay of up to 495 milliseconds may be placed between each scan transmission using the Programming Chart inside the back cover of this manual. 4 - 6 3800g User's Guide - Honeywell 3800G14E | User Manual - Page 51
one bar code has been read, the imager reverts to the primary data format. See Chart inside the back cover of this manual. If you are programming an alternate Supported Terminals Chart (page 2-2) and locate the Terminal ID number for your PC. Scan three numeric bar codes on the 3800g User's Guide - Honeywell 3800G14E | User Manual - Page 52
to program the imager for your terminal from the Programming Chart inside the back cover of this manual. Step 5. Length Specify what length (up to 9999 characters you are clearing. Scan the Terminal Type (refer to the Supported Terminals Chart on page 2-2), Code I.D. (refer to the 3800g User's Guide - Honeywell 3800G14E | User Manual - Page 53
not moved by the FB command. Syntax = FBnnxxyy . .zz where nn is a count of the number of suppressed characters in the list and xxyy .. 3800g User's Guide 5 - 3 - Honeywell 3800G14E | User Manual - Page 54
characters. Syntax = FC. E4 Replaces up to 15 characters in the data string with user specified characters. Replacement continues until the E5 command is encountered. Syntax = E4nnxx1xx2yy1yy2...zz1zz2 Data Format Save * Default Data Format Clear All Data Formats Discard 5 - 4 3800g User's Guide - Honeywell 3800G14E | User Manual - Page 55
is required, all input data must conform to an edited format or the imager does not transmit the input data to the host device. Data Format On, initiated by scanning one of the 3 alternate format bar codes below. The imager will scan the next bar code, formatting the data with the selected alternate - Honeywell 3800G14E | User Manual - Page 56
5 - 6 3800g User's Guide - Honeywell 3800G14E | User Manual - Page 57
secondary interface cables, the 3800g imager, for example, can communicate with a portable data terminal (secondary interface) in addition to the host terminal (primary interface). See the table below for the secondary interfaces for the 3800g. 3800g Models Models 3800G04E, 3800G14E 3800G05E - Honeywell 3800G14E | User Manual - Page 58
imager scans continuously at full power. Automatic Trigger Presentation Mode: The LEDs are off until a bar code is presented to the imager. Then the LEDs turn on automatically to read the code. Presentation Mode uses ambient light to detect the bar codes. Presentation Mode 6 - 2 3800g User's Guide - Honeywell 3800G14E | User Manual - Page 59
Trigger and Presentation Modes are referred to as "hands free" modes. If the imager's trigger is pulled when using a hands free mode, the imager changes to manual trigger mode. You can set the time the imager should remain in manual trigger mode by setting the Hands Free Time-Out. Once the time-out - Honeywell 3800G14E | User Manual - Page 60
6 - 4 3800g User's Guide - Honeywell 3800G14E | User Manual - Page 61
Code • UPC A • EAN/JAN 8 • UPC E All Symbologies If you want to decode all the symbologies allowable for your imager, scan the All Symbologies On code. If on the other hand, you want to decode only a particular symbology, scan All Symbologies Off followed by the On symbol for that particular - Honeywell 3800G14E | User Manual - Page 62
't match the valid reading length, the imager will issue an error beep. You may wish to set the same value for minimum and maximum length to force the imager to read fixed length bar code data. This helps reduce cover of this manual. The minimum and maximum lengths and the defaults are included with - Honeywell 3800G14E | User Manual - Page 63
that the imager reads and transmits bar code data with or without a check character. When Check Character is set to Validate and Transmit, the imager will only read Codabar bar codes printed with a check character, and will transmit this character at the end of the scanned data. 3800g User's Guide - Honeywell 3800G14E | User Manual - Page 64
Don't Transmit Codabar Concatenation Codabar supports symbol concatenation. When you enable concatenation, the imager looks for a Codabar symbol having Stop Start Stop Codabar A12D D34A Select Require to prevent the imager from decoding a single "D" Codabar symbol without its companion. This - Honeywell 3800G14E | User Manual - Page 65
leading and trailing ends of the bar code. You may either transmit, or not transmit Start/Stop characters. Default = Don't Transmit. Transmit * Don't Transmit 3800g User's Guide 7 - 5 - Honeywell 3800G14E | User Manual - Page 66
check character with the scanned data. When Check Character is set to Validate and Transmit, the imager only reads Code 39 bar codes printed with a check character, and will transmit this character at 0, Maximum Default = 48. Minimum Message Length Maximum Message Length 7 - 6 3800g User's Guide - Honeywell 3800G14E | User Manual - Page 67
the data in the order in which the bar codes are read, deleting the first space from each. The imager transmits the appended data when it reads a Code 39 bar code that starts with a character other than a must be turned off to scan Code 32 Pharmaceutical codes. On * Off 3800g User's Guide 7 - 7 - Honeywell 3800G14E | User Manual - Page 68
r +R +C s +S +D t +T +E u +U +F v +V +G w +W +H x +X +I y +Y +J z +Z +K { %P +L | %Q +M } %R +N ~ %S +O DEL %T Character pairs /M and /N decode as a minus sign and period respectively. Character pairs /P through /Y decode as 0 through 9. Full ASCII On * Full ASCII Off 7 - 8 3800g User's Guide - Honeywell 3800G14E | User Manual - Page 69
the SAVE bar code from the Programming Chart inside the back cover of this manual. The data characters should then appear properly. Code 39 Code Page Interleaved 2 of No Check Digit indicates that the imager reads and transmits bar code data with or without a check digit. 3800g User's Guide 7 - 9 - Honeywell 3800G14E | User Manual - Page 70
transmit the check digit with the scanned data. When Check Digit is set to Validate and Transmit, the imager only reads Interleaved 2 of 5 bar codes printed with a check digit, and will transmit this digit Default = 80. Minimum Message Length Maximum Message Length 7 - 10 3800g User's Guide - Honeywell 3800G14E | User Manual - Page 71
of Printed Bar Codes on page A-4, and scan the value and the SAVE bar code from the Programming Chart inside the back cover of this manual. The data characters should then appear properly. Code 93 Code Page 3800g User's Guide 7 - 11 - Honeywell 3800G14E | User Manual - Page 72
Default = 4, Maximum Default = 48. Minimum Message Length Maximum Message Length Straight 2 of 5 IATA (two-bar start/stop) 7 - 12 3800g User's Guide - Honeywell 3800G14E | User Manual - Page 73
lengths = 1-48. Minimum Default = 4, Maximum Default = 48. Minimum Message Length Maximum Message Length Matrix 2 of 5 Matrix 2 of 5 On * Off 3800g User's Guide 7 - 13 - Honeywell 3800G14E | User Manual - Page 74
option sets whether 1 or 2 check digits are required with Code 11 bar codes. Default = Two Check Digits. One Check Digit * Two Check Digits 7 - 14 3800g User's Guide - Honeywell 3800G14E | User Manual - Page 75
Code 128 * On Off ISBT 128 Concatenation In 1994 the International Society of Blood Transfusion (ISBT) ratified a standard for communicating 128 due to its high degree of security and its space-efficient design, 3) a variation of Code 128 that supports concatenation of neighboring symbols, and 4) - Honeywell 3800G14E | User Manual - Page 76
scan the value and the SAVE bar code from the Programming Chart inside the back cover of this manual. The data characters should then appear properly. Code 128 Code Page Code 128 Function Code Transmit By Off Function Codes On Telepen 7 - 16 3800g User's Guide - Honeywell 3800G14E | User Manual - Page 77
as standard full ASCII (start/stop pattern 1). When Original Telepen Output is selected, the imager reads symbols with start/stop pattern 1 and decodes them as compressed numeric with optional full = 1, Maximum Default = 60. Minimum Message Length Maximum Message Length 3800g User's Guide 7 - 17 - Honeywell 3800G14E | User Manual - Page 78
beginning of the scanned data, but the unit can be programmed so it will not transmit it. Default = On. * On Off UPC A Addenda 7 - 18 3800g User's Guide - Honeywell 3800G14E | User Manual - Page 79
5 Digit Addenda On * 5 Digit Addenda Off UPC A Addenda Required When Addenda Required is set to on, the imager will only read UPC A bar codes that have addenda. Default = Not Required. Required * Not Required UPC A turned off, there is no space. Default = On. * On Off 3800g User's Guide 7 - 19 - Honeywell 3800G14E | User Manual - Page 80
UPC E1 selection. Default = On (UPC E0) and Off (UPC E1). * UPC E0 On UPC E1 On UPC E0 Off * UPC E1 Off 7 - 20 3800g User's Guide - Honeywell 3800G14E | User Manual - Page 81
Default = Off. On * Off UPC E0 and UPC E1 Addenda Required When Addenda Required is set to on, the imager will only read UPC E bar codes that have addenda. Default = Not Required. Required * Not Required UPC E0 and UPC of the scanned data or not. Default = On. * On Off 3800g User's Guide 7 - 21 - Honeywell 3800G14E | User Manual - Page 82
On * 2 Digit Addenda Off 5 Digit Addenda On * 5 Digit Addenda Off EAN/JAN 13 EAN/JAN 13 * On 7 - 22 Off 3800g User's Guide - Honeywell 3800G14E | User Manual - Page 83
. 2 Digit Addenda On * 2 Digit Addenda Off 5 Digit Addenda On * 5 Digit Addenda Off EAN/JAN 13 Addenda Required When Addenda Required is set to on, the imager will only read EAN/JAN 13 bar codes that have addenda. Default = Not Required. Required * Not Required 3800g - Honeywell 3800G14E | User Manual - Page 84
be translated into their equivalent ISBN number format. Default = Off. On * Off EAN/JAN 8 EAN/JAN 8 * On Off 7 - 24 3800g User's Guide - Honeywell 3800G14E | User Manual - Page 85
Addenda. 2 Digit Addenda On * 2 Digit Addenda Off 5 Digit Addenda On * 5 Digit Addenda Off EAN/JAN 8 Addenda Required When Addenda Required is set to on, the imager will only read EAN/JAN 8 bar codes that have addenda. Default = Not Required. Required * Not Required 3800g - Honeywell 3800G14E | User Manual - Page 86
= Validate Type 10, but Don't Transmit. When Check Character is set to Validate and Transmit, the imager will only read MSI bar codes printed with the specified type check character, and will transmit this character at 10, but Don't Transmit Validate Type 10 and Transmit 7 - 26 3800g User's Guide - Honeywell 3800G14E | User Manual - Page 87
to Message Length on page 7-2 for additional information. Minimum and Maximum lengths = 4-48. Minimum Default = 4, Maximum Default = 48. Minimum Message Length Maximum Message Length 3800g User's Guide 7 - 27 - Honeywell 3800G14E | User Manual - Page 88
RSS-14 < Default All RSS-14 Settings > RSS-14 * On Off RSS Limited < Default All RSS Limited Settings > RSS Limited * On Off RSS Expanded < Default All RSS Expanded Settings > 7 - 28 3800g User's Guide - Honeywell 3800G14E | User Manual - Page 89
Default = 4, Maximum Default = 74. Minimum Message Length Maximum Message Length EAN•UCC Emulation The imager can automatically format the output from any EAN•UCC data carrier to emulate what would be encoded Off. RSS Emulation * EAN•UCC Emulation Off 128 Emulation 3800g User's Guide 7 - 29 - Honeywell 3800G14E | User Manual - Page 90
Message Length on page 7-2 for additional information. Minimum and Maximum lengths = 2-80. Minimum Default = 4, Maximum Default = 80. Minimum Message Length Maximum Message Length 7 - 30 3800g User's Guide - Honeywell 3800G14E | User Manual - Page 91
. Minimum and Maximum lengths = 2-80. Minimum Default = 4, Maximum Default = 48. Minimum Message Length PosiCode Maximum Message Length PosiCode A and B * On 3800g User's Guide Off 7 - 31 - Honeywell 3800G14E | User Manual - Page 92
for labeling magnetic storage media. Note: If you are going to scan Code 32 Pharmaceutical codes, Trioptic Code must be off. On * Off 7 - 32 3800g User's Guide - Honeywell 3800G14E | User Manual - Page 93
information. Minimum and Maximum lengths = 1-2048. Minimum Default = 1, Maximum Default = 2048. Minimum Message Length Code 16K Maximum Message Length 3800g User's Guide 7 - 33 - Honeywell 3800G14E | User Manual - Page 94
= 0-160. Minimum Default = 1, Maximum Default = 160. Minimum Message Length Code 49 Maximum Message Length Code 49 * On Off 7 - 34 3800g User's Guide - Honeywell 3800G14E | User Manual - Page 95
Code 49 Message Length Scan the bar codes below to change the message length. Refer to Message Length on page 7-2 for additional information. Minimum and Maximum lengths = 1-81. Minimum Default = 1, Maximum Default = 81. Minimum Message Length Maximum Message Length 3800g User's Guide 7 - 35 - Honeywell 3800G14E | User Manual - Page 96
7 - 36 3800g User's Guide - Honeywell 3800G14E | User Manual - Page 97
Value, and Full ASCII "CTRL"+ relationships apply to all terminals that can be used with the imager. Refer to page 2-6 enable Control + ASCII mode. Function Code NUL SOH STX ETX EOT 1F Full ASCII "CTRL" + 2 A B C D E F G H I J K L M N O P Q R S T U V W X Y Z [ \ ] 6 - 3800g User's Guide 8 - 1 - Honeywell 3800G14E | User Manual - Page 98
States [ Belgium [ Scandinavia 8 France ^ Germany Italy Switzerland United Kingdom [ Denmark 8 Norway 8 Spain [ Codes \ ] 6 - < ] 6 - < 9 6 - 8 $ 6 = Ã + 6 - \ + 6 - < . . 6 - ¢ ] 6 - \ 9 6 - \ 9 6 - \ ] 6 - 8 - 2 3800g User's Guide - Honeywell 3800G14E | User Manual - Page 99
Compatibles, IBM XTs and WYSE PC/AT Compatibles ASCII HEX Supported Keys Supported Keys NUL 00 Reserved Reserved SOH 01 Enter (KP) 3196/97, 3476/77, Telex (all models) IBM, DDC, Memorex Telex, Harris* Supported Keys Reserved Enter F11 F12 F13 F14 F15 New Line F16 F17 F18 Tab/Field Forward - Honeywell 3800G14E | User Manual - Page 100
Interface Keys IBM, Memorex Telex (102)* Memorex Telex (88)** ASCII HEX Supported Keys Supported Keys NUL 00 Reserved Reserved SOH 01 Enter Enter STX 02 F11 PF10 ETX 72, Memorex Telex (all models) with 102 key keyboards ** Memorex Telex with 88 key keyboards 8 - 4 3800g User's Guide - Honeywell 3800G14E | User Manual - Page 101
Supported 1D RS 1E US 1F Esprit 200, 400 ANSI Supported Keys Reserved New Line N/A N/A N/A N/A N/A F5 F6 F7 F8 F9 F10 Esprit 200, 400 ASCII Supported Keys Reserved New Line N/A N/A N/A N/A N/A New Line F6 F7 F8 F9 F10 Esprit 200, 400 PC Supported Keys Reserved New Line N/A N/A N/A N/A N/A New - Honeywell 3800G14E | User Manual - Page 102
Supported Interface Keys ASCII NUL SOH STX ETX EOT ENQ ACK BEL BS HT LF VT FF CR SO SI DLE 0D 0E 0F 10 11 12 13 14 15 16 17 18 19 1A 1B 1C 1D 1E 1F 7F Apple Mac/iMac Supported Keys Reserved Enter/Numpad Enter CAPS ALT make ALT break CNTRL make CNTRL break RETURN APPLE make TAB APPLE break TAB Del - Honeywell 3800G14E | User Manual - Page 103
Resetting the Standard Product Defaults If you aren't sure what programming options are in your imager, or you've changed some options and want the standard product default settings restored, scan the commands (indicated by an asterisk (*) on the programming pages). 3800g User's Guide 9 - 1 - Honeywell 3800G14E | User Manual - Page 104
Xpress bar code to temporarily configure the imager for Visual Xpress settings. Refer to Visual Xpress. To convert the imager back to keyboard wedge communication, cycle the power. Visual Xpress Note unit, the user-programmed parameters are retained. If you need to discard user-programmed settings, - Honeywell 3800G14E | User Manual - Page 105
from the imager can be saved to files in different image formats. You can modify the image settings and save the image settings to an INI file, which can be loaded later to capture new images. Imaging also lets you preview the images continuously captured by the imager. 3800g User's Guide 10 - 1 - Honeywell 3800G14E | User Manual - Page 106
Installing Visual Xpress from the Web 1. Access the Hand Held Products web site at www.handheld.com. 2. Click in the Quick Search text box and enter Visual Xpress. 3. the defaults during installation, you can click on Start Menu-Programs-Hand Held Products-Visual Xpress. 10 - 2 3800g User's Guide - Honeywell 3800G14E | User Manual - Page 107
descriptions and examples of each serial programming command, refer to the corresponding programming bar code in this manual. The device must be set to an RS-232 interface (see page 1-7). The following commands can -permanent changes you want saved through a power cycle. 3800g User's Guide 11 - 1 - Honeywell 3800G14E | User Manual - Page 108
(s). (The de- vice's response uses a dash (-) to indicate a continuous range of values. A pipe (|) separates items in a list of non-continuous values.) Tag Field Usage When a query is used in place of a Tag field, of 100 when the field will only accept 2 characters. 11 - 2 3800g User's Guide - Honeywell 3800G14E | User Manual - Page 109
Length (MIN) is set to 2 characters; the Maximum Message Length (MAX) is set to 60 characters; and the Default setting (DFT) has no value. 3800g User's Guide 11 - 3 - Honeywell 3800G14E | User Manual - Page 110
imager with serial trigger commands. First, the imager must be put in Manual/Serial Trigger Mode either by scanning the Manual/Serial Trigger Mode bar code (page 3-3), or by sending the Manual/ Serial Menu Command (page 11-7). Once the imager (*) on the programming pages). 11 - 4 3800g User's Guide - Honeywell 3800G14E | User Manual - Page 111
Factory Default Settings Default Terminal Interfaces Terminal ID USB PC Keyboard Program Keyboard Country Keyboard Style Keyboard 2-6 KBDCAS0 2-6 KBDCAS1 2-6 KBDTMD0 2-6 KBDTMD1 2-6 KBDNPS0 2-6 KBDNPS1 2-6 KBDADC0 2-7 KBDADC1 2-7 PAP232 1-7 3800g User's Guide 11 - 5 - Honeywell 3800G14E | User Manual - Page 112
232WRD7 232WRD5 232WRD2 232WRD8 232CTS0 232CTS1 232XON0 232XON1 232ACK0 232ACK1 Page 2-7 2-7 2-7 2-7 2-7 2-7 2-7 2-7 2-7 2-7 2-8 2-8 2-8 2-8 2-8 2-8 2-8 2-8 2-8 2-9 2-9 2-9 2-9 2-9 2-9 BEPBEP0 3-1 BEPBEP1 3-1 BEPLVL0 3-1 BEPLVL1 3-1 BEPLVL2 3-1 BEPLVL3 3-1 11 - 6 3800g User's Guide - Honeywell 3800G14E | User Manual - Page 113
Reread Delay User-Specified Reread Delay Centering Setting * Indicates default Low (1600) (min 400Hz) *Medium (2550) High (4200) (max 9000Hz) *Normal Beep Short Beep Off *On *1 Range 1 - 9 *No Delay Short Delay (500 ms) Medium Delay (1000 ms) Long Delay (1500 ms) Range 0 - 30,000 ms *Manual/Serial - Honeywell 3800G14E | User Manual - Page 114
All Suffixes Function Code Transmit *Enable Disable Intercharacter Delay User Specified Intercharac- Delay Length ter Delay Character to Page 3-9 3-9 3-9 3-9 3-9 3-12 3-12 3-11 3-11 3-11 3-11 4-3 4-3 4-3 4-3 4-4 4-4 4-4 4-4 4-4 4-5 4-5 4-5 4-6 4-6 5-4 5-4 5-4 5-4 11 - 8 3800g User's Guide - Honeywell 3800G14E | User Manual - Page 115
Trigger Mode Symbologies *Disable Enable RS-232 Interface *Manual Trigger Automatic Trigger Presentation Mode All Symbologies Codabar 7-3 CBRCK20 7-4 CBRCK21 7-4 CBRCK22 7-4 CBRCCT0 7-4 CBRCCT1 7-4 CBRCCT2 7-4 CBRMIN## 7-5 CBRMAX## 7-5 C39DFT 7-5 3800g User's Guide 11 - 9 - Honeywell 3800G14E | User Manual - Page 116
I25CK21 I25CK22 I25MIN## I25MAX## C93DFT C93ENA0 C93ENA1 C93MIN## C93MAX## R25DFT Page 7-5 7-5 7-5 7-5 7-6 7-6 7-6 7-6 7-6 7-7 7-7 7-7 7-7 7-8 7-8 7-9 7-9 7-9 7-10 7-10 7-10 7-10 7-10 7-11 7-11 7-11 7-11 7-11 7-12 11 - 10 3800g User's Guide - Honeywell 3800G14E | User Manual - Page 117
7-13 7-13 7-13 7-13 7-13 7-13 7-13 7-14 7-14 7-14 7-14 7-14 7-14 7-14 7-15 7-15 7-15 7-15 7-15 7-15 7-15 7-16 7-16 7-16 3800g User's Guide 11 - 11 - Honeywell 3800G14E | User Manual - Page 118
7-17 7-17 7-18 7-18 7-18 7-18 7-18 7-18 7-18 7-19 7-19 7-19 7-19 7-19 7-19 7-19 7-19 7-20 7-20 7-20 7-20 7-20 11 - 12 3800g User's Guide - Honeywell 3800G14E | User Manual - Page 119
*On Off *On *Off On *Off On *Not Required Required Off *On *Off On Default All EAN/ JAN 8 Settings Off *On 3800g User's Guide Serial Command # Indicates a numeric entry UPEEXP0 UPEEXP1 UPECKX0 UPECKX1 UPENSX0 UPENSX1 UPEAD20 UPEAD21 UPEAD50 UPEAD51 UPEARQ0 UPEARQ1 UPEADS0 UPEADS1 E13DFT E13ENA0 - Honeywell 3800G14E | User Manual - Page 120
7-26 7-26 7-26 7-20 7-26 7-26 7-26 7-26 7-26 7-27 7-27 7-27 7-27 7-27 7-27 7-27 7-28 7-28 7-28 7-28 7-28 7-28 11 - 14 3800g User's Guide - Honeywell 3800G14E | User Manual - Page 121
7-29 7-29 7-29 7-30 7-30 7-30 7-30 7-30 7-31 7-31 7-31 7-31 7-31 7-31 7-31 7-31 7-32 7-32 7-32 7-32 7-32 7-32 7-32 7-33 3800g User's Guide 11 - 15 - Honeywell 3800G14E | User Manual - Page 122
16KMIN### 16KMAX### C49DFT C49ENA0 C49ENA1 C49MIN## C49MAX## Page 7-33 7-33 7-33 7-33 7-33 7-34 7-34 7-34 7-34 7-34 7-34 7-34 7-35 7-35 11 - 16 3800g User's Guide - Honeywell 3800G14E | User Manual - Page 123
Product Specifications Parameter Dimensions (Typical): usages ±65 degrees ±65 degrees 20 inches (50 cm) per second 20% minimum 4.5 to 12VDC at imager Scanning Standby Inrush 235mA 87mA 380mA 126mA 50mA N/A 32° F to +122° F (0° C to + , NOM, USB Certified 3800g User's Guide 12 - 1 - Honeywell 3800G14E | User Manual - Page 124
cm) 24 in (61 cm) 29 in (74 cm) 44 in (112 cm) 1. May be impacted by bar code quality and environmental conditions. 12 - 2 3800g User's Guide - Honeywell 3800G14E | User Manual - Page 125
Standard Cable Pinouts Keyboard Wedge 3800g User's Guide 10 Pin RJ41 Modular Plug connects to the imager handle 1 2 Cord shield 3 Tied to supply power 4 Supply ground 5 Terminal clock 6 Terminal data 7 Supply power input (Refer to tables on page 12-1) 8 Keyboard data 9 Keyboard clock 10 12 - 3 - Honeywell 3800G14E | User Manual - Page 126
the imager handle 1 2 Cord shield 3 Prog 1 (Tied to supply power for primary cable) 4 Supply ground 5 Receive data - Serial data to imager 6 Transmit data - Serial data from imager 7 Supply power input (Refer to tables on page 12-1) 8 Request to send data 9 Clear to send data 10 3800g User's Guide - Honeywell 3800G14E | User Manual - Page 127
12 - 5 3800g User's Guide connects to the imager handle 10 Pin Modular Plug 1 2 Data + 3 Tied to supply power 4 Supply ground 5 6 7 5 volt supply power input 8 9 10 Data - Standard Cable Pinouts USB - Honeywell 3800G14E | User Manual - Page 128
12 - 6 3800g User's Guide - Honeywell 3800G14E | User Manual - Page 129
interface cable and connector for wear or other signs of damage. A badly worn cable or damaged connector may interfere with scanner operation. Contact your Hand Held Products distributor for information about cable replacement. Cable replacement instructions are on page 13-2. 3800g User's Guide 13 - Honeywell 3800G14E | User Manual - Page 130
turn it on. If your scanner is not functioning properly, review the following Troubleshooting Guide to try to isolate the problem. Is the power on? Is the red aiming illumination line on? If the red aiming illumination line isn't illuminated, check that: • The cable is connected properly. • The host - Honeywell 3800G14E | User Manual - Page 131
If the scanner still can't read the sample bar codes, scan All Symbologies on page 7-1. If you aren't sure what programming options have been set in the scanner, or if you want the factory default settings restored, scan Resetting the Standard Product Defaults on page 11-4. 3800g User's Guide 13 - Honeywell 3800G14E | User Manual - Page 132
13 - 4 3800g User's Guide - Honeywell 3800G14E | User Manual - Page 133
14 Customer Support Product Service and Repair Hand Held Products provides service for all its products through service centers throughout the world. To obtain warranty or non-warranty service, return the unit to Hand Held Products (postage paid) with a copy of the dated purchase record attached. - Honeywell 3800G14E | User Manual - Page 134
You can also access product service and repair assistance online at www.handheld.com. Technical Assistance If you need assistance installing or troubleshooting, please call your Distributor or the nearest Hand Held Products technical support office: North America/Canada: Telephone: Fax number - Honeywell 3800G14E | User Manual - Page 135
a Return Materials Authorization, which may be obtained by contacting Hand Held Products. In the event that the product is returned to Hand Held Products or its authorized service center within the Warranty Period and Hand Held Products determines to its satisfaction that the product is defective - Honeywell 3800G14E | User Manual - Page 136
limited to: cables, power supplies, cradles, and docking stations. Hand Held Products, Inc. extends these warranties only to the first endusers of the products. These warranties are nontransferable. The limited duration of the warranty for the 3800g is for five (5) years. 14 - 4 3800g User's Guide - Honeywell 3800G14E | User Manual - Page 137
79 74 3D 63 63 45 99 Note: "m" represents the AIM modifier character. Refer to International Technical Specification, Symbology Identifiers, for AIM modifier character details. Note: Prefix/Suffix entries for page 5-1 for information about using Code ID and AIM ID. 3800g User's Guide A - 1 - Honeywell 3800G14E | User Manual - Page 138
61 3D = 93 5D ] 125 7D } 30 1E RS 62 3E > 94 5E ^ 126 7E ~ 31 1F US 63 3F ? 95 5F _ 127 7F A - 2 3800g User's Guide - Honeywell 3800G14E | User Manual - Page 139
ü 157 9D 189 BD ½ 221 DD Ý 253 FD ý 158 9E ž 190 BE ¾ 222 DE Þ 254 FE þ 159 9F Ÿ 191 BF ¿ 223 DF ß 255 FF ÿ 3800g User's Guide A - 3 - Honeywell 3800G14E | User Manual - Page 140
/Belgium Replacement Characters German Replacement Characters Italian Replacement Characters Swiss Replacement Characters British Replacement Characters Danish Replacement Characters Norwegian Replacement Characters Spanish Replacement Characters A - 4 3800g User's Guide - Honeywell 3800G14E | User Manual - Page 141
Sample Symbols UPC A 0 123456 7890 Interleaved 2 of 5 Code 128 Code 128 1234567890 EAN 13 EAN 8 654 3210 5 9 780330 290951 UPC-E 0 456123 8 - Honeywell 3800G14E | User Manual - Page 142
Sample Symbols Code 39 BC321 Code 93 Codabar A13579B 123456-9$ Straight 2 of 5 Industrial Matrix 2 of 5 123456 6543210 RSS-14 (01)00123456789012 - Honeywell 3800G14E | User Manual - Page 143
Programming Chart 0 1 2 3 4 5 6 7 8 9 A B C D E F Discard Save Note: If you make an error while scanning the letters or digits (before scanning Save), scan Discard, scan the correct letters or digits, and Save. - Honeywell 3800G14E | User Manual - Page 144
Hand Held Products, Inc. 700 Visions Drive P.O. Box 208 Skaneateles Falls, NY 13153-0208 3800g-UG Rev A 4/06
-
 1
1 -
 2
2 -
 3
3 -
 4
4 -
 5
5 -
 6
6 -
 7
7 -
8
-
9
-
10
-
11
-
12
-
13
-
14
-
15
-
16
-
17
-
18
-
19
-
20
-
21
-
22
-
23
-
24
-
25
-
26
-
27
-
28
-
29
-
30
-
31
-
32
-
33
-
34
-
35
-
36
-
37
-
38
-
39
-
40
-
41
-
42
-
43
-
44
-
45
-
46
-
47
-
48
-
49
-
50
-
51
-
52
-
53
-
54
-
55
-
56
-
57
-
58
-
59
-
60
-
61
-
62
-
63
-
64
-
65
-
66
-
67
-
68
-
69
-
70
-
71
-
72
-
73
-
74
-
75
-
76
-
77
-
78
-
79
-
80
-
81
-
82
-
83
-
84
-
85
-
86
-
87
-
88
-
89
-
90
-
91
-
92
-
93
-
94
-
95
-
96
-
97
-
98
-
99
-
100
-
101
-
102
-
103
-
104
-
105
-
106
-
107
-
108
-
109
-
110
-
111
-
112
-
113
-
114
-
115
-
116
-
117
-
118
-
119
-
120
-
121
-
122
-
123
-
124
-
125
-
126
-
127
-
128
-
129
-
130
-
131
-
132
-
133
-
134
-
135
-
136
-
137
-
138
-
139
-
140
-
141
-
142
-
143
-
144
 |
 |
™
User’s Guide
3800g
Retail/Commercial Handheld Linear Imager