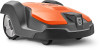
Husqvarna AUTOMOWER 520 Owner Manual
Husqvarna AUTOMOWER 520 Manual
 |
View all Husqvarna AUTOMOWER 520 manuals
Add to My Manuals
Save this manual to your list of manuals |
Husqvarna AUTOMOWER 520 manual content summary:
- Husqvarna AUTOMOWER 520 | Owner Manual - Page 1
Operator's manual HUSQVARNA AUTOMOWER® 520/550 Read the operator's manual carefully and make sure that you understand the instructions before you use the product. EN, English - Husqvarna AUTOMOWER 520 | Owner Manual - Page 2
General safety instructions 8 2.3 Safety instructions for operation guide wire 19 3.8 Checking the installation 21 3.9 Connectivity 21 3.10 How to start up the robotic lawnmower 22 3.11 Control panel 23 3.12 Automower Winter service 44 6 Troubleshooting 6.1 Introduction - troubleshooting - Husqvarna AUTOMOWER 520 | Owner Manual - Page 3
lawnmower, how it must be installed and how to use it. As a complement to this Operator's manual, there are information movies with instructions available on Husqvarna's website, www.husqvarna.com. Keep in mind that the operator is responsible for accidents or hazards occuring to other people or - Husqvarna AUTOMOWER 520 | Owner Manual - Page 4
combines these 3 search methods to locate the charging station as fast as possible, but also to avoid as much tracks forming as possible. Using the manual settings options, the 3 search methods can be combined to optimize the search for the shape of the garden in question, see Installation on page - Husqvarna AUTOMOWER 520 | Owner Manual - Page 5
than about 3 m /10 ft.), and no or only a few small islands. The benefit of this search method is that there is no need to install a guide wire. The disadvantage is that some tracks can be formed alongside the boundary loop. The search time will also be longer if there are narrow - Husqvarna AUTOMOWER 520 | Owner Manual - Page 6
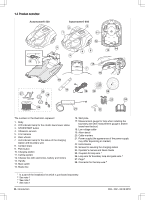
1.3 Product overview Automower® 520 Automower® 550 3 2 1 11 12 9 4 6 5 14 13 8 15 7 blades 23. Screws for securing the charging station 24. Operator's manual and Quick Guide 25. Couplers for loop wire 1 26. Loop wire for boundary loop and guide wire 2 27. Pegs 3 28. Connector for the loop - Husqvarna AUTOMOWER 520 | Owner Manual - Page 7
robotic lawnmower. Study them carefully. WARNING: Read the user instructions before operating the robotic lawnmower. WARNING: Operate the disabling manner. For these reasons the chassis shall only be opened by authorized service technicians. A broken seal can result in the entire or parts of the - Husqvarna AUTOMOWER 520 | Owner Manual - Page 8
other materials or the adjacent area if the instructions in the manual are not obeyed. 2.2 General safety instructions The following system is used in the Operator's Manual to make it easier to use: • Text written in italics is a text that is in the Automower® Connect, or is a reference to another - Husqvarna AUTOMOWER 520 | Owner Manual - Page 9
regulations. Please read the Operator's Manual carefully and make sure you understand the instructions before using the robotic lawnmower. • page 24) so the mower and sprinkler never run simultaneously. • Husqvarna does not guarantee full compatibility between the robotic lawnmower and other types - Husqvarna AUTOMOWER 520 | Owner Manual - Page 10
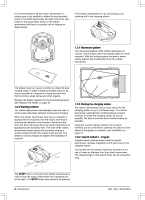
in the robotic lawnmower and its charging station, we recommend that all connections to the charging station are disconnected (power supply, boundary wire and guide wires) if there is a risk of a thunderstorm. 1. Make sure the wires are marked with the supplied markers to simplify reconnecting. The - Husqvarna AUTOMOWER 520 | Owner Manual - Page 11
what is included in the carton. Automower® 520/550 Robotic lawnmower √ Charging station √ Power supply √ Low voltage cable Charging station screws √ 6 pcs Allen key √ Measurement gauge √ Cable markers √ Operator's manual and Quick guide Extra blades √ 9 pcs Alarm decal √ charging - Husqvarna AUTOMOWER 520 | Owner Manual - Page 12
Charging station The charging station has 3 functions: • To send control signals along the boundary wire. • To send control signals in the guide wire so that the robotic lawnmower can find the charging station. • To charge the robotic lawnmower battery. 3.3.1 Best charging station location Consider - Husqvarna AUTOMOWER 520 | Owner Manual - Page 13
the laying of the guide wire in an optimal way. However, if the charging station has to be installed on an island, the guide wire also has to The robotic lawnmower is only to be used with a power supply unit supplied by Husqvarna. The low voltage cable must never be stored in a coil or under the - Husqvarna AUTOMOWER 520 | Owner Manual - Page 14
screws are screwed all the way down in the countersink. Note: The guide wire must be laid and connected to the charging station before securing position 1. Place the robotic lawnmower in the charging station while the boundary and guide wires are being laid. If the battery is flat, it takes about 80 - Husqvarna AUTOMOWER 520 | Owner Manual - Page 15
in the working area. • The wire is no more than 800 m / ft. long. • About 20 cm / 8 in. of extra wire is available to which the guide wire will be connected later. See Laying the boundary wire on page 18. The illustration below shows how the boundary wire must be laid around - Husqvarna AUTOMOWER 520 | Owner Manual - Page 16
lawnmower. About 15 cm / 6 in. of the lawn along the ditch/kerbstone will not be mown. min. 15 cm / 6" 30 cm / 12" 1-5 cm / 0.4-2" If the working area borders on a paving stone path or similar that is level with the lawn (+/- 1 cm / 0.4 in.), it is possible to allow the robotic lawnmower to run a - Husqvarna AUTOMOWER 520 | Owner Manual - Page 17
The robotic lawnmower must be moved manually between the main and secondary area when cut straight after charging, tap on Start in the Automower® Connect app and then select Resume on main area. m / 6.5 ft. (between boundary wires) Husqvarna recommends that a guide wire is installed. 100 cm / 40" - Husqvarna AUTOMOWER 520 | Owner Manual - Page 18
can disrupt the robotic lawnmower. 0-15 cm / 0-6" 100 cm / 40" 0-45% 0-45 cm / 0-18" 100 cm / 40" 3.5.4.1 Eyelet for connecting the guide wire To facilitate the connection of the guide wire to the boundary wire, it is recommended to create an eyelet with about 20 cm / 8 in. of extra boundary wire - Husqvarna AUTOMOWER 520 | Owner Manual - Page 19
the left pin. Connect the boundary wire to the charging station: 1. Open the connector and place the wire in the connector grip. 3.7 Installation of the guide wire The guide wire is used by the robotic lawnmower to find its way back to the charging station but also to - Husqvarna AUTOMOWER 520 | Owner Manual - Page 20
to the slope. This makes it easier for the robotic lawnmower to follow the guide wire on the slope. max. distance min. 30 cm / 12" Avoid This can make it difficult for the robotic lawnmower to follow the guide wire. min. 2 m / 7 ft The guide wire, as the boundary wire, can be stapled to or buried - Husqvarna AUTOMOWER 520 | Owner Manual - Page 21
: The guide wire may Automower® 520 and Automower® 550 support both cellular communication and Bluetooth communication. See Automower® Connect on page 21. It is also possible to monitor and control your robotic lawnmower if you are subscribing to Husqvarna Fleet Services. See Husqvarna Fleet Services - Husqvarna AUTOMOWER 520 | Owner Manual - Page 22
Automower® 520 and Automower® 550 can be added to Husqvarna Fleet Services™ and upload valuable data. The data is transferred automatically and wirelessly to the Husqvarna Fleet Services PIN code. Note: Use the MEMO page in the beginning of the manual to make a note of the chosen PIN code. 11. Time - Husqvarna AUTOMOWER 520 | Owner Manual - Page 23
Husqvarna account. 10. Name your robotic lawnmower, and select Done. 3.10.3 Guide guide wire signal to create as wide guide corridor as possible. This prevents tracks from forming along the guide wire. When this is completed, mowing can begin. 3.11 Control panel Automower® 520 and Automower - Husqvarna AUTOMOWER 520 | Owner Manual - Page 24
depending on the lawn complexity, the mowing result can be improved by making manual settings. See Installation on page 27. For more information about the operating robotic lawnmower accessories, for examples Automower® Connect. Contact your local Husqvarna representative for information on what - Husqvarna AUTOMOWER 520 | Owner Manual - Page 25
number of square meters per hour and day listed in table Work capacity below. Model Approximate work capacity, m2 per hour and day Automower® 520 92 Automower® 550 208 The table below provides suggestions for different timer settings depending on the size of the lawn. The time intervals should - Husqvarna AUTOMOWER 520 | Owner Manual - Page 26
1000 m2 5 7 2000 m2 5 7 3000 m2 5 7 4000 m2 6 7 5000 m2 7 3.14.3 Edit timer settings Tap Edit on the Timer Overview screen in the Automower® Connect app. Several timer intervals can be useful to enable the lawn for children's game or other activities during certain hours. To disable - Husqvarna AUTOMOWER 520 | Owner Manual - Page 27
can be set to search for the charging station in one or more of the following three ways: 1. Charging station signal 2. Follow boundary wire 3. Follow guide wire The default settings are set so that these 3 search options are combined to find the charging station as fast as possible, but also with - Husqvarna AUTOMOWER 520 | Owner Manual - Page 28
areas. In more complex gardens operation can be improved by carrying out some of the manual settings below. 3.17.2.1 GPS assisted navigation There is no need to set Lawn coverage manually for Automower® 520 and Automower® 550. They use a built-in GPS to check which areas have been mowed, 3.17 - Husqvarna AUTOMOWER 520 | Owner Manual - Page 29
interval. The default setting is 3-6. 3.17.3.2 Corridor width > Guide The guide corridor width is adjusted automatically. Only in rare occasions manual settings need to be entered. The guide corridor width can be set between 0 and 9. If guide corridor width is set to 0, the robotic lawnmower - Husqvarna AUTOMOWER 520 | Owner Manual - Page 30
an approximate value and should be regarded as a guide. The actual distance the robotic mower passes the 3.18.2 Ultrasonic Ultrasonic is applicable for Automower® 550. It ensures that the robotic This function allows you to set current time and date manually, or to choose to get it from the mobile - Husqvarna AUTOMOWER 520 | Owner Manual - Page 31
try to set GeoFence again. 1. Select Settings > Security > GeoFence in the Automower® Connect app. 2. Enable GeoFence by tapping on the On/Off bar. 3. into storage for a long period, such as during the winter, Husqvarna recommends turning off the main switch. With the GeoFence function activated, - Husqvarna AUTOMOWER 520 | Owner Manual - Page 32
In this menu it is also possible to remove the robotic lawnmower from all paired accounts, or to initiate a new pairing. Note: When the Automower® Connect module is disabled, this means that the module is inactivated and that all accounts paired with the robotic lawnmower will loose their connection - Husqvarna AUTOMOWER 520 | Owner Manual - Page 33
3.22 Overview of the settings structure (1) Timer Overview Timer settings Edit Change current timer settings Add new timer settings Cutting height Cutting height Weather timer Cutting time Operation ECO mode Spiral cutting Intensity Low Medium High Very low Low Medium High Very high 362 - Husqvarna AUTOMOWER 520 | Owner Manual - Page 34
charging station Lawn coverage Corridor width Exit angles Reversing Drive distance past wire Charging Follow guide station signal Follow 1/2/3 boundary wire Boundary corridor Guide (Min/Max) 1/2/3 corridor Reversing Drive distance past wire GPS assisted navigation (default) How often - Husqvarna AUTOMOWER 520 | Owner Manual - Page 35
Theft protection GeoFence Create new loop signal Alarm Lifted Turned STOP button Time lock upside down pressed Alarm duration Time lock Automower® Connect Signal strength /No signal Connected /Not connected Initiate new pairing Remove mower from paired accounts 362 - 002 - 06.02.2018 - Husqvarna AUTOMOWER 520 | Owner Manual - Page 36
the Automower® Connect app: 1. Select the plus sign (+). 2. Select model. 3. Follow the instructions in the Automower® applicable to Automower® 520 unless otherwise stated. There is more installation help on www.husqvarna.com. guide wire in this installation. 36 - Installation 362 - 002 - 06. - Husqvarna AUTOMOWER 520 | Owner Manual - Page 37
passage Area 2200 m2 Timer 00:00-24:00 Monday-Sunday Lawn coverage GPS assisted navigation Find charging sta- Default settings tion Remarks The guide wire should be placed along the narrow passage to ensure that the robotic lawnmower can with ease locate the left hand side of the working - Husqvarna AUTOMOWER 520 | Owner Manual - Page 38
charging sta- Default settings tion Remarks As the installation requires 3 guide wires, this working area is not suitable for Automower® 520. Make sure that the guide wire is laid according to recommendations in Laying and connecting the guide wire on page 20. 38 - Installation 362 - 002 - 06.02 - Husqvarna AUTOMOWER 520 | Owner Manual - Page 39
area mode on Wednesday and Sunday. As the area is open and uncomplicated there is no need for a guide wire in this installation. Make sure that the guide wire is laid according to recommendations in Laying and connecting the guide wire on page 20. 362 - 002 - 06.02.2018 Installation - 39 - Husqvarna AUTOMOWER 520 | Owner Manual - Page 40
4.1 Main switch WARNING: Read the safety instructions carefully before you start your robotic lawnmower. robotic lawnmower cannot start. 4.2 Start 1. Set the Main switch to position 1. 2. Open the Automower® Connect app. 3. Select the Dashboard. 4. Select Start in the app. If the robotic lawnmower - Husqvarna AUTOMOWER 520 | Owner Manual - Page 41
override the timer up to 7 days. 4. Select a suitable parking duration. 4.4.4 The charging station's park button The PARK button on the charging station is applicable for Automower® 520 and Automower® 550. It is used to call the robotic lawnmower back to the charging station. Park in the - Husqvarna AUTOMOWER 520 | Owner Manual - Page 42
must be moved outside the working area. 4.7 Charge a flat battery When the Husqvarna robotic lawnmower is new or has been stored for a long period, the battery strips in Product overview on page 6 3. The dashboard in the Automower® Connect app shows that charging is in progress. 4.8 Slope control - Husqvarna AUTOMOWER 520 | Owner Manual - Page 43
life: check and clean the robotic lawnmower regularly and replace worn parts if necessary. All maintenance and servicing must be done according to Husqvarna's instructions. See Guarantee terms on page 59. When the robotic lawnmower is first used, the blade disc and blades should be inspected once - Husqvarna AUTOMOWER 520 | Owner Manual - Page 44
must be replaced more regularly. Contact your local Husqvarna representative to replace the battery. 5.5 Winter service Take your robotic lawnmower to your local Husqvarna representative for service prior to winter storage. Regular winter service will maintain the robotic lawnmower in good condition - Husqvarna AUTOMOWER 520 | Owner Manual - Page 45
Troubleshooting 6.1 Introduction - troubleshooting All messages can be found in the Messages menu in Automower® Connect. More suggestions for steps to take in the event of malfunction or symptoms can be found on www.husqvarna wire was laid according to instructions, e.g. in the right direction - Husqvarna AUTOMOWER 520 | Owner Manual - Page 46
boundary wire has been laid according to the instructions. See Boundary wire on page 14. permitted, and the keypad is then cal Husqvarna representative if you forget the blocked for 17. The guide wire is not laid at an angle on a slope. If the guide wire is Troubleshooting 362 - 002 - 06.02.2018 - Husqvarna AUTOMOWER 520 | Owner Manual - Page 47
problem Temporary battery problem Battery problem Temporary battery or software related issue in the mower. Restart the mower. Disconnect and reconnect the battery. If the problem remains, the message requires action by an authorized service technician. 362 - 002 - 06.02.2018 Troubleshooting - Husqvarna AUTOMOWER 520 | Owner Manual - Page 48
by an au- is tilted or upside down. thorized service technician. 6.3 Information messages Below a number of information messages are listed, which can be found in the Messages menu in Automower® Connect. Contact your local Husqvarna representative if the same message appears often. Message Low - Husqvarna AUTOMOWER 520 | Owner Manual - Page 49
Automower® Connect requires a SIM card to Contact your local Husqvarna representative. be inserted in the mower. GeoFence problem The GeoFence is not working due to poor (or Contact your local Husqvarna representative. no) communication with the system. 362 - 002 - 06.02.2018 Troubleshooting - Husqvarna AUTOMOWER 520 | Owner Manual - Page 50
the troubleshooting guide below. There is more help on www.husqvarna.com. If you still need help, please contact your local Husqvarna representative The fault should be rectified by an authorized service technician. Contact your local Husqvarna representative. 6.5 LED indicator lamp on the robotic - Husqvarna AUTOMOWER 520 | Owner Manual - Page 51
guide below. There is a FAQ (Frequently Asked Questions) on www.husqvarna.com which provides more detailed answers to a number of standard questions. Contact your local Husqvarna according to the instructions in Laying the boundary wire on page 18 The guide wire is not inserted Troubleshooting - 51 - Husqvarna AUTOMOWER 520 | Owner Manual - Page 52
system. screw. Different versions (thickness) of Husqvarna Check if the blades are of different This is completely normal for Automower® er turns round and 520 and Automower® 550 with GPS assisted Please first check all known splices before further troubleshooting is done. A wire break can be - Husqvarna AUTOMOWER 520 | Owner Manual - Page 53
G1 new loop wire at the middle of the suspected wire section. AR 3. Switch the connections between the guide wire and the boundary wire in the charging station. Start by switching connection AL and G1. If the indicator AR. Connect the other end of this 362 - 002 - 06.02.2018 Troubleshooting - 53 - Husqvarna AUTOMOWER 520 | Owner Manual - Page 54
wire remains which is the difference between a solid green light and a flashing blue light. Then follow instruction in step 5 below. 4. If indicator lamp still flashes blue in step 3 above: Put AL replaced with a new wire. Always use original couplers. 54 - Troubleshooting 362 - 002 - 06.02.2018 - Husqvarna AUTOMOWER 520 | Owner Manual - Page 55
on page 43. To guarantee battery functionality and service life, it is important to charge the power supply indoors. The boundary wire and the guide wire can be left in the ground. 1. 7.4 Environmental information The symbol on the Husqvarna robotic lawnmower indicates that this product cannot be - Husqvarna AUTOMOWER 520 | Owner Manual - Page 56
while holding the chassis in place. 5. Loosen all 14 screws (Torx 20). 6. Remove the guarantee seal at the point of separation between the chassis halves on the righthand side. 7. Carefully lift the rear edge of the upper section of the chassis. 8. Disconnect the MMI cable from the main circuit - Husqvarna AUTOMOWER 520 | Owner Manual - Page 57
maximum use Charging current, A DC Average mowing time, min Average charging time, min Automower® 520 Automower® 550 18 V/3.2 Ah Art.No. 580 68 18 V/10.4 Ah Art.No. 588 variation in production as well as variation from the test code with 1-3 dB(A). 7 Sound pressure noise uncertainties KpA, 2-4 - Husqvarna AUTOMOWER 520 | Owner Manual - Page 58
length guide wire, m Working capacity, m2+/- 20% Automower® 520 400 2200 Automower® 550 400 5000 IP-classification Robotic lawnmower Charging station Power supply Automower® 520 IPX4 IPX1 IPX4 Automower® 550 IPX4 IPX1 IPX4 Frequency Band Support Bluetooth® Frequency range Automower® Connect - Husqvarna AUTOMOWER 520 | Owner Manual - Page 59
charging station may only be used in compliance with the instructions in this Operator's manual. This manufacturer's guarantee does not have an effect on error occurs with your Husqvarna robotic lawnmower, please contact your local Husqvarna representative for further instructions. Please have the - Husqvarna AUTOMOWER 520 | Owner Manual - Page 60
10 EC Declaration of Conformity 10.1 EC Declaration of Conformity Husqvarna AB, SE-561 82 Huskvarna, Sweden, tel: +46-36-146500, declares that the Robotic lawnmovers Automower® 520 and Automower® 550 with serial numbers dating 2018 week 4 and onwards (the year and week is clearly stated on the - Husqvarna AUTOMOWER 520 | Owner Manual - Page 61
362 - 002 - 06.02.2018 EC Declaration of Conformity - 61 - Husqvarna AUTOMOWER 520 | Owner Manual - Page 62
62 - EC Declaration of Conformity 362 - 002 - 06.02.2018 - Husqvarna AUTOMOWER 520 | Owner Manual - Page 63
362 - 002 - 06.02.2018 EC Declaration of Conformity - 63 - Husqvarna AUTOMOWER 520 | Owner Manual - Page 64
AUTOMOWER® is a trademark owned by Husqvarna AB. Copyright© 2018 HUSQVARNA. All rights reserved. www.husqvarna.com Original instructions 1159063-26 2018-02-15
-
 1
1 -
 2
2 -
 3
3 -
 4
4 -
 5
5 -
 6
6 -
 7
7 -
8
-
9
-
10
-
11
-
12
-
13
-
14
-
15
-
16
-
17
-
18
-
19
-
20
-
21
-
22
-
23
-
24
-
25
-
26
-
27
-
28
-
29
-
30
-
31
-
32
-
33
-
34
-
35
-
36
-
37
-
38
-
39
-
40
-
41
-
42
-
43
-
44
-
45
-
46
-
47
-
48
-
49
-
50
-
51
-
52
-
53
-
54
-
55
-
56
-
57
-
58
-
59
-
60
-
61
-
62
-
63
-
64
 |
 |
EN, English
Operator's manual
HUSQVARNA AUTOMOWER
®
520/550
Read the operator's manual carefully and make sure that you understand the instructions before
you use the product.