Husqvarna AUTOMOWER 520 Owner Manual - Page 11
Presentation, 2 Preparations
 |
View all Husqvarna AUTOMOWER 520 manuals
Add to My Manuals
Save this manual to your list of manuals |
Page 11 highlights
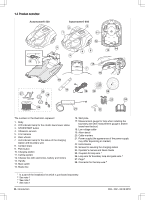
3 Installation 3.1 Presentation This chapter contains information that is important to be aware of when planning the installation. Before starting the installation make yourself familiar with what is included in the carton. Automower® 520/550 Robotic lawnmower √ Charging station √ Power supply √ Low voltage cable Charging station screws √ 6 pcs Allen key √ Measurement gauge √ Cable markers √ Operator's manual and Quick guide Extra blades √ 9 pcs Alarm decal √ charging station using a 10 m / 33 ft. long low voltage cable. Low voltage cables with 3 m / 10 ft. and 20 m / 66 ft. length are available as optional accessories. No parts of the power supply must be changed or tampered with. For example, the low voltage cable must not be shortened or extended. 4. Loop wire, which is laid around the edges of the lawn and around objects and plants that the robotic lawnmower must not run into. The loop wire is used both as a boundary wire and a guide wire. The maximum permitted length for the boundary loop is 800 m / 874 yd. 3.1.1 Main components for installation The installation of the robotic lawnmower involves 4 main components: 1. A robotic lawnmower that mows the lawn by essentially operating in a random pattern. 2. A charging station, to where the robotic lawnmower returns when the battery level becomes too low. 3.2 Preparations Read through this entire chapter before beginning the installation. How the installation is done affects how well the robotic lawnmower works. It is therefore important to plan the installation carefully. Planning is simplified if you make a sketch of the working area, including all obstacles. This makes it easier to see the ideal positions for the charging station, the boundary wire and the guide wire. Draw on the sketch where the boundary and guide wires should be routed. Visit www.husqvarna.com for further descriptions and tips regarding installation. 1. If the lawn in the working area is longer than 10 cm / 4 in. mow it using a standard lawnmower. Collect the grass. 2. Fill in holes and hollows to stop rainwater from forming pools of water. The product may be damaged if it operates in pools of water. See Guarantee terms on page 59. 3. A power supply, which is connected to the charging station and a 100-240V wall socket. The power supply is connected to the wall socket and to the 3. Read carefully through all the steps before the installation. 362 - 002 - 06.02.2018 Installation - 11
-
 1
1 -
2
-
3
-
4
-
5
-
 6
6 -
 7
7 -
 8
8 -
 9
9 -
 10
10 -
 11
11 -
 12
12 -
 13
13 -
 14
14 -
 15
15 -
 16
16 -
17
-
18
-
19
-
20
-
21
-
22
-
23
-
24
-
25
-
26
-
27
-
28
-
29
-
30
-
31
-
32
-
33
-
34
-
35
-
36
-
37
-
38
-
39
-
40
-
41
-
42
-
43
-
44
-
45
-
46
-
47
-
48
-
49
-
50
-
51
-
52
-
53
-
54
-
55
-
56
-
57
-
58
-
59
-
60
-
61
-
62
-
63
-
64
 |
 |
