Husqvarna AUTOMOWER 520 Owner Manual - Page 48
Information messages
 |
View all Husqvarna AUTOMOWER 520 manuals
Add to My Manuals
Save this manual to your list of manuals |
Page 48 highlights
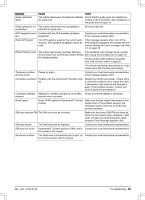
Message Cause Action Charging current too Wrong or faulty power supply unit. high Restart the mower. If the problem remains, the message requires action by an authorized service technician. Connectivity problem Potential problem on the connectivity circuit board in the mower. Restart the mower. If the problem remains, the message requires action by an authorized service technician. Connectivity settings The connectivity settings were restored due Please check and change the settings if nee- restored to a fault. ded. Poor signal quality The connectivity circuit board in the mower is Verify the mower is not upside down or tilted. assembled upside down, or the mower itself If not, the message requires action by an au- is tilted or upside down. thorized service technician. 6.3 Information messages Below a number of information messages are listed, which can be found in the Messages menu in Automower® Connect. Contact your local Husqvarna representative if the same message appears often. Message Low battery Cause Action The robotic lawnmower cannot find the charg- Check that the charging station and the guide ing station. wire are installed in accordance with the in- structions. See Installation of the guide wire on page 19. The guide wire is broken or not connected. Find out where the break is and rectify it. The battery is spent. Replace the battery. See Battery on page 44. The charging station's antenna is defective. Check if the indicator lamp in the charging station flashes red. See LED indicator lamp on the charging station on page 50. Settings restored Confirmation that a Reset all user settings has been carried out. This is normal. No action required. Limited cutting height The maximum and minimum position of the range cutting height adjustment is limited. Check that no grass or other objects are blocking the blade disc from moving up or down. Carry out a cutting height calibration. Contact your local Husqvarna representative. Unexpected cutting The cutting height adjustment is altered with- Carry out a cutting height calibration. Contact height adj out a request from the robotic lawnmower. your local Husqvarna representative. Cutting system imbal- The robotic lawnmower has discovered vibra- Verify that the blades (and screws) are intact ance tions in the cutting disc. and not worn out. Verify that all blades are correctly mounted. Check that no double blades are mounted on any of the three blade positions. Guide 1 not found Guide 2 not found Guide 3 not found The guide wire is not connected to the charg- Check that the guide wire's connector is tight- ing station. ly connected to the charging station. See Lay- ing and connecting the guide wire on page 20. Break in the guide wire. Find out where the break is. Replace the damaged section of the guide wire with a new loop wire and splice using an original coupler. The guide wire is not connected to the boun- Check that the guide wire is connected cor- dary loop. rectly to the boundary loop. See Laying and connecting the guide wire on page 20. 48 - Troubleshooting 362 - 002 - 06.02.2018
-
 1
1 -
2
-
3
-
4
-
5
-
6
-
7
-
8
-
9
-
10
-
11
-
12
-
13
-
14
-
15
-
16
-
17
-
18
-
19
-
20
-
21
-
22
-
23
-
24
-
25
-
26
-
27
-
28
-
29
-
30
-
31
-
32
-
33
-
34
-
35
-
36
-
37
-
38
-
39
-
40
-
41
-
42
-
 43
43 -
 44
44 -
 45
45 -
 46
46 -
 47
47 -
 48
48 -
 49
49 -
 50
50 -
 51
51 -
 52
52 -
 53
53 -
54
-
55
-
56
-
57
-
58
-
59
-
60
-
61
-
62
-
63
-
64
 |
 |
