Husqvarna AUTOMOWER 520 Owner Manual - Page 51
Symptoms
 |
View all Husqvarna AUTOMOWER 520 manuals
Add to My Manuals
Save this manual to your list of manuals |
Page 51 highlights
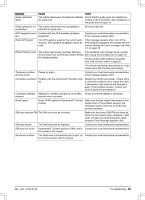
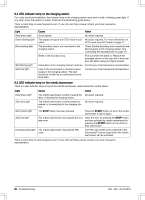
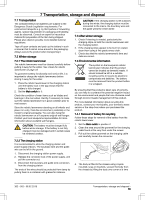
6.6 Symptoms If your robotic lawnmower does not work as expected, follow the symptoms guide below. There is a FAQ (Frequently Asked Questions) on www.husqvarna.com which provides more detailed answers to a number of standard questions. Contact your local Husqvarna representative if you still cannot find the reason for the fault. Symptoms Cause Action The robotic lawnmow- The boundary wire is not laid in a long er has difficulty dock- straight line that is far enough out from the ing. charging station. Check that the charging station has been installed according to the instructions in Laying the boundary wire on page 18 The guide wire is not inserted in the slot under the charging station. It is critical for operation that the guide wire is perfectly straight and is in the correct position under the charging station. Therefore make sure that the guide wire is always in its slot in the charging station. See Laying and connecting the guide wire on page 20. The charging station is on a slope. Place the charging station on a surface that is entirely level. See Best charging station location on page 12. Uneven mowing re- The robotic lawnmower works too few hours Increase the mowing time. See Timer on sults. per day. page 24. The Weather timer senses that the lawn has been mowed more than it actually has. Increase the intensity level in the Weather timer. Disable the Weather timer if this does not help. The How often? setting is incorrect in relation Check that the correct How often? value is to the layout of the working area. Note: Not selected. applicable if GPS assisted navigation is enabled. The shape of the working area requires the Use Area 1-5 to steer the robotic lawnmower use of Area 1-5 for the robotic lawnmower to to a remote area. See Lawn coverage on find its way to all remote areas. Note: Not ap- page 28. plicable if GPS assisted navigation is enabled. Working area is too large. Try to limit the working area, or to extend the working time. See Timer on page 24. Dull blades. Replace all the blades. See Replace the blades on page 43. Long grass in relation to the set cutting height. Increase the cutting height and then successively lower it. Accumulation of grass by the blade disc or around the motor shaft. Check that the blade disc rotates freely and easily. If not, screw off the blade disc and remove grass and foreign objects. See Maintenance on page 43. The robotic lawnmow- The robotic lawnmower clock needs to be set. Set the clock. See Time & Date on page 30. er runs at the wrong time The start and stop times for mowing are incorrect. Reset the start time and stop time settings for mowing. See Timer on page 24. 362 - 002 - 06.02.2018 Troubleshooting - 51
-
 1
1 -
2
-
3
-
4
-
5
-
6
-
7
-
8
-
9
-
10
-
11
-
12
-
13
-
14
-
15
-
16
-
17
-
18
-
19
-
20
-
21
-
22
-
23
-
24
-
25
-
26
-
27
-
28
-
29
-
30
-
31
-
32
-
33
-
34
-
35
-
36
-
37
-
38
-
39
-
40
-
41
-
42
-
43
-
44
-
45
-
 46
46 -
 47
47 -
 48
48 -
 49
49 -
 50
50 -
 51
51 -
 52
52 -
 53
53 -
 54
54 -
 55
55 -
 56
56 -
57
-
58
-
59
-
60
-
61
-
62
-
63
-
64
 |
 |
