Insignia NS-DVDR1 User Manual (English) - Page 13
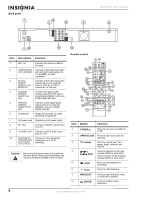
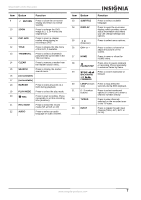
Using your recorder - ns dvd 1 a remote control
 |
View all Insignia NS-DVDR1 manuals
Add to My Manuals
Save this manual to your list of manuals |
Page 13 highlights
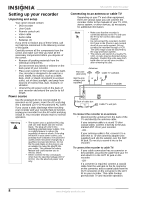
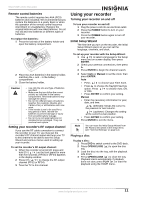
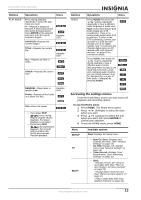
NS-DVDR1 DVD Recorder Remote control batteries The remote control requires two AAA (RO3) batteries (not included). We recommend that you replace the batteries on a yearly basis or when the operation of the remote control becomes intermittent or unsatisfactory. Replace the original batteries with new AAA batteries. Do not mix old and new batteries or different types of batteries. To replace the batteries: 1 Press the lock tab of the battery holder and open the battery compartment. 2 Place two AAA batteries in the battery holder, matching the + and - in the battery compartment. 3 Close the battery holder. Caution • Use only the size and type of batteries specified. • Make sure that you follow the correct polarity as indicated in the battery compartment. Reversed batteries may damage the device. • Do not mix different types of batteries together (for example, Alkaline and Carbon-Zinc) or old batteries with new ones. • If the remote is not to be used for a long period of time, remove the batteries to prevent damage or injury from possible battery leakage. • Do not try to recharge batteries not intended to be recharged. They can overheat and rupture. Setting your recorder's RF output channel If you use the RF cable connection to connect the recorder to your TV, you must set the recorder's RF channel output and tune your TV to this channel to be able to see the Setup Wizard and various menus used in setting up your recorder. To set the recorder's RF output channel: 1 When the recorder is turned off, press and hold CH ( / ) on the front panel for more than five seconds. [RF03] or [RF04] appears in the display window. 2 Press CH ( / ) to change the RF output channel (RF03 or RF04). 3 Tune the TV to this channel. Using your recorder Turning your recorder on and off To turn your recorder on and off: 1 Plug the power cord into an electrical outlet. 2 Press the POWER button to turn on your recorder. 3 Press the POWER button again to turn off your recorder. Initial Setup Wizard The first time you turn on the recorder, the Initial Setup Wizard opens so you can set the language, channels, and clock. To set up your recorder with the Setup Wizard: 1 Use / to select a language for the Setup menu and on-screen display, then press ENTER. 2 Check your antenna connections, then press . 3 Press ENTER to begin the channel search. 4 Select Auto or Manual to set the clock, then press ENTER. Auto • Press / to choose your Time Zone. • Press to choose the Daylight Savings option. Press / to choose Auto, ON, or OFF. • Press ENTER to confirm your setting. Manual • Enter the necessary information for year, date, and time. / (left/right): Moves the cursor to the previous or next column. / (up/down): Changes the setting at the current cursor position. • Press ENTER to confirm your setting. 5 Press ENTER to exit the menu. Note You can reset the Initial Setup Wizard from the Factory Set option in the setup menu (see "General Settings" on page 14). Playing a disc To play a disc: 1 Press DVD to switch control to the DVD deck. 2 Press OPEN/CLOSE ( ) to open the disc tray. 3 Load the disc into the tray, with the playback side down. 4 Press OPEN/CLOSE ( ) to close the tray. Playback starts automatically. If playback does not start, press PLAY ( ) or start the playback using the HOME menu. www.insignia-products.com 11
-
 1
1 -
2
-
3
-
4
-
5
-
6
-
7
-
 8
8 -
 9
9 -
 10
10 -
 11
11 -
 12
12 -
 13
13 -
 14
14 -
 15
15 -
 16
16 -
 17
17 -
 18
18 -
19
-
20
-
21
-
22
-
23
-
24
-
25
-
26
-
27
-
28
-
29
-
30
-
31
-
32
-
33
-
34
-
35
-
36
-
37
-
38
-
39
-
40
-
41
-
42
-
43
-
44
-
45
-
46
-
47
-
48
-
49
-
50
-
51
-
52
-
53
-
54
-
55
-
56
-
57
-
58
-
59
-
60
-
61
-
62
-
63
-
64
-
65
-
66
-
67
-
68
-
69
-
70
-
71
-
72
-
73
-
74
-
75
-
76
-
77
-
78
-
79
-
80
-
81
-
82
-
83
-
84
-
85
-
86
-
87
-
88
-
89
-
90
-
91
-
92
-
93
-
94
-
95
-
96
-
97
-
98
-
99
-
100
-
101
-
102
-
103
-
104
-
105
-
106
-
107
-
108
-
109
-
110
-
111
-
112
-
113
-
114
-
115
-
116
-
117
-
118
 |
 |
