Invacare XLT Owners Manual - Page 59
Replacing Back Upholstery
 |
View all Invacare XLT manuals
Add to My Manuals
Save this manual to your list of manuals |
Page 59 highlights
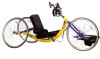
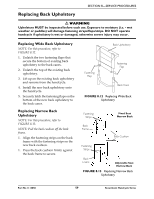
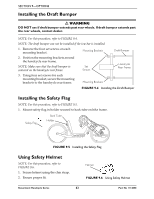
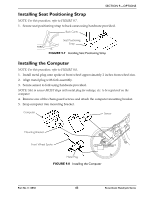
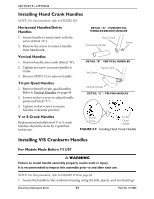
SECTION 8-SERVICE PROCEDURES Replacing Back Upholstery ƽ WARNING Upholstery MUST be inspected before each use. Exposure to moisture (i.e. - wet weather or puddles) will damage fastening straps/flaps/strips. DO NOT operate handcycle if upholstery is wet or damaged, otherwise severe injury may occur. Replacing Wide Back Upholstery NOTE: For this procedure, refer to FIGURE 8.12. 1. Unlatch the two fastening flaps that secure the bottom of existing back upholstery to the back canes. 2. Unlatch the top of the existing back upholstery. 3. Lift up on the existing back upholstery and remove from the handcycle. 4. Install the new back upholstery onto the handcycle. 5. Securely latch the fastening flaps on the bottom of the new back upholstery to the back canes. Replacing Narrow Back Upholstery NOTE: For this procedure, refer to FIGURE 8.13. NOTE: Pull the back cushion off the back frame. 1. Align the fastening strips on the back frame with the fastening strips on the new back cushion. 1. Press the back cushion firmly against the back frame to secure. Back Upholstery Fastening Flap Fastening Flap Back Cane FIGURE 8.12 Replacing Wide Back Upholstery Fastening Strips Back Frame Fixed Seat Narrow Back Back Cushion Fastening Strips Back Frame Adjustable Seat Narrow Back FIGURE 8.13 Replacing Narrow Back Upholstery Part No 1114850 59 Recumbent Handcycle Series
-
 1
1 -
2
-
3
-
4
-
5
-
6
-
7
-
8
-
9
-
10
-
11
-
12
-
13
-
14
-
15
-
16
-
17
-
18
-
19
-
20
-
21
-
22
-
23
-
24
-
25
-
26
-
27
-
28
-
29
-
30
-
31
-
32
-
33
-
34
-
35
-
36
-
37
-
38
-
39
-
40
-
41
-
42
-
43
-
44
-
45
-
46
-
47
-
48
-
49
-
50
-
51
-
52
-
53
-
 54
54 -
 55
55 -
 56
56 -
 57
57 -
 58
58 -
 59
59 -
 60
60 -
 61
61 -
 62
62 -
 63
63 -
 64
64 -
65
-
66
-
67
-
68
-
69
-
70
-
71
-
72
-
73
-
74
-
75
-
76
 |
 |
