Invacare XLT Owners Manual - Page 63
Installing Seat Positioning Strap, Installing the Computer
 |
View all Invacare XLT manuals
Add to My Manuals
Save this manual to your list of manuals |
Page 63 highlights
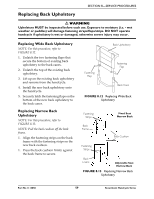
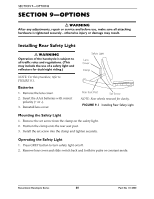
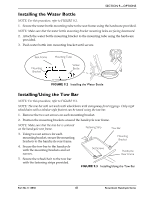
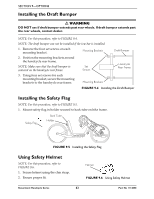
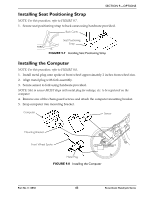
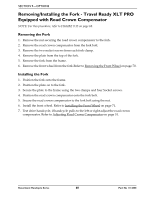
SECTION 9-OPTIONS Installing Seat Positioning Strap NOTE: For this procedure, refer to FIGURE 9.7. 1. Secure seat positioning strap to back canes using hardware provided. Back Canes Seat Positioning Strap FIGURE 9.7 Installing Seat Positioning Strap Installing the Computer NOTE: For this procedure, refer to FIGURE 9.8. 1. Install metal plug onto spoke of front wheel approximately 2 inches from wheel rim. 2. Align metal plug with fork assembly. 3. Secure sensor to fork using hardware provided. NOTE: Slot in sensor MUST align with metal plug for mileage, etc. to be registered on the computer. 4. Remove one of the chain guard screws and attach the computer mounting bracket. 5. Snap computer into mounting bracket. Computer Sensor Mounting Bracket Front Wheel Spoke Metal Plug FIGURE 9.8 Installing the Computer Part No 1114850 63 Recumbent Handcycle Series
-
 1
1 -
2
-
3
-
4
-
5
-
6
-
7
-
8
-
9
-
10
-
11
-
12
-
13
-
14
-
15
-
16
-
17
-
18
-
19
-
20
-
21
-
22
-
23
-
24
-
25
-
26
-
27
-
28
-
29
-
30
-
31
-
32
-
33
-
34
-
35
-
36
-
37
-
38
-
39
-
40
-
41
-
42
-
43
-
44
-
45
-
46
-
47
-
48
-
49
-
50
-
51
-
52
-
53
-
54
-
55
-
56
-
57
-
 58
58 -
 59
59 -
 60
60 -
 61
61 -
 62
62 -
 63
63 -
 64
64 -
 65
65 -
 66
66 -
 67
67 -
 68
68 -
69
-
70
-
71
-
72
-
73
-
74
-
75
-
76
 |
 |
