Invacare XLT Owners Manual - Page 70
Removing/Installing the Front Wheel - XLT Gold, XLT, Pro and XLT with Speed Cassette Chain
 |
View all Invacare XLT manuals
Add to My Manuals
Save this manual to your list of manuals |
Page 70 highlights
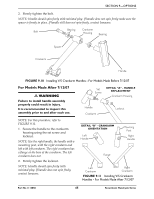
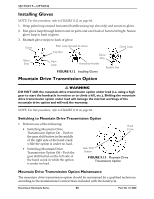
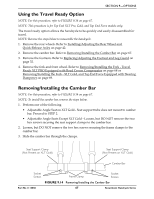
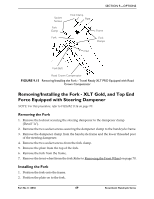
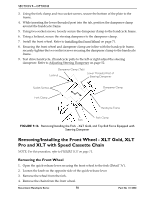
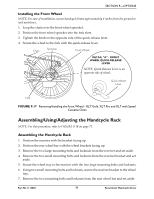
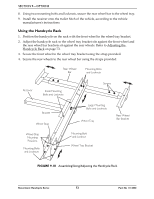
SECTION 9-OPTIONS 3. Using the fork clamp and two socket screws, secure the bottom of the plate to the frame. 4. While inserting the lower threaded post into the tab, position the dampener clamp around the handcycle frame. 5. Using two socket screws, loosely secure the dampener clamp to the handcycle frame. 6. Using a locknut, secure the steering dampener to the dampener clamp. 7. Install the front wheel. Refer to Installing the Front Wheel on page 71. 8. Ensuring the front wheel and dampener clamp are inline with the handcycle frame, securely tighten the two socket screws securing the dampener clamp to the handcycle frame. 9. Test drive handcycle, if handcycle pulls to the left or right adjust the steering dampener. Refer to Adjusting Steering Dampener on page 52. Dampener Clamp (Tab) Locknut Lower Threaded Post of Steering Dampener Socket Screws Fork Clamp Dampener Clamp Handcycle Frame Fork Clamp Fork FIGURE 9.16 Removing/Installing the Fork - XLT Gold, and Top End Force Equipped with Steering Dampener Removing/Installing the Front Wheel - XLT Gold, XLT Pro and XLT with Speed Cassette Chain NOTE: For this procedure, refer to FIGURE 9.17 on page 71. Removing the Front Wheel 1. Open the quick‐release lever securing the front wheel to the fork (Detail ʺAʺ). 2. Loosen the knob on the opposite side of the quick‐release lever. 3. Remove the wheel from the fork. 4. Remove the chain from the front wheel. Recumbent Handcycle Series 70 Part No 1114850
-
 1
1 -
2
-
3
-
4
-
5
-
6
-
7
-
8
-
9
-
10
-
11
-
12
-
13
-
14
-
15
-
16
-
17
-
18
-
19
-
20
-
21
-
22
-
23
-
24
-
25
-
26
-
27
-
28
-
29
-
30
-
31
-
32
-
33
-
34
-
35
-
36
-
37
-
38
-
39
-
40
-
41
-
42
-
43
-
44
-
45
-
46
-
47
-
48
-
49
-
50
-
51
-
52
-
53
-
54
-
55
-
56
-
57
-
58
-
59
-
60
-
61
-
62
-
63
-
64
-
 65
65 -
 66
66 -
 67
67 -
 68
68 -
 69
69 -
 70
70 -
 71
71 -
 72
72 -
 73
73 -
 74
74 -
 75
75 -
76
 |
 |
