JVC BR-DV3000UB BR-DV3000U Pro-DV recorder 71 page instruction manual - Page 10
Wireless remote controller
 |
UPC - 046838325595
View all JVC BR-DV3000UB manuals
Add to My Manuals
Save this manual to your list of manuals |
Page 10 highlights
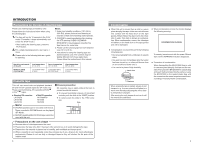
NAMES AND FUNCTIONS OF VARIOUS PARTS - Wireless remote controller - 245 3 9 SET BUTTON 0 ! $ ^ DISPLAY STILL BARS MODE BLANK MENU SEARCH+ AUDIO MUTING SET SEARCH- OUT SEL. OUT LEV. A.DUB PAUSE F.REV PLAY REC F.ADV REW FF STOP INDEX- INDEX+ REMOTE CONTROL UNIT RM-G3000 1 6 7 8 @ # & % 1 OPERATE button f Press this button to turn on the power of the unit. (OPERATE ON) Press this button again to turn off the power. (OPERATE OFF) 2 DISPLAY button Use this button to turn on/off, the on-screen (e.g. status screen) display on the monitor connected to the VIDEO LINE OUT terminal and Y/C OUT terminal. Each time this button is pressed, the display mode changes in the following sequence: ON (always display) ¥ AUTO (display when switching mode) ¥ OFF. ☞ Page 18, "On-screen display" 3 BARS button When this button is pressed in the Stop or RECPause mode, the color bar of the built in signal generator will be output. When it is pressed again, the screen returns to the usual display. During DV signal input, the color bar will not be output. Note Please do not use it as the standard signal because the signals are simplified. 4 STILL MODE button Use this button to select images in the STILL mode. When the unit is in the STILL mode, press this button to toggle images in the following sequence. Field image (1st/2nd alternate still) ¥ 1st field image ¥ 2nd field image ¥ frame image 5 BLANK button When the unit enters the STOP mode, press this button to begin a blank search. Once it finds a blank part of the tape, it will enter the STILL mode. ☞ Page 47 6 AUDIO MUTING button During playback, press this button to mute the audio output. Press this button again to re-enable audio output. 7 AUDIO OUT SEL. button When playing back tapes recorded in the 32k mode, use this button to select the audio channel that allows output from the AUDIO OUT terminal. CH1/2 ¥ CH3/4 ¥ MIX 8 AUDIO OUT LEV button Use this button to switch the standard level of the playback or EE audio output (NORMAL or ATT). When it is set to ATT, the output level is reduced by 8dB. 9 Buttons related to menu setting and variable speed playback Ⅵ MENU button When the unit enters the STOP mode and this button is pressed, a menu will be displayed on the monitor connected to the VIDEO LINE OUT or Y/C OUT terminal. When the menu is displayed, press this button to return to the usual screen display. Ⅵ SEARCH+ / ᮡ button • During playback, STILL mode or variable speed playback in the forward direction, press this button to speed up playback. • During reverse playback or variable speed playback in the reverse direction, press this button to slow down the playback speed. (☞ page 46) • When the menu is displayed, use this button to select the menu items or setting values. 16 Ⅵ SEARCH- / ᮢ button • During playback, STILL mode or variable speed playback in the forward direction, press this button to slow down the playback speed. • During reverse playback or variable speed playback in the reverse direction, press this button to speed up the playback speed. (☞ page 46) • When the menu is displayed, use this but- ton to select the menu items or setting values. Ⅵ P / ᮣ button • During reverse payback/ variable-speed playback, press this button to execute forward playback. • When the menu is displayed, use this button to display the selected menu items. During date/time or time code setup, press this button to move the cursor to the right. Ⅵ p / ᮤ button • During forward playback/ variable-speed playback, press this button to execute reverse playback. • When the menu is displayed, press this button to display the previous menu. During date/time or time code setup, press this button to move the cursor to the left. Ⅵ SET button During menu display, press this button to confirm the menu items or setting values. 0 A. DUB button Press this button to perform audio dubbing (af- ter-recording). ☞ Page 39, "Audio dubbing" ! PAUSE button During recording, audio dubbing or playback, press this button to pause recording or enter the STILL mode. If this button is pressed in the STOP mode, the STILL mode will be engaged. @ REC button ● Hold down this button and press the PLAY button to begin recording. ● During recording, press this button to record an index on the tape (when the INDEX WRITE item of the SYSTEM menu is set to ON). ● When the unit enters the STOP mode, holding this button down will enable you to check the value of the time code generator. # F. ADV button Each time this button is pressed in the STILL mode, the image is advanced one frame. When holding down this button, the image is advanced continuously frame by frame. $ F. REV button Each time this button is pressed in the STILL mode, the image is reversed one frame. When holding down this button, the image is reversed continuously frame by frame. Memo The image of frame advance playback or frame reverse playback can be selected with the STL/F.ADV MODE item of the SYSTEM menu or the STILL MODE button on the wireless remote controller. % INDEX+ button Press this button to perform an index search in the forward direction. ☞ Page 47 ^ INDEX- button Press this button to perform an index search in the reverse direction. ☞ Page 47 & Operation buttons Ⅵ PLAY( ᮣ ) button • Press this button to play back. • Press this button to resume recording from the PAUSE mode. Ⅵ FF( ᮣᮣ ) button • Press this button to fast-forward the tape when the unit is in the STOP mode. • Press this button to execute fast-forward playback in the PLAY or STILL mode. Ⅵ REW( ᮤᮤ ) button • Press this button to rewind the tape when the unit is in the STOP mode. • Press this button to execute reverse playback in the PLAY or STILL mode. Ⅵ STOP( Ⅵ ) button • Press this button to stop the tape. 17
-
 1
1 -
2
-
3
-
4
-
 5
5 -
 6
6 -
 7
7 -
 8
8 -
 9
9 -
 10
10 -
 11
11 -
 12
12 -
 13
13 -
 14
14 -
 15
15 -
16
-
17
-
18
-
19
-
20
-
21
-
22
-
23
-
24
-
25
-
26
-
27
-
28
-
29
-
30
-
31
-
32
-
33
-
34
-
35
-
36
-
37
 |
 |
