JVC BR-DV3000UB BR-DV3000U Pro-DV recorder 71 page instruction manual - Page 11
On-screen Displa
 |
UPC - 046838325595
View all JVC BR-DV3000UB manuals
Add to My Manuals
Save this manual to your list of manuals |
Page 11 highlights
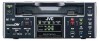
ON-SCREEN DISPLAY - Regarding on-screen display - Besides E-E images and playback images, the monitor connected to the VIDEO LINE OUT terminal and Y/ C OUT terminal provides the following on-screen information. Wireless remote controller Display (1/2) menu screen DISPLAY BUTTON MENU BUTTON DISPLAY STILL BARS MODE BLANK MENU SEARCH+ AUDIO MUTING SET SEARCH- OUT SEL. OUT LEV. ---D I SPLAY [ 1 / 2 ] --- D I PLAY COUNTER POS I . T I ME CODE V T R MODE TAPE REMA I N T I ME DATE AUD I O I NFO . NEXT PAGE PAGE BACK ON L OWER - R ON ON OFF DA T E + TM CH+RATE Set at ON or AUTO A.DUB PAUSE REC On-screen display Status display Event display Alarm display Warning display Menu display Contents It displays the setting status of date/ time, time code and VTR operation mode. It displays the operating status of the blank search, index recording/search, or the wireless remote control. It displays alarm messages upon operation errors or if the unit is in a poor state for operation. It displays warning messages with error codes in the event of VTR anoma- lies. (☞ Page 66) It displays the menu setting screen. (☞ Page 53) Method Main unit Set the DISPLAY item of the DISPLAY (1/2) menu as follows: ON : Always display. Depending on the items, Event and Alarm displays are shown for about 3 seconds. AUTO : It displays for about 4 seconds after switching between modes. OFF : No on-screen display. Remote controller The display can be turned ON/OFF with the DISPLAY button. Each time the DISPLAY button is pressed, the display mode changes in the following sequence: ON (Always display) ¥AUTO ¥ OFF. *The settings for the DISPLAY menu items will also change accordingly. It is displayed automatically when anomalies happen. Main unit If no cassette is loaded and the EJECT button is pressed for at least 2 seconds, the menu will be displayed. Remote controller If the unit is in the STOP mode and the MENU button is pressed, the menu screen will be displayed. 18 ON-SCREEN DISPLAY - Status display - Ⅵ Status display: It displays the current settings and operating status. 1 3 2K CH- 1 / 2 S P000m i n 2 04 / 01 / 02 11 : 20 : 00 S T ANDBY -OF F TCR 0 2 : 0 0 : 0 0 : 0 0 No. Item Content 1 Sampling frequency/audio • Sampling frequency output CH During recording, the setting value of the AUDIO MODE item of the AUDIO/VIDEO menu is displayed (32k or 48k). Memo During playback, the sampling frequency of the sound recorded on the tape is displayed (32k, 48k, 44.1k). If the time code display position is set to the upper left, this item will be displayed on the lower right. During DV signal input, the sampling frequency of the sound input is displayed. • A.LOCK Lights up when the video and audio sampling clocks (at 48kHz) are synchronized in the PLAY mode. Lights up in the RECORDING mode and EE mode. Does not light up when the sampling rate is 32kHz or 44.1 kHz. • Audio output channel During recording, the audio channel recorded on the tape is displayed. During playback, the audio channel output from the AUDIO OUT terminal is displayed (CH1/2, CH3/4, MIX). (only in 32k mode) • The AUDIO INFO item of the DISPLAY menu can be set to activate/deactivate the display. 2 Date/time Memo If the display position of the time code is set to the lower left, this item will be displayed on the lower right. • It displays the date (MM/DD/YY) and time (HR:MM:SS). • When the unit is in the RECORDING or STOP mode, it displays the data of the built-in clock. • During playback, fast forward or rewind, the data recorded on the tape is displayed. • During DV signal recording, the data from the DV terminal is displayed. If the REC button is pressed in the STOP mode, the input data from the DV terminal will be displayed. • The style for displaying the date and time can be selected from the DATE STYLE and TIME STYLE items of the DISPLAY menu. • The TIME/DATE setting of the DISPLAY menu can be set to turn on/off the date and time display or to select the style. • When the data/time is not set, "- -" will be displayed. If a tape with no date and time data is played, "- -" will be displayed. 19
-
 1
1 -
2
-
3
-
4
-
5
-
 6
6 -
 7
7 -
 8
8 -
 9
9 -
 10
10 -
 11
11 -
 12
12 -
 13
13 -
 14
14 -
 15
15 -
 16
16 -
17
-
18
-
19
-
20
-
21
-
22
-
23
-
24
-
25
-
26
-
27
-
28
-
29
-
30
-
31
-
32
-
33
-
34
-
35
-
36
-
37
 |
 |
