JVC BR-DV3000UB BR-DV3000U Pro-DV recorder 71 page instruction manual - Page 15
Switching on the power, urning off the po, Connecting to the A, C adapter
 |
UPC - 046838325595
View all JVC BR-DV3000UB manuals
Add to My Manuals
Save this manual to your list of manuals |
Page 15 highlights
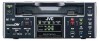
PREPARATION - Power - Connecting to the AC adapter Connect the provided AC adapter to the main unit. DV IN/OUT AUDIO CH 1/3 CH 2/4 LINE VIDEO Y/C OUT IN REMOTE DC12V NTSC/PAL 9PIN SERIAL NTSC PAL DC IN terminal Screw Clamp Provided AC adapter AC Provided power cord DC cord OPERATE indicator OPERATE Mini A.DUB PROFESSIONAL MIC REMOTE SEL. INPUT SEL. SERIAL LINE 9PIN WIRELESS DV Y/C DVCAM NTSC PAL REC INH. CH-1/3 CH-2/4 BR-DV3000 OPERATE button Memo • Even in the OPERATE OFF mode, a small amount of electricity will still flow into the unit. • When the unit is in the OPERATE OFF mode, no operation can be performed except that of the OPERATE buttons(on the main unit and the remote controller) and cassette loading/ejecting. Notes 1. Connect the DC cord of the AC adapter to the DC IN terminal of the main unit. 2. To prevent accidental disconnection of the DC cord, fasten the DC cord with a clamp. 1Remove 1 screw followed by the clamp. 2Insert the DC cord into the clamp and fasten the clamp unto the main unit. 3. Connect the provided power cord to the AC IN terminal of the AC adapter. 4. Connect the power cord to the power socket. • Power is channeled into the unit and the OPERATE indicator lights up red (OPERATE OFF mode). • If the DC IN MODE item of the SYSTEM (2/ 2) menu is set to OPE ON or PLAY, the OPERATE indicator will light up green (OPERATE ON mode). If it is set to PLAY, the VTR will automatically start to play the loaded tape. LOW VOLTAGE • Please supply power to the unit via the provided AC adapter. Do not use other power sources. • During recording or playback, please do not unplug the DC or power cord. • When the supply voltage is low, the "LOW VOLTAGE" alarm mes- sage will be displayed. ☞ Page 66 Alarm message 26 Switching on the power OPERATE indicator OPERATE Mini A.DUB PROFESSIONAL MIC REMOTE SEL. SERIAL INPUT SEL. LINE 9PIN WIRELESS DV Y/C DVCAM NTSC PAL REC INH. CH-1/3 CH-2/4 BR-DV3000 OPERATE button DISPLAY STILL BARS MODE BLANK MENU SEARCH+ AUDIO MUTING SET SEARCH- OUT SEL. OUT LEV. A.DUB PAUSE F.REV PLAY REC F.ADV REW FF STOP INDEX- INDEX+ REMOTE CONTROL UNIT RM-G3000 REC PLAY REW STO Ⅵ When the unit is in the OPERATE OFF mode (the OPERATE indicator lights up red), press the OPERATE button on the unit or the remote controller. • The power is turned on and the OPERATE indicator lights up green. The unit is now ready for operation. (OPERATE ON mode) Memo • Once a cassette has been loaded in the OPERATE OFF mode, power will be turned on and the OPERATE ON mode will be engaged. • The remote controller is only effective when the REMOTE SEL. switch is set to WIRELESS. Turning off the power Ⅵ Stop all operational activities of the unit. 1. Press the OPERATE button on the unit or the remote controller. • The unit will enter the OPERATE OFF mode and the OPERATE indicator will light up red. 2. If the unit is not to be used for a long period of time, please unplug the AC adapter. • To disconnect the AC adapter, please unplug the power cord from the socket first. 27
-
 1
1 -
2
-
3
-
4
-
5
-
6
-
7
-
8
-
9
-
 10
10 -
 11
11 -
 12
12 -
 13
13 -
 14
14 -
 15
15 -
 16
16 -
 17
17 -
 18
18 -
 19
19 -
 20
20 -
21
-
22
-
23
-
24
-
25
-
26
-
27
-
28
-
29
-
30
-
31
-
32
-
33
-
34
-
35
-
36
-
37
 |
 |
