JVC HD100 Instructions - Page 39
About Warning Indicators, Actions to Be Taken for Warning Mode
 |
UPC - 046838032745
View all JVC HD100 manuals
Add to My Manuals
Save this manual to your list of manuals |
Page 39 highlights
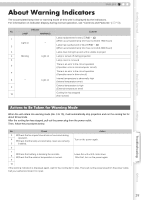
Getting Started Preparation Basic Operation ENGLISH About Warning Indicators The accumulated lamp time or warning mode of this unit is displayed by the indicators. For information on indicator display during normal operation, see "Controls and Features" (pP10). Indicator No. LAMP WARNING Content 1 Light on 2 Lamp replacement is near (pP40 f 42) (When accumulated lamp time has exceeded 1900 hours) b Lamp has reached end of life (pP40 f 42) (When accumulated lamp time has exceeded 2000 hours) 3 Lamp does not light up and unit is unable to project 4 Blinking Light on Lamp is turned off during projection 5 Lamp cover is removed There is an error in the circuit operation 6 (Operation error in microcomputer circuit) There is an error in the circuit operation 7 (Operation error in drive circuit) 8 b Light on Internal temperature is abnormally high (Internal temperature error) External temperature is high 9 (External temperature error) Cooling fan has stopped 10 (Fan locked) Actions to Be Taken for Warning Mode When the unit enters into warning mode (No. 3 to 10), it will automatically stop projection and run the cooling fan for about 60 seconds. After the cooling fan has stopped, pull out the power plug from the power outlet. Then, follow the procedures below. No. Check 3 z Check that an impact shock has not occurred during 4 operation. z Check that the lamp unit and lamp cover are correctly 5 installed. Action Turn on the power again. 6 7 z Check that nothing is blocking the air inlets. 8 z Check that the external temperature is normal. 9 Leave the unit until it cools down. After that, turn on the power again. 10 If the warning indication is displayed again, wait for the cooling fan to stop. Then pull out the power plug from the power outlet. Call your authorized dealer for repair. Settings Troubleshooting Others 39
-
 1
1 -
2
-
3
-
4
-
5
-
6
-
7
-
8
-
9
-
10
-
11
-
12
-
13
-
14
-
15
-
16
-
17
-
18
-
19
-
20
-
21
-
22
-
23
-
24
-
25
-
26
-
27
-
28
-
29
-
30
-
31
-
32
-
33
-
 34
34 -
 35
35 -
 36
36 -
 37
37 -
 38
38 -
 39
39 -
 40
40 -
 41
41 -
 42
42 -
 43
43 -
 44
44 -
45
-
46
-
47
-
48
-
49
-
50
-
51
-
52
-
53
-
54
-
55
 |
 |