JVC KD-ADV38 Instructions
JVC KD-ADV38 - DVD Player With LCD monitor Manual
 |
UPC - 046838030499
View all JVC KD-ADV38 manuals
Add to My Manuals
Save this manual to your list of manuals |
JVC KD-ADV38 manual content summary:
- JVC KD-ADV38 | Instructions - Page 1
DVD/CD RECEIVER RECEPTOR CON DVD/CD RÉCEPTEUR DVD/CD KD-ADV38/KD-AVX33 KD-ADV38 KD-AVX33 For canceling the display demonstration, see page 5. Para cancelar la demonstración en pantalla, consulte la página 5. Pour annuler la démonstration des affichages, référez-vous à la page 5. For installation - JVC KD-ADV38 | Instructions - Page 2
the dealer or an experienced radio/TV technician for help. Caution Changes or modifications not approved by JVC could void the user's authority to operate the equipment. [European Union only] WARNINGS: To prevent accidents and damage • DO NOT install any unit and wire any cable in locations where - JVC KD-ADV38 | Instructions - Page 3
radio 10 Disc operations 13 Dual Zone operations 26 USB operations 29 Bluetooth® operations- Cellular phone/audio player .......... 31 • If this does not work, reset the unit until the temperature in the car becomes normal before operating the unit. This product incorporates copyright protection - JVC KD-ADV38 | Instructions - Page 4
ENGLISH Playable disc type Disc type DVD Recording format, file type, etc. DVD Video (Region Code: 1)*1 Playable DVD Audio DVD-ROM DVD Recordable/Rewritable DVD Video (DVD-R*2/-RW, +R/+RW*3) DVD-VR (non-CPRM only) • DVD Video: UDF bridge DivX/MPEG1/MPEG2 • DVD-VR • DivX/MPEG1/MPEG2/JPEG/ - JVC KD-ADV38 | Instructions - Page 5
unit; however, the buttons on the remote controller can work in the same way if they have the same names or marks. Setup menu icon AV Menu Setup ENT Enter Currently selected menu Indication language: ~ Turn on the power. Ÿ Display . ! Enter the menu. In this manual, English - JVC KD-ADV38 | Instructions - Page 6
menu. fl Select . & Activate the screen. ‡ Select the setting. • Off: The clock time is not displayed while playing back a video source. • On: The clock time is displayed while playing back - JVC KD-ADV38 | Instructions - Page 7
(SIRIUS/XM) = DISC (DVD/VCD/CD) = USB =CD-CH, iPod, D.PLAYER, or EXT-IN =Bluetooth Phone =Bluetooth Audio = AV-IN =(back to the beginning) • You cannot select these sources if they are not ready. • Turn on the power. • Turn off the power [Hold]. • Display or erase *1. • Activate Voice - JVC KD-ADV38 | Instructions - Page 8
the Installation/Connection Manual (separate i ; volume) for connection. Caution: • Do not expose batteries to heat or flame. o a s IMPORTANT: If Dual Zone is activated (☞ page 26), the remote controller functions only for operating the DVD/CD player. 1*1 • Turns on the power. • Attenuates - JVC KD-ADV38 | Instructions - Page 9
/USB • 5 / ∞: Selects a category. • 4 / ¢: operations s • DVD Video: Selects audio language ( ), - Selects a channel rapidly if pressed and held. subtitles ( ), angle ( ). - Selects a channel if pressed. • DVD Audio: Selects audio stream ( ). For Apple iPod/JVC D. player operations: • DVD - JVC KD-ADV38 | Instructions - Page 10
: Hold either 4 or ¢ until "Manual Search" appears on the display, then press it repeatedly. • The ST indicator lights up when receiving an FM stereo broadcast with sufficient signal strength. When an FM stereo broadcast is hard to receive 1 AV Menu Setup ENT Enter 2 AV Menu 4 Mono Off On ENT - JVC KD-ADV38 | Instructions - Page 11
works only for FM bands. You can preset six stations for each band. 1 AV Menu Setup ENT Enter 2 AV Menu Setup ENT Enter 2 AV Menu Mode ENT Enter Mode menu icon 3 Mode Mono DX/Local SSM Title Entry DX detected. • The DX indicator goes off, then the LO indicator lights up. 11 OPERATIONS - JVC KD-ADV38 | Instructions - Page 12
ENGLISH Manual presetting Ex.: Storing FM station of 92.5 MHz into preset number , you can change the FM bands. • Preset List can also be accessed through = . (☞ right ) Selecting preset stations On the remote: 1 2 or On the unit: or 1 FM1 1 87.5 2 89.9 3 97.9 4 92.5 5 108.0 - JVC KD-ADV38 | Instructions - Page 13
the source or eject the disc. If " " appears on the monitor, the unit cannot accept the operation you have tried to do. • In some cases, without showing the control panel. Caution on volume setting: Discs and connected USB devices produce very little noise compared with other sources. Lower the - JVC KD-ADV38 | Instructions - Page 14
following discs, press . • Each time you press the button, playback picture and disc information screens appear alternately. Disc type Audio format Surround mode DVD VIDEO DIGITAL MULTI T 01 C 02 0:45:38 CHAP. RPT 3: 45PM 4 ¢ Press: Select chapter Playback mode Hold: Reverse/forward search - JVC KD-ADV38 | Instructions - Page 15
ENGLISH DVD DivX FRONT 2CH T 01 C 02 0:45:38 Current Folder Name Current File Name : Display Folder List For DivX/MPEG: Folder no./Track no./Playing time For JPEG: Folder no./File no. PBC indicator lights up when PBC is in use. ☞ page 46 VCD PBC FLAT 02 0:45:38 3: 45PM 4 ¢ Press: Select - JVC KD-ADV38 | Instructions - Page 16
Title RPT 3: 45PM 4 ¢ Press: Select track Hold: Reverse/forward search*1 Disc title/Artist Name/Track title Track no./Playing time (only for CD Text)*3 Audio format (MP3/WMA/WAV/AAC) ☞ page 46 CD MP3 FLAT T 01 02 0:45:38 Current Folder Name Current File Name.mp3 RPT 3: 45PM 4 ¢ Press - JVC KD-ADV38 | Instructions - Page 17
3 Mode All Off Intro Repeat Random Off Setup ENT Enter 2 AV Menu Mode ENT Enter Mode menu icon 4 Repeat Off Track Folder ENT Set When one of the playback modes is selected, the corresponding indicator lights up on the disc information screen. To cancel, select in step 3 or - JVC KD-ADV38 | Instructions - Page 18
start playing. File List Song011.mp3 Song012.mp3 Song013.mp3 Song014.mp3 Song015.mp3 Off Song016.mp3 ENT • Folder List can also be accessed through = . AV Menu Setup AV Menu ENT Enter List ENT Enter List menu icon 18 - JVC KD-ADV38 | Instructions - Page 19
playing). 1 (twice) = = : 2 Select an item you want Select title (during playback or pause). to start playback. : Select aspect ratio. : Select audio language. 3 *1 : Select subtitle language. : Select view angle. *1 Erases the misentry of the number. *2 Search speed: x2 ] x5 ] x10 ] x20 - JVC KD-ADV38 | Instructions - Page 20
). Hold: Reverse/forward search.*6 Select program. : Select play list (during playback or pause). : Select aspect ratio. : Select audio channel (ST: stereo, L: left, R: Right). : Turn on/off subtitle. = = : Select chapter. Select program (when not playing). (twice) = = : Select program/play - JVC KD-ADV38 | Instructions - Page 21
Hold: Reverse/forward search.*6 (No 1 sound can be heard.) : Select aspect ratio. 2 Start the desired track. : Select audio channel (ST: stereo, L: left, R: = = Right). • To resume PBC, press / . : Stop playback. : Start playback/Pause (if pressed during playback). : Reverse/forward - JVC KD-ADV38 | Instructions - Page 22
can also be used for "USB." MULTI: For multi-channel encoded sources such as Dolby Digital*1, DTS*2, and DVD Audio. (When activated, "MULTI" instructions shown on the monitor. Selecting browsable still picture When a disc including browsable still pictures is detected, the B.S.P indicator lights - JVC KD-ADV38 | Instructions - Page 23
ENT Set • Auto: When multi-channel digital signals come in, "MULTI" surround is activated. When 2-channel or 2.1-channel signals come in, "4CH STEREO" is activated. • Through: All incoming channel signals are sent to the corresponding speakers. • Dolby PLIIMovie: Activates Dolby Pro Logic II Movie - JVC KD-ADV38 | Instructions - Page 24
ENGLISH Operations using the on-screen bar (DVD/VCD/DivX/MPEG1/MPEG2/ JPEG) These operations are possible on the monitor using the remote controller. 1 Display the on-screen bar. (☞ page 25) 2 Select an - JVC KD-ADV38 | Instructions - Page 25
Items shown on the bar vary due to the disc type. 1 Disc type 2 • DVD: Audio signal format • VCD: PBC 3 Playback mode*1 DVD Video: T. RPT: Title repeat C. RPT: Chapter repeat DVD Audio: T. RPT: Track repeat DVD-VR: C. RPT: Chapter repeat PG. RPT: Program repeat DivX/MPEG: T. RPT: Track - JVC KD-ADV38 | Instructions - Page 26
VIDEO OUT and 2nd AUDIO OUT plugs, while listening to any other source than "USB" through the speakers. • When Dual Zone is in use, you can only operate the DVD/CD player using the remote controller. 1 AV DISC." * DVD VIDEO DIGITAL FLAT DUAL-S 2 T 01 C 02 0:45:38 *1 JVC original headphone - JVC KD-ADV38 | Instructions - Page 27
ENGLISH 1 Current folder (highlighted bar) 2 Current folder number/total folder number 3 Folder list * If tag data includes "Jacket Picture" (baseline JPEG), it will be displayed. If you press OSD, the playback mode selection window appears. (☞ below) 4 Selected playback mode (☞ below) 5 Elapsed - JVC KD-ADV38 | Instructions - Page 28
06/25 L-1 Time 19:00 10:30 17:00 13:19 22:00 8:23 Title JVC DVD World 2004 Music Festival children 001 children 002 PLAY LIST No Date 1 07/05/25 2 005 003 001 Length 1:03:16 1:35:25 0:10:23 0:07:19 Title My JVC World Favorite music children001-002 Folder : 144/240 Track 144/198 Page : 4/5 - JVC KD-ADV38 | Instructions - Page 29
You can connect a USB mass storage class device such as a USB memory, Digital Audio player*1, portable HDD, etc. to the unit. ~ Connect a USB device. USB cable from the rear of the unit. • You cannot connect a computer to the USB ( ) terminal of the unit. Ÿ Select "USB". 4 ¢ Press: Select track - JVC KD-ADV38 | Instructions - Page 30
data. • Do not leave a USB device in the car, expose to direct sunlight, or AV Menu Setup ENT Enter 2 AV Menu Mode Mode menu icon ENT Enter 3 Mode All Off Intro Repeat Random Off 4 Repeat Off Track Folder ENT Set When one of the playback modes is selected, the corresponding indicator lights - JVC KD-ADV38 | Instructions - Page 31
) to see the countries where you may use the Bluetooth® function. Bluetooth profile This unit supports the following Bluetooth profiles; HSP (Headset Profile) HFP (Hands-Free Profile) A2DP (Advanced Audio Distribution Profile) AVRCP (Audio/Video Remote Control Profile) SPP (Serial Port Profile) OPP - JVC KD-ADV38 | Instructions - Page 32
Unfound" appears.) 2 Select a device you want to connect. 3 Enter the specific PIN code of the device to the unit. • Refer to the instructions supplied with the device to check the PIN code. 4 Use the Bluetooth device to connect. Now connection is established and you can use the device through the - JVC KD-ADV38 | Instructions - Page 33
... 1 NEW DEVICE Dial Menu Message Open Search Special Device The unit displays the list of the preset devices. 2 Select a device you want to connect. Deleting a registered device 1 Select "Bluetooth Phone" or "Bluetooth Audio," then select a registered device you want to delete. 2 Perform steps - JVC KD-ADV38 | Instructions - Page 34
can adjust the microphone volume level. (☞ page 57) To end the call or reject an incoming call Hold any button (except ATT or +/-). Name and phone number (if acquired) The source is automatically changed to "Bluetooth Phone". When is activated... The unit answers the incoming calls - JVC KD-ADV38 | Instructions - Page 35
through the unit. When is set to ... To read the message While "Receiving Message" is displayed... • The source is changed to "Bluetooth Phone." phone book memory of the cellular phone to this unit. (Refer to the instruction manual supplied with your cellular phone.) - With some - JVC KD-ADV38 | Instructions - Page 36
be also accessed through = = . AV Menu Setup AV Menu ENT Enter Bluetooth ENT Enter Bluetooth menu icon Direct operations number 4. To call a preset number On the remote: On the unit: 1 Preset List 1 11122223333 2 22233336666 3 44455556666 4 09845671234 5 - JVC KD-ADV38 | Instructions - Page 37
operations. For details, ☞ pages 8 and 9. ENGLISH Setup AV Menu ENT Enter List ENT Enter List menu icon Using the Bluetooth audio player Reverse/forward skip POWER]ON Turns Blue when the Bluetooth device is connected. *1 Bluetooth Audio FLAT Connected device name 3: 45PM ☞ page 46 - JVC KD-ADV38 | Instructions - Page 38
∞ Press: Select track Hold: Reverse/forward search Press: Select folder (MP3 only) Hold: Display Disc List It is recommended to use a JVC MP3-compatible CD changer with your unit. • You can play only CDs (CD-DA) and MP3 discs. Preparation: Make sure is selected for the external input - JVC KD-ADV38 | Instructions - Page 39
Setup ENT Enter 2 AV Menu Mode ENT Enter Mode menu icon 3 Mode All Off Intro Repeat Random Off 4 Repeat Off Track Disc ENT Set When one of the playback modes is selected, the corresponding indicator lights up on the monitor. To cancel, select in step 3 or in step 4. Disc - JVC KD-ADV38 | Instructions - Page 40
following (separately purchased) to the CD changer jack on the rear of this unit. • JVC SIRIUS radio DLP-Down Link Processor, for listening to the SIRIUS Satellite radio. • XMDirectTM Universal Tuner Box-With a JVC Smart Digital Adapter (XMDJVC100: not supplied), for listening to the XM Satellite - JVC KD-ADV38 | Instructions - Page 41
the display to program information-artist name/song name (/composer name: only for SIRIUS Satellite radio). POWER]ON SIRIUS/XM Band Preset no. ☞ page 46 Channel no. ENGLISH For SIRIUS Radio ~ Select "SAT." Ÿ Select the bands. SAT FLAT XM1 Preset1 01ch Category Name Channel Name 3: 45PM - JVC KD-ADV38 | Instructions - Page 42
1 Channel Name 2 The City 3 40 at 40 4 Hank's Place 5 Audio Visions 6 Preview ENT 4 SAT FLAT XM1 Preset4 3Bch Rock XM Music Club 3: the following lists-Preset list/Category list/Channel list. 1 AV Menu Setup ENT Enter 2 AV Menu List ENT Enter List menu icon 3 Select a desired - JVC KD-ADV38 | Instructions - Page 43
the iPod/D. player POWER]ON Track no./Playing time ☞ page 46 4 ¢: Press: Select track Hold: Reverse/forward search 5 ∞ 5 : Enter player's menu ∞ : Pause/stop playback • To resume, press again. It is required to connect the interface adapter (KSPD100 for Apple iPod or KS-PD500 for JVC D. player) to - JVC KD-ADV38 | Instructions - Page 44
VIDEO IN plug so that you can watch the navigation screen (Make sure is selected for ). (☞ page 53) POWER]ON Assigned title (☞ page 47) ☞ page 46 AV-IN FLAT AV is selected for ... • You can use the source "AV-IN" for listening to an audio source connected to the - JVC KD-ADV38 | Instructions - Page 45
to the CD changer jack on the rear using the Line Input Adapter-KS-U57 (not supplied) or AUX Input Adapter-KS-U58 (not supplied). POWER]ON Assigned title (☞ page 47) ☞ page 46 EXT-IN FLAT EXT-INPUT 3: 45PM Preparation: Make sure is selected for the external input setting - JVC KD-ADV38 | Instructions - Page 46
ENGLISH Sound equalization POWER]ON Edit 60.0 Hz +03 ENT Store Selecting sound mode ~ AV Menu Ÿ Setup ENT Enter Equalizer menu icon AV Menu Storing your own adjustment You can store your adjustment into User1, User2, and User3. 1 Repeat steps ~ and Ÿ, then in step !... Equalizer Flat Hard - JVC KD-ADV38 | Instructions - Page 47
ENGLISH Assigning titles to the sources POWER]ON Press: Change character set Hold: Erase title Title Entry Station Name ABC Radio DISP A a 0 Á á ENT Store You can assign titles as follows. FM/AM stations Up to 16 characters-up to 30 stations AV-IN EXT-IN Up to 16 characters • If you try to - JVC KD-ADV38 | Instructions - Page 48
Menu operations POWER]ON Setup Equalizer Sound AV Menu Disc Surround Setup ENT Enter Mode Ex. Changing the setting ~ AV Menu Setup ENT Enter Non-available items will be displayed being shaded. Ÿ Sound menu icon AV Menu Sound ENT Enter List Bluetooth Dual Zone - JVC KD-ADV38 | Instructions - Page 49
Auto : Repeats scrolling (5-second intervals). • Holding DISP (on the unit) scrolls the information regardless of this setting. Tag Display Off : Cancels required. (☞ Installation/Connection Manual) *2 Adjustable only when the source is a disc or USB containing pictures or movies, or "AV-IN." - JVC KD-ADV38 | Instructions - Page 50
to the incoming signals. • For the other video sources: Aspect ratio is fixed to . Regular audio sources. *4 After you change the indication language setting, turn off then on the power so that your setting takes effect. *5 Appears only when SIRIUS Satellite Radio or XM Satellite Radio - JVC KD-ADV38 | Instructions - Page 51
of files. You can store this setting separately for each source -"DISC/ USB." Audio : Plays back audio files. Still Picture : Plays back JPEG files. Video : Plays back DivX/MPEG1/MPEG2 files. DivX Regist. (Registration) This unit has its own Registration Code. Once you have played back a file with - JVC KD-ADV38 | Instructions - Page 52
D. (Dynamic) Range Compres. (Compression)*7 You can enjoy a powerful sound at a low volume level while playing Dolby Digital software. Auto ). • Press and hold DISP to change the measuring unit-cm and inch. *7 Selectable only for "DISC" and "USB." (Playback stops when you select one of the items - JVC KD-ADV38 | Instructions - Page 53
, iPod, or D. player ☞ [38, 43] External Input : Any other than the above. ☞ [45] • For connecting JVC DLP/XMDJVC100, this setting is not required. It is automatically detected. *10 Appears only when SIRIUS Satellite Radio is connected. *11 Reverse lamp lead connection is required. See Installation - JVC KD-ADV38 | Instructions - Page 54
using the cellular phone. Initialize Initialize all settings you have made in . Press ENT, then reset the unit. (☞ page 3) *14 The TEL MUTING lead connection is required. See Installation/Connection Manual (separate volume). Equalizer Flat/Hard Rock/R&B/Pop/Jazz/Dance/Country/Reggae - JVC KD-ADV38 | Instructions - Page 55
unit. Off : Deactivates the built-in amplifier. Low Power : VOL 00 to 30 (Select this if the maximum power of the speakers is less than 50 W.) High Power 11] Only for FM/AM stations, AV-IN and EXT-IN. ☞ [47] All Off/Intro/Repeat/Random Only for disc/USB playback and iPod/D. player. ☞ [17, 30, 39, 43 - JVC KD-ADV38 | Instructions - Page 56
. *20 Selectable only for "Bluetooth Phone" or "Bluetooth Audio." Select a device (or "NEW DEVICE") before operating the menu. *21 Selectable only when the device is compatible with Text Message. When operating the Bluetooth device, refer also to the instructions supplied with the device. 56 - JVC KD-ADV38 | Instructions - Page 57
message by ringing and displaying "Receiving Message." To read the message, press ENT (☞ page 35). Manual : The unit does not inform you the arrival of a message. MIC Setting*23 Adjust microphone volume connected to the unit. 01, 02, 03 Version*24 The Bluetooth software and hardware versions are - JVC KD-ADV38 | Instructions - Page 58
etc.) to clean discs. Connector Moisture condensation Moisture may condense on the lens inside the unit in the following cases: • After starting the heater in the car. • If it becomes very humid inside the car. Should this occur, the unit may malfunction. In this case, eject the disc and leave the - JVC KD-ADV38 | Instructions - Page 59
or less. • This unit supports DivX 6.x, 5.x, 4.x, and 3.11. • Audio stream should conform to MP3 or Dolby Digital. • The file encoded in the interlaced scanning mode may not be played back correctly. • The maximum bit rate for video signals (average) is as follows: - DVD: 4 Mbps - USB: 2 Mbps 59 - JVC KD-ADV38 | Instructions - Page 60
Audio streams should conform to MPEG1 Audio Layer-2 or Dolby Digital. • The maximum bit rate for video signals (average) is as follows: - DVD: 4 Mbps - USB: 2 Mbps Playing JPEG files • This unit -channel DVD Video, DivX 2-channel and MPEG 2-channel sources. If is selected, stereo sounds - JVC KD-ADV38 | Instructions - Page 61
using a USB extension cord. • This unit cannot assure proper functions or supply power to all types of the devices. • This unit can recognize a total of 5 000 files and 250 folders (a maximum of 999 files per folder). • This unit can recognize a total 25 characters for file/ folder names. Bluetooth - JVC KD-ADV38 | Instructions - Page 62
operating an iPod or a D. player, some operations may not be performed correctly or as intended. In this case, visit the following JVC web site: For iPod users: For D. player users: - JVC KD-ADV38 | Instructions - Page 63
00 • "DVD Logo" is a trademark of DVD Format/Logo video (including DivX® 6) with enhanced playback of DivX® media files and the DivX® Media Format • Microsoft and Windows Media are either registered trademarks or trademarks of Microsoft Corporation in the United States and/or other countries. • iPod - JVC KD-ADV38 | Instructions - Page 64
ENGLISH Language codes (for DVD/DivX language selection) Code Language Code Language AA Afar FA Persian AB Abkhazian FI Finnish AF Afrikaans FJ Fiji AM Ameharic FO Faroese AR Arabic - JVC KD-ADV38 | Instructions - Page 65
the DVD/CD player.) • Change the source. • Start the playback on the external component connected to VIDEO IN plug. • Check the cords and connections. • Signal input is too weak. Reset the unit. (☞ page 3) Store stations manually. (☞ page 12) • Static noise while listening to the radio. Connect - JVC KD-ADV38 | Instructions - Page 66
Elapsed playing time is not correct. • "Not Support" appears on the monitor and track is skipped. Installation/Connection Manual) • Connect the video back using other players. • Readout time varies depending on the USB device. • Do the power then on again. • Do not pull out or connect the USB device - JVC KD-ADV38 | Instructions - Page 67
try to connect again. (☞ page 33) • Echo or noise occurs. Adjust the microphone unit position. • Phone sound quality is poor. • Reduce the distance between the unit and the Bluetooth audio device. • Move the car to place where you can get a better signal reception. • The sound is interrupted - JVC KD-ADV38 | Instructions - Page 68
text information for the selected channel. The receiver is updating the channel information and it unit is loading the channel information and audio. Text information is temporarily unavailable. Reconnect this unit and the Satellite radio correctly and reset the unit. Reconnect the Satellite radio - JVC KD-ADV38 | Instructions - Page 69
them again. Check the connection between the adapter and this unit. Reset the iPod or D. player. • Turn on the video component if it is not on. • This unit is not connected to the video component correctly. Connect it correctly. Adjust items in . (☞ page 49) AV-IN 69 REFERENCES - JVC KD-ADV38 | Instructions - Page 70
Video Output (composite): 1 Vp-p/75 Ω Other Terminals: Input: LINE IN, VIDEO IN, MIC IN, USB input terminal, Antenna input Output: 2nd AUDIO OUT, VIDEO 40 Hz to 15 000 Hz Stereo Separation: 35 dB AM Tuner laser) Frequency Response: DVD, fs=48 kHz: 16 Hz to 22 000 Hz DVD, fs=192 kHz: - JVC KD-ADV38 | Instructions - Page 71
Less than 500 mA/5 V Version: Bluetooth 1.2 certified Output Power: +4 dBm Max. (Power class 2) Service Area: Within 10 m (10.9 yd) Profile: HSP (Headset Profile) HFP (Hands-Free Profile) A2DP (Advanced Audio Distribution Profile) AVRCP (Audio/Video Remote Control Profile) SPP (Serial Port - JVC KD-ADV38 | Instructions - Page 72
Having TROUBLE with operation? Please reset your unit Refer to page of How to reset your unit Still having trouble?? USA ONLY Call 1-800-252-5722 http://www.jvc.com We can help you! EN, SP, FR © 2007 Victor Company of Japan, Limited 0207MNMMDWJEIN - JVC KD-ADV38 | Instructions - Page 73
KD-ADV38 KD-AVX33 Installation/Connection Manual Manual de instalación/conexión Manuel d'installation/raccordement ENGLISH ESPAÑOL This unit JVC car audio dealer. • It is recommended to connect to the speakers with maximum power (voir page 55 du MANUEL D'INSTRUCTIONS). • Pour éviter les court- - JVC KD-ADV38 | Instructions - Page 74
installation kits, consult your JVC car audio dealer or a company supplying kits. • If you are not sure how to install this unit correctly, have it installed pouces) *2 Bracket *2 Ménsula *2 Support *2 Bracket *2 Ménsula *2 Support *2 *2 Not included for this unit. *2 No suministrado con esta unidad - JVC KD-ADV38 | Instructions - Page 75
and those of the connector from the car body may be different in color. 1 Connect the colored leads of the power cord in the order specified in the illustration below. 2 Connect the antenna cord. 3 Finally connect the wiring harness to the unit. Conexiones tipicas Antes de la conexión: Verifique - JVC KD-ADV38 | Instructions - Page 76
microphone en utilisant des serre-fils (non fournis). TROUBLESHOOTING • The fuse blows. * Are the red and black leads connected correctly? • Power * Is the rear ground terminal connected to the car's chassis using shorter and thicker cords? • Unit becomes hot. * Is the speaker output lead grounded - JVC KD-ADV38 | Instructions - Page 77
cord (not supplied) *5 Cable de audio (no suministrado) *5 Cordon audio (non fourni) JVC Amplifier Amplificador de JVC JVC Amplificateur Center speaker Altavoz central Enceinte centrale *6 Firmly attach the ground wire to the metallic body or to the chassis of the car-to the place uncoated with - JVC KD-ADV38 | Instructions - Page 78
) Cable de audio (no suministrado) Codon audio (non fourni) External component Componente exterior Appareil extérieur To JVC DLP, XMDJVC100, KD-ADV38 or KD-AVX33 A JVC DLP, XMDJVC100, KD-ADV38 o KD-AVX33 Au JVC DLP, XMDJVC100, KD-ADV38 ou KD-AVX33 or / o / ou 3.5 mm stereo mini plug Miniclavija - JVC KD-ADV38 | Instructions - Page 79
CEPTEUR DVD/CD DVD/CD-RECEIVER KD-AVX33 For canceling the display demonstration, see page 5. Zum Abbrechen der Displaydemonstration siehe Seite 5. Pour annuler la démonstration des affichages, référez-vous à la page 5. Zie bladzijde 5 voor het annuleren van de displaydemonstratie. For installation - JVC KD-ADV38 | Instructions - Page 80
requisitos esenciales y cualesquiera otras disposiciones aplicables o exigibles de la Directiva 1999/5/CE. JVC KD-AVX33 1999/5/ΕΚ. Italiano: Con la presente JVC dichiara che questo KD-AVX33 è conforme ai requisiti essenziali ed alle altre disposizioni pertinenti stabilite dalla direttiva 1999 - JVC KD-ADV38 | Instructions - Page 81
sentliga egenskapskrav och övriga relevanta bestämmelser som framgår av direktiv 1999/5/EG. Lietuviu: Šiuo JVC deklaruoja, kad šis KD-AVX33 atitinka esminius reikalavimus ir kitas 1999/5/EB Direktyvos nuostatas. Íslenska: Hér með lýsir JVC yfir því að KD-AVX33 er í samræmi við grunnkröfur og aðrar - JVC KD-ADV38 | Instructions - Page 82
a JVC product. Please read all instructions carefully before operation, to ensure your complete understanding and to obtain the best possible performance from the unit. IMPORTANT FOR LASER PRODUCTS 1. CLASS 1 LASER PRODUCT 2. CAUTION: Do not open the top cover. There are no user serviceable parts - JVC KD-ADV38 | Instructions - Page 83
radio 10 Disc operations 15 Dual Zone operations 28 USB operations 31 Bluetooth® operations- Cellular phone/audio player .......... 33 • If this does not work, reset the unit until the temperature in the car becomes normal before operating the unit. This product incorporates copyright protection - JVC KD-ADV38 | Instructions - Page 84
ENGLISH Playable disc type Disc type DVD Recording format, file type, etc. DVD Video (Region Code: 2)*1 Playable DVD Audio DVD-ROM DVD Recordable/Rewritable DVD Video (DVD-R*2/-RW, +R/+RW*3) DVD-VR (non-CPRM only) • DVD Video: UDF bridge DivX/MPEG1/MPEG2 • DVD-VR • DivX/MPEG1/MPEG2/JPEG/ - JVC KD-ADV38 | Instructions - Page 85
using the buttons on the unit; however, the buttons on the remote controller can work in the same way if they have the same names or marks. Setup menu icon AV Menu Setup ENT Enter Currently selected menu Indication language: ~ Turn on the power. In this manual, English indications are used for - JVC KD-ADV38 | Instructions - Page 86
auto clock adjustment using the clock time (CT) data from an FM RDS station. * Finish the procedure. To display the clock time while playing back a video source, select = = . 6 - JVC KD-ADV38 | Instructions - Page 87
= DISC (DVD/VCD/CD) = USB =CD-CH, iPod, D.PLAYER, or EXT-IN =Bluetooth Phone =Bluetooth Audio = AV-IN =(back to the beginning) • You cannot select these sources if they are not ready. Activate TA Standby Reception. Show PTY preset list [Hold]. • Turn on the power. • Display or erase - JVC KD-ADV38 | Instructions - Page 88
the Installation/Connection Manual (separate i ; volume) for connection. Caution: • Do not expose batteries to heat or flame. o a s IMPORTANT: If Dual Zone is activated (☞ page 28), the remote controller functions only for operating the DVD/CD player. 1*1 • Turns on the power. • Attenuates - JVC KD-ADV38 | Instructions - Page 89
: Selects the bands. DISC/USB: Stop playback. Bluetooth Phone: Ends the call. Bluetooth Audio: Plays/pauses. On menus: Back. e*2 Adjusts the volume level through the 2nd AUDIO OUT plug. (☞ page 28) r*2 Activates or deactivates Dual Zone. t*1*2 Selects the sound mode. y • DVD Video/DivX 6: Shows the - JVC KD-ADV38 | Instructions - Page 90
: Hold either 4 or ¢ until "Manual Search" appears on the display, then press it repeatedly. • The ST indicator lights up when receiving an FM stereo broadcast with sufficient signal strength. When an FM stereo broadcast is hard to receive 1 AV Menu Setup ENT Enter 2 AV Menu 4 Mono Off On ENT - JVC KD-ADV38 | Instructions - Page 91
detected. • The DX indicator goes off, then the LO indicator lights up. FM station automatic presetting -SSM (Strong-station Sequential Memory) FM bands. You can preset six stations for each band. 1 AV Menu Setup ENT Enter Manual presetting Ex.: Storing FM station of 92.5 MHz into preset number - JVC KD-ADV38 | Instructions - Page 92
features are available only for FM RDS stations. 2 or On the unit: or 1 FM1 1 87.5 2 89.9 3 97.9 4 Preset List can also be accessed through = . AV Menu Setup AV Menu ENT Enter List ENT Enter List menu , Rock Music, Easy Listening, Light Classics M, Serious Classics, Other - JVC KD-ADV38 | Instructions - Page 93
providing the RDS signals. Press to deactivate. Goes off PTY Standby Reception Indicator Activate , then select , (☞ PTY pages 14, 57). The unit will temporarily switch to Lights up your favorite PTY programme from any source other than AM. Not yet activated. Tune - JVC KD-ADV38 | Instructions - Page 94
ENGLISH Activating PTY Standby Reception 1 AV Menu Setup ENT Enter 2 AV Menu Tracing the same programme- Network-Tracking Reception When driving in an area where FM reception is not sufficient enough, this unit automatically tunes in to another FM RDS station of the same network, possibly - JVC KD-ADV38 | Instructions - Page 95
the source or eject the disc. If " " appears on the monitor, the unit cannot accept the operation you have tried to do. • In some cases, without showing the control panel. Caution on volume setting: Discs and connected USB devices produce very little noise compared with other sources. Lower the - JVC KD-ADV38 | Instructions - Page 96
the following discs, press . • Each time you press the button, playback picture and disc information screens appear alternately. Disc type Audio format Surround mode DVD VIDEO DIGITAL MULTI T 01 C 02 0:45:38 CHAP. RPT 15: 45 4 ¢ Press: Select chapter Playback mode Hold: Reverse/forward search - JVC KD-ADV38 | Instructions - Page 97
ENGLISH DVD DivX FRONT 2CH T 01 C 02 0:45:38 Current Folder Name Current File Hold: Display Folder List For DivX/MPEG: Folder no./Track no./Playing time For JPEG: Folder no./File no. PBC indicator lights up when PBC is in use. ☞ page 48 VCD PBC FLAT 02 0:45:38 15: 45 4 ¢ Press: Select - JVC KD-ADV38 | Instructions - Page 98
Title RPT 15: 45 4 ¢ Press: Select track Hold: Reverse/forward search*1 Disc title/Artist Name/Track title Track no./Playing time (only for CD Text)*3 Audio format (MP3/WMA/WAV/AAC) ☞ page 48 CD MP3 FLAT T 01 02 0:45:38 Current Folder Name Current File Name.mp3 RPT 15: 45 4 ¢ Press - JVC KD-ADV38 | Instructions - Page 99
3 Mode All Off Intro Repeat Random Off Setup ENT Enter 2 AV Menu Mode ENT Enter Mode menu icon 4 Repeat Off Track Folder ENT Set When one of the playback modes is selected, the corresponding indicator lights up on the disc information screen. To cancel, select in step 3 or - JVC KD-ADV38 | Instructions - Page 100
start playing. File List Song011.mp3 Song012.mp3 Song013.mp3 Song014.mp3 Song015.mp3 Off Song016.mp3 ENT • Folder List can also be accessed through = . AV Menu Setup AV Menu ENT Enter List ENT Enter List menu icon 20 - JVC KD-ADV38 | Instructions - Page 101
). 1 (twice) = = : 2 Select an item you want Select title (during playback or pause). to start playback. : Select aspect ratio. *1 : Select audio language. 3 : Select subtitle language. : Select view angle. *1 Erases the misentry of the number. *2 Search speed: x2 ] x5 ] x10 ] x20 ] x60 - JVC KD-ADV38 | Instructions - Page 102
). Hold: Reverse/forward search*6 : Select program. Select play list (during playback or pause). : Select aspect ratio. : Select audio channel (ST: stereo, L: left, R: Right). : Turn on/off subtitle. = = : Select chapter. Select program (when not playing). (twice) = = : Select program/play - JVC KD-ADV38 | Instructions - Page 103
Select track. To cancel PBC playback Hold: Reverse/forward search*6 (No sound 1 can be heard.) : : Select aspect ratio. Select audio channel (ST: stereo, L: left, R: Right). 2 Start the desired track. = = • To resume PBC, press / . : Stop playback. : Start playback/Pause (if pressed during - JVC KD-ADV38 | Instructions - Page 104
can also be used for "USB." MULTI: For multi-channel encoded sources such as Dolby Digital*1, DTS*2, and DVD Audio. (When activated, "MULTI" instructions shown on the monitor. Selecting browsable still picture When a disc including browsable still pictures is detected, the B.S.P indicator lights - JVC KD-ADV38 | Instructions - Page 105
ENT Set • Auto: When multi-channel digital signals come in, "MULTI" surround is activated. When 2-channel or 2.1-channel signals come in, "4CH STEREO" is activated. • Through: All incoming channel signals are sent to the corresponding speakers. • Dolby PLIIMovie: Activates Dolby Pro Logic II Movie - JVC KD-ADV38 | Instructions - Page 106
ENGLISH Operations using the on-screen bar (DVD/VCD/DivX/MPEG1/MPEG2/ JPEG) These operations are possible on the monitor using the remote controller. 1 Display the on-screen bar. (☞ page 27) 2 Select an - JVC KD-ADV38 | Instructions - Page 107
Items shown on the bar vary due to the disc type. 1 Disc type 2 • DVD: Audio signal format • VCD: PBC 3 Playback mode*1 DVD Video: T. RPT: Title repeat C. RPT: Chapter repeat DVD Audio: T. RPT: Track repeat DVD-VR: C. RPT: Chapter repeat PG. RPT: Program repeat DivX/MPEG: T. RPT: Track - JVC KD-ADV38 | Instructions - Page 108
VIDEO OUT and 2nd AUDIO OUT plugs, while listening to any other source than "USB" through the speakers. • When Dual Zone is in use, you can only operate the DVD/CD player using the remote controller. 1 AV "DISC." 3 Operate the DVD/CD player. *1 JVC original headphone virtual surround system. - JVC KD-ADV38 | Instructions - Page 109
ENGLISH 1 Current folder (highlighted bar) 2 Current folder number/total folder number 3 Folder list * If tag data includes "Jacket Picture" (baseline JPEG), it will be displayed. If you press OSD, the playback mode selection window appears. (☞ below) 4 Selected playback mode (☞ below) 5 Elapsed - JVC KD-ADV38 | Instructions - Page 110
/06/07 L-1 Time 19:00 10:30 17:00 13:19 22:00 8:23 Title JVC DVD World 2004 Music Festival children 001 children 002 2 Select a folder on the list. PLAY 003 001 Length 1:03:16 1:35:25 0:10:23 0:07:19 Title My JVC World Favorite music children001-002 Folder : 144/240 Track 144/198 Page : 4/5 - JVC KD-ADV38 | Instructions - Page 111
mass storage class device such as a USB memory, Digital Audio player*1, portable HDD, etc. to the unit. ~ Connect a USB device. USB cable from the rear of the unit. • You cannot connect a computer to the USB ( ) terminal of the unit. Ÿ Select "USB". 4 ¢ Press: Select track Hold: Reverse/forward - JVC KD-ADV38 | Instructions - Page 112
data. • Do not leave a USB device in the car, expose to direct sunlight, or AV Menu Setup ENT Enter 2 AV Menu Mode Mode menu icon ENT Enter 3 Mode All Off Intro Repeat Random Off 4 Repeat Off Track Folder ENT Set When one of the playback modes is selected, the corresponding indicator lights - JVC KD-ADV38 | Instructions - Page 113
book, from call history (Redial/Missed Call/Received Call), by dialing number, by preset numbers, by voice command • Receiving the SMS (Short Message Service) • Play back a Bluetooth audio player Pairing and PIN Code When you connect a Bluetooth device to the unit for the first time, make pairing - JVC KD-ADV38 | Instructions - Page 114
Audio." Bluetooth Phone FLAT NEW DEVICE 15: 45 Select "NEW DEVICE" by pressing 5 / ∞. 2 AV Menu Setup ENT Enter 3 AV Menu Bluetooth ENT Enter Bluetooth menu icon 4 NEW DEVICE Dial Menu Message Open Search Special Device 5 Enter a PIN (Personal Identification Number)* code to the unit - JVC KD-ADV38 | Instructions - Page 115
... 1 NEW DEVICE Dial Menu Message Open Search Special Device The unit displays the list of the preset devices. 2 Select a device you want to connect. Deleting a registered device 1 Select "Bluetooth Phone" or "Bluetooth Audio," then select a registered device you want to delete. 2 Perform steps - JVC KD-ADV38 | Instructions - Page 116
adjust the microphone volume level. (☞ page 59) When a call comes in... To end the call or reject an incoming call Hold any button (except ATT or +/-). Name and phone number (if acquired) The source is automatically changed to "Bluetooth Phone." When is activated... The unit answers - JVC KD-ADV38 | Instructions - Page 117
Service) and is set to (☞ page 59), the unit rings and "Receiving unit. When is set to ... To read the message While "Receiving Message" is displayed... • The source is changed to "Bluetooth to this unit. (Refer to the instruction manual supplied with your - JVC KD-ADV38 | Instructions - Page 118
the unit: 1 Select a number. Move the entry position. • To delete an unwanted digit, select blank space. 2 or Dialling ... Jack 09845671234 can be also accessed through = = . AV Menu Setup AV Menu ENT Enter Bluetooth ENT Enter Bluetooth menu - JVC KD-ADV38 | Instructions - Page 119
phone operations. For details, ☞ pages 8 and 9. ENGLISH Setup AV Menu ENT Enter List ENT Enter List menu icon Using the Bluetooth audio player Reverse/forward skip Turns Blue when the Bluetooth POWER]ON device is connected. *1 Bluetooth Audio FLAT Connected Device Name 15: 45 ☞ page 48 - JVC KD-ADV38 | Instructions - Page 120
: Select track Hold: Reverse/forward search 5 ∞ Press: Select folder (MP3 only) Hold: Display Disc List It is recommended to use a JVC MP3-compatible CD changer with your unit. • You can play only CDs (CD-DA) and MP3 discs. Preparation: Make sure is selected for the external input setting - JVC KD-ADV38 | Instructions - Page 121
Setup ENT Enter 2 AV Menu Mode ENT Enter Mode menu icon 3 Mode All Off Intro Repeat Random Off 4 Repeat Off Track Disc ENT Set When one of the playback modes is selected, the corresponding indicator lights up on the monitor. To cancel, select in step 3 or in step 4. Disc - JVC KD-ADV38 | Instructions - Page 122
service with DLS (Dynamic Label Segment), the TEXT indicator lights up. ! Searching for an ensemble. • Manual Search: Hold either 4 or ¢ until "Manual • The DRC indicator will light up while tuning in a service with the DRC signals. 1 AV Menu 4 Setup ENT Enter AV Menu Mode ENT Enter Mode - JVC KD-ADV38 | Instructions - Page 123
ENGLISH Manual presetting You can preset six DAB services (primary) for each band. 1 On the unit: 1 2 Search for a service you want to preset. 3 DAB1 Store ENT 1 Service Label 2 No Serv. 3 FFH 4 No Serv. 5 HRS 6 HRH ENT • Preset List can also be accessed through = (☞ - JVC KD-ADV38 | Instructions - Page 124
Standby Reception allows the unit to switch temporarily to your favorite service (announcement type). Announcement Standby Reception Indicator Activate , then select , ANN (☞ below). The unit will temporarily switch to your Lights up favorite service from any source - JVC KD-ADV38 | Instructions - Page 125
to the iPod/D. player POWER]ON Track no./Playing time ☞ page 48 4 ¢ : Press: Select track Hold: Reverse/forward search 5 ∞ 5 : Enter player's menu ∞ : Pause/stop playback • To resume, press again. It is required to connect the interface adapter (KSPD100 for Apple iPod or KS-PD500 for JVC D. player - JVC KD-ADV38 | Instructions - Page 126
VIDEO IN plug so that you can watch the navigation screen (Make sure is selected for ). (☞ page 55) POWER]ON Assigned title (☞ page 49) ☞ page 48 AV-IN FLAT AV is selected for ... • You can use the source "AV-IN" for listening to an audio source connected to the - JVC KD-ADV38 | Instructions - Page 127
to the CD changer jack on the rear using the Line Input Adapter-KS-U57 (not supplied) or AUX Input Adapter-KS-U58 (not supplied). POWER]ON Assigned title (☞ page 49) ☞ page 48 EXT-IN FLAT EXT-INPUT 15: 45 Preparation: Make sure is selected for the external input - JVC KD-ADV38 | Instructions - Page 128
ENGLISH Sound equalization POWER]ON Edit 60.0 Hz +03 ENT Store Selecting sound mode ~ AV Menu Ÿ Setup ENT Enter Equalizer menu icon AV Menu Storing your own adjustment You can store your adjustment into User1, User2, and User3. 1 Repeat steps ~ and Ÿ, then in step !... Equalizer Flat Hard - JVC KD-ADV38 | Instructions - Page 129
to the sources POWER]ON Press: Change character set Hold: Erase title Title Entry AV-In Name MY BEST DISP A a 0 Á á ENT Store You can assign titles to "AV-IN" and "EXT-IN." Ex.: Assigning title to "AV-IN" ~ Select "AV-IN." Ÿ Display the title entry screen. 1 AV Menu Setup 2 AV Menu ENT Enter - JVC KD-ADV38 | Instructions - Page 130
Menu operations POWER]ON Setup Equalizer Sound AV Menu Disc Surround Setup ENT Enter Mode Ex. Changing the setting ~ AV Menu Setup ENT Enter Non-available items will be displayed being shaded. Ÿ Sound menu icon AV Menu Sound ENT Enter List Bluetooth Dual Zone - JVC KD-ADV38 | Instructions - Page 131
Auto : Repeats scrolling (5-second intervals). • Holding DISP (on the unit) scrolls the information regardless of this setting. Tag Display Off : Cancels required. (☞ Installation/Connection Manual) *2 Adjustable only when the source is a disc or USB containing pictures or movies, or "AV-IN." - JVC KD-ADV38 | Instructions - Page 132
the external monitor connected to the VIDEO OUT plug; Initial English. *3 Not adjustable for audio sources. *4 After you change the indication language setting, turn off then on the power so that your setting takes effect. *5 Selectable only for "DISC" and "USB." (Playback stops when you select one - JVC KD-ADV38 | Instructions - Page 133
USB." Audio : Plays back audio files. Still Picture : Plays back JPEG files. Video : Plays back DivX/MPEG1/MPEG2 files. DivX Regist. (Registration) This unit unit's Registration Code is overwritten for copyright protection. D. (Dynamic) Range Compres. (Compression)*5 You can enjoy a powerful - JVC KD-ADV38 | Instructions - Page 134
from the one currently received (AF indicator lights up), ☞ [14]. Tuner TA Volume 00 to 30 or 50*8, Initial 15, ☞ [13]. Program Search Off, On, ☞ [14] IF Band Width Auto : Increases the tuner selectivity to reduce interference noises between adjacent stations. (Stereo effect may be lost - JVC KD-ADV38 | Instructions - Page 135
IN plugs. Off : Select when no component is connected ("AV-IN" is skipped while selecting the source). Audio&Video : Select when connecting an AV component such as a VCR. Audio : Select when connecting an audio component such as a digital audio player. Camera*10: Select when connecting the rear view - JVC KD-ADV38 | Instructions - Page 136
, 120Hz, 150Hz Amplifier Gain You can change the maximum volume level of this unit. Off : Deactivates the built-in amplifier. Low Power : VOL 00 to 30 (Select this if the maximum power of the speakers is less than 50 W.) High Power : VOL 00 to 50 Rear Speaker*15 You can activate/deactivate the - JVC KD-ADV38 | Instructions - Page 137
, you can change the PTY code for PTY Standby Reception. Title Entry Only for AV-IN and EXT-IN. ☞ [49] All Off/Intro/Repeat/Random D.(Dynamic) Range Control Announce Standby Only for disc/USB playback and iPod/D. player. ☞ [19, 32, 41, 45] Only for DAB. (Off, DRC1, DRC2, DRC3), ☞ [42] Only for - JVC KD-ADV38 | Instructions - Page 138
devices. *19 Selectable only for " Bluetooth Phone" or "Bluetooth Audio. " Select a device (or "NEW DEVICE") before operating the menu. *20 Selectable only when the device is compatible with SMS. When operating the Bluetooth device, refer also to the instructions supplied with the device. 58 - JVC KD-ADV38 | Instructions - Page 139
message by ringing and displaying "Receiving Message." To read the message, press ENT (☞ page 37). Manual : The unit does not inform you the arrival of a message. MIC Setting*22 Adjust microphone volume connected to the unit. 01, 02, 03 Version*23 The Bluetooth software and hardware versions are - JVC KD-ADV38 | Instructions - Page 140
etc.) to clean discs. Connector Moisture condensation Moisture may condense on the lens inside the unit in the following cases: • After starting the heater in the car. • If it becomes very humid inside the car. Should this occur, the unit may malfunction. In this case, eject the disc and leave the - JVC KD-ADV38 | Instructions - Page 141
or less. • This unit supports DivX 6.x, 5.x, 4.x, and 3.11. • Audio stream should conform to MP3 or Dolby Digital. • The file encoded in the interlaced scanning mode may not be played back correctly. • The maximum bit rate for video signals (average) is as follows: - DVD: 4 Mbps - USB: 2 Mbps 61 - JVC KD-ADV38 | Instructions - Page 142
Audio streams should conform to MPEG1 Audio Layer-2 or Dolby Digital. • The maximum bit rate for video signals (average) is as follows: - DVD: 4 Mbps - USB: 2 Mbps Playing JPEG files • This unit -channel DVD Video, DivX 2-channel and MPEG 2-channel sources. If is selected, stereo sounds - JVC KD-ADV38 | Instructions - Page 143
of the device. • This unit may not work for some Bluetooth devices. • Connecting condition may vary depending on circumstances around you. • When the unit is turned off, the device is disconnected. iPod/D. player operations • When you turn on this unit, the iPod or D. player is charged through the - JVC KD-ADV38 | Instructions - Page 144
visit the following JVC web site: For iPod users: For D. player users: Menu settings • If you change the setting from to while the - JVC KD-ADV38 | Instructions - Page 145
ENGLISH Language codes (for DVD/DivX language selection) Code Language Code Language AA Afar FA Persian AB Abkhazian FI Finnish AF Afrikaans FJ Fiji AM Ameharic FO Faroese AR Arabic - JVC KD-ADV38 | Instructions - Page 146
the DVD/CD player.) • Change the source. • Start the playback on the external component connected to VIDEO IN plug. • Check the cords and connections. • Signal input is too weak. Reset the unit. (☞ page 3) Store stations manually. (☞ page 11) • Static noise while listening to the radio. Connect - JVC KD-ADV38 | Instructions - Page 147
Elapsed playing time is not correct. • "Not Support" appears on the monitor and track skips. • Installation/Connection Manual) • Connect the video back using other players. • Readout time varies depending on the USB device. • Do the power then on again. • Do not pull out or connect the USB device - JVC KD-ADV38 | Instructions - Page 148
try to connect again. (☞ page 35) • Echo or noise occurs. Adjust the microphone unit position. • Phone sound quality is poor. • Reduce the distance between the unit and the Bluetooth audio device. • Move the car to place where you can get a better signal reception. • The sound is interrupted - JVC KD-ADV38 | Instructions - Page 149
(☞ page 3) • The DAB tuner does not work at all. Connect this unit and the DAB tuner correctly, then reset the unit. (☞ page 3) • "Antenna Power NG" appears on the monitor. Check the cords and connections. • The iPod/D. player does not turn on or does not work. • Check the connecting cable and - JVC KD-ADV38 | Instructions - Page 150
Continuous Power Output Video Output (composite): 1 Vp-p/75 Ω Other Terminals: Input: LINE IN, VIDEO IN, MIC IN, USB input terminal, Aerial input Output: 2nd AUDIO OUT, VIDEO to 15 000 Hz Stereo Separation: 35 dB MW Frequency Response: DVD, fs=48 kHz: 16 Hz to 22 000 Hz DVD, fs=192 - JVC KD-ADV38 | Instructions - Page 151
. Current: Less than 500 mA/5 V Version: Bluetooth 1.2 certified Output Power: +4 dBm Max. (Power class 2) Service Area: Within 10 m Profile: HSP (Headset Profile) HFP (Hands-Free Profile) A2DP (Advanced Audio Distribution Profile) AVRCP (Audio/Video Remote Control Profile) SPP (Serial Port - JVC KD-ADV38 | Instructions - Page 152
Having TROUBLE with operation? Please reset your unit Refer to page of How to reset your unit Haben Sie PROBLEME mit dem Betrieb? Bitte Représentant européen de la société Victor Company of Japan, Limited: JVC Technology Centre Europe GmbH Postfach 10 05 52 61145 Friedberg Allemagne Sehr geehrter - JVC KD-ADV38 | Instructions - Page 153
inverter is required, which can be purchased at JVC INCAR ENTERTAINMENT dealers. WARNINGS • DO NOT install any unit and wire any cable in locations where; - it may E Power cord Stromkable Cordon d'alimentation Stroomkabel F Audio/video cord Audio/Video-Kabel Cordon audio/vidéo Audio-/videosnoer - JVC KD-ADV38 | Instructions - Page 154
contact op met uw JVC car audio dealer of een dealer of installation" (see page 1), first remove the car radio and install the unit in its place. In einem Fahrzeug wo der „Erforderlicher Platz für Einbau" (siehe Seite 1), bauen Sie zunächst das Autoradio aus und bauen an seiner Stelle den Receiver - JVC KD-ADV38 | Instructions - Page 155
the wiring of the supplied power cord as illustrated. • Contact your authorized car dealer before installing this unit. wiring 2 if the unit does not turn on. Verwenden Sie die modifizierte Verdrahtung 2 wenn der Receiver de auto) Parking brake lead (light green) Handbremsenkabel (hellgrün) Fil - JVC KD-ADV38 | Instructions - Page 156
cord and those of the connector from the car body may be different in color. 1 Cut the ISO connector. 2 Connect the colored leads of the power cord in the order specified in the illustration below. 3 Connect the aerial cord. 4 Finally connect the wiring harness to the unit. Vor dem Anschließen: Die - JVC KD-ADV38 | Instructions - Page 157
een stuurwiel-afstandsbediening heeft, kunt u deze receiver met die afstandsbediening bedienen. Hiervoor heeft u echter een JVC adapter (niet bijgeleverd) nodig die geschikt is voor de stuurwiel-afstandsbediening van uw auto. Raadpleeg uw JVC car audio dealer voor details. OE REMOTE Steering wheel - JVC KD-ADV38 | Instructions - Page 158
de externe componenten aan te sluiten dat dit toestel beslist is uitgeschakeld. • To use JVC CD changer, Apple iPod or JVC D. player, set "External Input" to "Changer/iPod/D. Player" (see page 55 of the INSTRUCTIONS). • To use other external components via KS-U57 or KS-U58, set "External Input - JVC KD-ADV38 | Instructions - Page 159
CCKИЙ ENGLISH DVD/CD RECEIVER DVD DVD/CD KD-AVX33 For canceling the display demonstration, see page 5 5 5. For installation and connections, refer to the separate manual INSTRUCTIONS LVT1659-003A [EE] - JVC KD-ADV38 | Instructions - Page 160
to qualified service personnel. 3. CAUTION: Visible and/or invisible class 1M laser radiation when open. Do not view directly with optical instruments. 4. REPRODUCTION OF LABEL: CAUTION LABEL, PLACED OUTSIDE THE UNIT. WARNINGS: To prevent accidents and damage • DO NOT install any unit and wire any - JVC KD-ADV38 | Instructions - Page 161
radio 10 Disc operations 15 Dual Zone operations 28 USB operations 31 Bluetooth® operations- Cellular phone/audio player .......... 33 • If this does not work, reset the unit until the temperature in the car becomes normal before operating the unit. This product incorporates copyright protection - JVC KD-ADV38 | Instructions - Page 162
ENGLISH Playable disc type Disc type DVD Recording format, file type, etc. DVD Video (Region Code: 5)*1 Playable DVD Audio DVD-ROM DVD Recordable/Rewritable DVD Video (DVD-R*2/-RW, +R/+RW*3) DVD-VR (non-CPRM only) • DVD Video: UDF bridge DivX/MPEG1/MPEG2 • DVD-VR • DivX/MPEG1/MPEG2/JPEG/ - JVC KD-ADV38 | Instructions - Page 163
using the buttons on the unit; however, the buttons on the remote controller can work in the same way if they have the same names or marks. Setup menu icon AV Menu Setup ENT Enter Currently selected menu Indication language: ~ Turn on the power. In this manual, English indications are used for - JVC KD-ADV38 | Instructions - Page 164
auto clock adjustment using the clock time (CT) data from an FM RDS station. * Finish the procedure. To display the clock time while playing back a video source, select = = . 6 - JVC KD-ADV38 | Instructions - Page 165
= DISC (DVD/VCD/CD) = USB =CD-CH, iPod, D.PLAYER, or EXT-IN =Bluetooth Phone =Bluetooth Audio = AV-IN =(back to the beginning) • You cannot select these sources if they are not ready. Activate TA Standby Reception. Show PTY preset list [Hold]. • Turn on the power. • Display or erase - JVC KD-ADV38 | Instructions - Page 166
the Installation/Connection Manual (separate i ; volume) for connection. Caution: • Do not expose batteries to heat or flame. o a s IMPORTANT: If Dual Zone is activated (☞ page 28), the remote controller functions only for operating the DVD/CD player. 1*1 • Turns on the power. • Attenuates - JVC KD-ADV38 | Instructions - Page 167
: Selects the bands. DISC/USB: Stop playback. Bluetooth Phone: Ends the call. Bluetooth Audio: Plays/pauses. On menus: Back. e*2 Adjusts the volume level through the 2nd AUDIO OUT plug. (☞ page 28) r*2 Activates or deactivates Dual Zone. t*1*2 Selects the sound mode. y • DVD Video/DivX 6: Shows the - JVC KD-ADV38 | Instructions - Page 168
: Hold either 4 or ¢ until "Manual Search" appears on the display, then press it repeatedly. • The ST indicator lights up when receiving an FM stereo broadcast with sufficient signal strength. When an FM stereo broadcast is hard to receive 1 AV Menu Setup ENT Enter 2 AV Menu 4 Mono Off On ENT - JVC KD-ADV38 | Instructions - Page 169
detected. • The DX indicator goes off, then the LO indicator lights up. FM station automatic presetting -SSM (Strong-station Sequential Memory) FM bands. You can preset six stations for each band. 1 AV Menu Setup ENT Enter Manual presetting Ex.: Storing FM station of 92.5 MHz into preset number - JVC KD-ADV38 | Instructions - Page 170
features are available only for FM RDS stations. 2 or On the unit: or 1 FM1 1 87.5 2 89.9 3 97.9 4 Preset List can also be accessed through = . AV Menu Setup AV Menu ENT Enter List ENT Enter List menu , Rock Music, Easy Listening, Light Classics M, Serious Classics, Other - JVC KD-ADV38 | Instructions - Page 171
providing the RDS signals. Press to deactivate. Goes off PTY Standby Reception Indicator Activate , then select , (☞ PTY pages 14, 57). The unit will temporarily switch to Lights up your favorite PTY programme from any source other than AM. Not yet activated. Tune - JVC KD-ADV38 | Instructions - Page 172
ENGLISH Activating PTY Standby Reception 1 AV Menu Setup ENT Enter 2 AV Menu Tracing the same programme- Network-Tracking Reception When driving in an area where FM reception is not sufficient enough, this unit automatically tunes in to another FM RDS station of the same network, possibly - JVC KD-ADV38 | Instructions - Page 173
the source or eject the disc. If " " appears on the monitor, the unit cannot accept the operation you have tried to do. • In some cases, without showing the control panel. Caution on volume setting: Discs and connected USB devices produce very little noise compared with other sources. Lower the - JVC KD-ADV38 | Instructions - Page 174
the following discs, press . • Each time you press the button, playback picture and disc information screens appear alternately. Disc type Audio format Surround mode DVD VIDEO DIGITAL MULTI T 01 C 02 0:45:38 CHAP. RPT 15: 45 4 ¢ Press: Select chapter Playback mode Hold: Reverse/forward search - JVC KD-ADV38 | Instructions - Page 175
ENGLISH DVD DivX FRONT 2CH T 01 C 02 0:45:38 Current Folder Name Current File Hold: Display Folder List For DivX/MPEG: Folder no./Track no./Playing time For JPEG: Folder no./File no. PBC indicator lights up when PBC is in use. ☞ page 48 VCD PBC FLAT 02 0:45:38 15: 45 4 ¢ Press: Select - JVC KD-ADV38 | Instructions - Page 176
Title RPT 15: 45 4 ¢ Press: Select track Hold: Reverse/forward search*1 Disc title/Artist Name/Track title Track no./Playing time (only for CD Text)*3 Audio format (MP3/WMA/WAV/AAC) ☞ page 48 CD MP3 FLAT T 01 02 0:45:38 Current Folder Name Current File Name.mp3 RPT 15: 45 4 ¢ Press - JVC KD-ADV38 | Instructions - Page 177
3 Mode All Off Intro Repeat Random Off Setup ENT Enter 2 AV Menu Mode ENT Enter Mode menu icon 4 Repeat Off Track Folder ENT Set When one of the playback modes is selected, the corresponding indicator lights up on the disc information screen. To cancel, select in step 3 or - JVC KD-ADV38 | Instructions - Page 178
start playing. File List Song011.mp3 Song012.mp3 Song013.mp3 Song014.mp3 Song015.mp3 Off Song016.mp3 ENT • Folder List can also be accessed through = . AV Menu Setup AV Menu ENT Enter List ENT Enter List menu icon 20 - JVC KD-ADV38 | Instructions - Page 179
). 1 (twice) = = : 2 Select an item you want Select title (during playback or pause). to start playback. : Select aspect ratio. *1 : Select audio language. 3 : Select subtitle language. : Select view angle. *1 Erases the misentry of the number. *2 Search speed: x2 ] x5 ] x10 ] x20 ] x60 - JVC KD-ADV38 | Instructions - Page 180
). Hold: Reverse/forward search*6 : Select program. Select play list (during playback or pause). : Select aspect ratio. : Select audio channel (ST: stereo, L: left, R: Right). : Turn on/off subtitle. = = : Select chapter. Select program (when not playing). (twice) = = : Select program/play - JVC KD-ADV38 | Instructions - Page 181
Select track. To cancel PBC playback Hold: Reverse/forward search*6 (No sound 1 can be heard.) : : Select aspect ratio. Select audio channel (ST: stereo, L: left, R: Right). 2 Start the desired track. = = • To resume PBC, press / . : Stop playback. : Start playback/Pause (if pressed during - JVC KD-ADV38 | Instructions - Page 182
can also be used for "USB." MULTI: For multi-channel encoded sources such as Dolby Digital*1, DTS*2, and DVD Audio. (When activated, "MULTI" instructions shown on the monitor. Selecting browsable still picture When a disc including browsable still pictures is detected, the B.S.P indicator lights - JVC KD-ADV38 | Instructions - Page 183
ENT Set • Auto: When multi-channel digital signals come in, "MULTI" surround is activated. When 2-channel or 2.1-channel signals come in, "4CH STEREO" is activated. • Through: All incoming channel signals are sent to the corresponding speakers. • Dolby PLIIMovie: Activates Dolby Pro Logic II Movie - JVC KD-ADV38 | Instructions - Page 184
ENGLISH Operations using the on-screen bar (DVD/VCD/DivX/MPEG1/MPEG2/ JPEG) These operations are possible on the monitor using the remote controller. 1 Display the on-screen bar. (☞ page 27) 2 Select an - JVC KD-ADV38 | Instructions - Page 185
Items shown on the bar vary due to the disc type. 1 Disc type 2 • DVD: Audio signal format • VCD: PBC 3 Playback mode*1 DVD Video: T. RPT: Title repeat C. RPT: Chapter repeat DVD Audio: T. RPT: Track repeat DVD-VR: C. RPT: Chapter repeat PG. RPT: Program repeat DivX/MPEG: T. RPT: Track - JVC KD-ADV38 | Instructions - Page 186
VIDEO OUT and 2nd AUDIO OUT plugs, while listening to any other source than "USB" through the speakers. • When Dual Zone is in use, you can only operate the DVD/CD player using the remote controller. 1 AV "DISC." 3 Operate the DVD/CD player. *1 JVC original headphone virtual surround system. - JVC KD-ADV38 | Instructions - Page 187
ENGLISH 1 Current folder (highlighted bar) 2 Current folder number/total folder number 3 Folder list * If tag data includes "Jacket Picture" (baseline JPEG), it will be displayed. If you press OSD, the playback mode selection window appears. (☞ below) 4 Selected playback mode (☞ below) 5 Elapsed - JVC KD-ADV38 | Instructions - Page 188
/06/07 L-1 Time 19:00 10:30 17:00 13:19 22:00 8:23 Title JVC DVD World 2004 Music Festival children 001 children 002 2 Select a folder on the list. PLAY 003 001 Length 1:03:16 1:35:25 0:10:23 0:07:19 Title My JVC World Favorite music children001-002 Folder : 144/240 Track 144/198 Page : 4/5 - JVC KD-ADV38 | Instructions - Page 189
mass storage class device such as a USB memory, Digital Audio player*1, portable HDD, etc. to the unit. ~ Connect a USB device. USB cable from the rear of the unit. • You cannot connect a computer to the USB ( ) terminal of the unit. Ÿ Select "USB". 4 ¢ Press: Select track Hold: Reverse/forward - JVC KD-ADV38 | Instructions - Page 190
data. • Do not leave a USB device in the car, expose to direct sunlight, or AV Menu Setup ENT Enter 2 AV Menu Mode Mode menu icon ENT Enter 3 Mode All Off Intro Repeat Random Off 4 Repeat Off Track Folder ENT Set When one of the playback modes is selected, the corresponding indicator lights - JVC KD-ADV38 | Instructions - Page 191
book, from call history (Redial/Missed Call/Received Call), by dialing number, by preset numbers, by voice command • Receiving the SMS (Short Message Service) • Play back a Bluetooth audio player Pairing and PIN Code When you connect a Bluetooth device to the unit for the first time, make pairing - JVC KD-ADV38 | Instructions - Page 192
Audio." Bluetooth Phone FLAT NEW DEVICE 15: 45 Select "NEW DEVICE" by pressing 5 / ∞. 2 AV Menu Setup ENT Enter 3 AV Menu Bluetooth ENT Enter Bluetooth menu icon 4 NEW DEVICE Dial Menu Message Open Search Special Device 5 Enter a PIN (Personal Identification Number)* code to the unit - JVC KD-ADV38 | Instructions - Page 193
... 1 NEW DEVICE Dial Menu Message Open Search Special Device The unit displays the list of the preset devices. 2 Select a device you want to connect. Deleting a registered device 1 Select "Bluetooth Phone" or "Bluetooth Audio," then select a registered device you want to delete. 2 Perform steps - JVC KD-ADV38 | Instructions - Page 194
adjust the microphone volume level. (☞ page 59) When a call comes in... To end the call or reject an incoming call Hold any button (except ATT or +/-). Name and phone number (if acquired) The source is automatically changed to "Bluetooth Phone." When is activated... The unit answers - JVC KD-ADV38 | Instructions - Page 195
Service) and is set to (☞ page 59), the unit rings and "Receiving unit. When is set to ... To read the message While "Receiving Message" is displayed... • The source is changed to "Bluetooth to this unit. (Refer to the instruction manual supplied with your - JVC KD-ADV38 | Instructions - Page 196
the unit: 1 Select a number. Move the entry position. • To delete an unwanted digit, select blank space. 2 or Dialling ... Jack 09845671234 can be also accessed through = = . AV Menu Setup AV Menu ENT Enter Bluetooth ENT Enter Bluetooth menu - JVC KD-ADV38 | Instructions - Page 197
phone operations. For details, ☞ pages 8 and 9. ENGLISH Setup AV Menu ENT Enter List ENT Enter List menu icon Using the Bluetooth audio player Reverse/forward skip Turns Blue when the Bluetooth POWER]ON device is connected. *1 Bluetooth Audio FLAT Connected Device Name 15: 45 ☞ page 48 - JVC KD-ADV38 | Instructions - Page 198
: Select track Hold: Reverse/forward search 5 ∞ Press: Select folder (MP3 only) Hold: Display Disc List It is recommended to use a JVC MP3-compatible CD changer with your unit. • You can play only CDs (CD-DA) and MP3 discs. Preparation: Make sure is selected for the external input setting - JVC KD-ADV38 | Instructions - Page 199
Setup ENT Enter 2 AV Menu Mode ENT Enter Mode menu icon 3 Mode All Off Intro Repeat Random Off 4 Repeat Off Track Disc ENT Set When one of the playback modes is selected, the corresponding indicator lights up on the monitor. To cancel, select in step 3 or in step 4. Disc - JVC KD-ADV38 | Instructions - Page 200
service with DLS (Dynamic Label Segment), the TEXT indicator lights up. ! Searching for an ensemble. • Manual Search: Hold either 4 or ¢ until "Manual • The DRC indicator will light up while tuning in a service with the DRC signals. 1 AV Menu 4 Setup ENT Enter AV Menu Mode ENT Enter Mode - JVC KD-ADV38 | Instructions - Page 201
ENGLISH Manual presetting You can preset six DAB services (primary) for each band. 1 On the unit: 1 2 Search for a service you want to preset. 3 DAB1 Store ENT 1 Service Label 2 No Serv. 3 FFH 4 No Serv. 5 HRS 6 HRH ENT • Preset List can also be accessed through = (☞ - JVC KD-ADV38 | Instructions - Page 202
Standby Reception allows the unit to switch temporarily to your favorite service (announcement type). Announcement Standby Reception Indicator Activate , then select , ANN (☞ below). The unit will temporarily switch to your Lights up favorite service from any source - JVC KD-ADV38 | Instructions - Page 203
to the iPod/D. player POWER]ON Track no./Playing time ☞ page 48 4 ¢ : Press: Select track Hold: Reverse/forward search 5 ∞ 5 : Enter player's menu ∞ : Pause/stop playback • To resume, press again. It is required to connect the interface adapter (KSPD100 for Apple iPod or KS-PD500 for JVC D. player - JVC KD-ADV38 | Instructions - Page 204
VIDEO IN plug so that you can watch the navigation screen (Make sure is selected for ). (☞ page 55) POWER]ON Assigned title (☞ page 49) ☞ page 48 AV-IN FLAT AV is selected for ... • You can use the source "AV-IN" for listening to an audio source connected to the - JVC KD-ADV38 | Instructions - Page 205
to the CD changer jack on the rear using the Line Input Adapter-KS-U57 (not supplied) or AUX Input Adapter-KS-U58 (not supplied). POWER]ON Assigned title (☞ page 49) ☞ page 48 EXT-IN FLAT EXT-INPUT 15: 45 Preparation: Make sure is selected for the external input - JVC KD-ADV38 | Instructions - Page 206
ENGLISH Sound equalization POWER]ON Edit 60.0 Hz +03 ENT Store Selecting sound mode ~ AV Menu Ÿ Setup ENT Enter Equalizer menu icon AV Menu Storing your own adjustment You can store your adjustment into User1, User2, and User3. 1 Repeat steps ~ and Ÿ, then in step !... Equalizer Flat Hard - JVC KD-ADV38 | Instructions - Page 207
to the sources POWER]ON Press: Change character set Hold: Erase title Title Entry AV-In Name MY BEST DISP A a 0 ENT Store You can assign titles to "AV-IN" and "EXT-IN." Ex.: Assigning title to "AV-IN" ~ Select "AV-IN." Ÿ Display the title entry screen. 1 AV Menu Setup 2 AV Menu ENT Enter - JVC KD-ADV38 | Instructions - Page 208
Menu operations POWER]ON Setup Equalizer Sound AV Menu Disc Surround Setup ENT Enter Mode Ex. Changing the setting ~ AV Menu Setup ENT Enter Non-available items will be displayed being shaded. Ÿ Sound menu icon AV Menu Sound ENT Enter List Bluetooth Dual Zone - JVC KD-ADV38 | Instructions - Page 209
Auto : Repeats scrolling (5-second intervals). • Holding DISP (on the unit) scrolls the information regardless of this setting. Tag Display Off : Cancels required. (☞ Installation/Connection Manual) *2 Adjustable only when the source is a disc or USB containing pictures or movies, or "AV-IN." - JVC KD-ADV38 | Instructions - Page 210
the external monitor connected to the VIDEO OUT plug; Initial Russian. *3 Not adjustable for audio sources. *4 After you change the indication language setting, turn off then on the power so that your setting takes effect. *5 Selectable only for "DISC" and "USB." (Playback stops when you select one - JVC KD-ADV38 | Instructions - Page 211
USB." Audio : Plays back audio files. Still Picture : Plays back JPEG files. Video : Plays back DivX/MPEG1/MPEG2 files. DivX Regist. (Registration) This unit unit's Registration Code is overwritten for copyright protection. D. (Dynamic) Range Compres. (Compression)*5 You can enjoy a powerful - JVC KD-ADV38 | Instructions - Page 212
from the one currently received (AF indicator lights up), ☞ [14]. Tuner TA Volume 00 to 30 or 50*8, Initial 15, ☞ [13]. Program Search Off, On, ☞ [14] IF Band Width Auto : Increases the tuner selectivity to reduce interference noises between adjacent stations. (Stereo effect may be lost - JVC KD-ADV38 | Instructions - Page 213
IN plugs. Off : Select when no component is connected ("AV-IN" is skipped while selecting the source). Audio&Video : Select when connecting an AV component such as a VCR. Audio : Select when connecting an audio component such as a digital audio player. Camera*10: Select when connecting the rear view - JVC KD-ADV38 | Instructions - Page 214
, 120Hz, 150Hz Amplifier Gain You can change the maximum volume level of this unit. Off : Deactivates the built-in amplifier. Low Power : VOL 00 to 30 (Select this if the maximum power of the speakers is less than 50 W.) High Power : VOL 00 to 50 Rear Speaker*15 You can activate/deactivate the - JVC KD-ADV38 | Instructions - Page 215
, you can change the PTY code for PTY Standby Reception. Title Entry Only for AV-IN and EXT-IN. ☞ [49] All Off/Intro/Repeat/Random D.(Dynamic) Range Control Announce Standby Only for disc/USB playback and iPod/D. player. ☞ [19, 32, 41, 45] Only for DAB. (Off, DRC1, DRC2, DRC3), ☞ [42] Only for - JVC KD-ADV38 | Instructions - Page 216
devices. *19 Selectable only for " Bluetooth Phone" or "Bluetooth Audio. " Select a device (or "NEW DEVICE") before operating the menu. *20 Selectable only when the device is compatible with SMS. When operating the Bluetooth device, refer also to the instructions supplied with the device. 58 - JVC KD-ADV38 | Instructions - Page 217
message by ringing and displaying "Receiving Message." To read the message, press ENT (☞ page 37). Manual : The unit does not inform you the arrival of a message. MIC Setting*22 Adjust microphone volume connected to the unit. 01, 02, 03 Version*23 The Bluetooth software and hardware versions are - JVC KD-ADV38 | Instructions - Page 218
etc.) to clean discs. Connector Moisture condensation Moisture may condense on the lens inside the unit in the following cases: • After starting the heater in the car. • If it becomes very humid inside the car. Should this occur, the unit may malfunction. In this case, eject the disc and leave the - JVC KD-ADV38 | Instructions - Page 219
or less. • This unit supports DivX 6.x, 5.x, 4.x, and 3.11. • Audio stream should conform to MP3 or Dolby Digital. • The file encoded in the interlaced scanning mode may not be played back correctly. • The maximum bit rate for video signals (average) is as follows: - DVD: 4 Mbps - USB: 2 Mbps 61 - JVC KD-ADV38 | Instructions - Page 220
Audio streams should conform to MPEG1 Audio Layer-2 or Dolby Digital. • The maximum bit rate for video signals (average) is as follows: - DVD: 4 Mbps - USB: 2 Mbps Playing JPEG files • This unit -channel DVD Video, DivX 2-channel and MPEG 2-channel sources. If is selected, stereo sounds - JVC KD-ADV38 | Instructions - Page 221
of the device. • This unit may not work for some Bluetooth devices. • Connecting condition may vary depending on circumstances around you. • When the unit is turned off, the device is disconnected. iPod/D. player operations • When you turn on this unit, the iPod or D. player is charged through the - JVC KD-ADV38 | Instructions - Page 222
visit the following JVC web site: For iPod users: For D. player users: Menu settings • If you change the setting from to while the - JVC KD-ADV38 | Instructions - Page 223
ENGLISH Language codes (for DVD/DivX language selection) Code Language Code Language AA Afar FA Persian AB Abkhazian FI Finnish AF Afrikaans FJ Fiji AM Ameharic FO Faroese AR Arabic - JVC KD-ADV38 | Instructions - Page 224
the DVD/CD player.) • Change the source. • Start the playback on the external component connected to VIDEO IN plug. • Check the cords and connections. • Signal input is too weak. Reset the unit. (☞ page 3) Store stations manually. (☞ page 11) • Static noise while listening to the radio. Connect - JVC KD-ADV38 | Instructions - Page 225
Elapsed playing time is not correct. • "Not Support" appears on the monitor and track skips. • Installation/Connection Manual) • Connect the video back using other players. • Readout time varies depending on the USB device. • Do the power then on again. • Do not pull out or connect the USB device - JVC KD-ADV38 | Instructions - Page 226
try to connect again. (☞ page 35) • Echo or noise occurs. Adjust the microphone unit position. • Phone sound quality is poor. • Reduce the distance between the unit and the Bluetooth audio device. • Move the car to place where you can get a better signal reception. • The sound is interrupted - JVC KD-ADV38 | Instructions - Page 227
(☞ page 3) • The DAB tuner does not work at all. Connect this unit and the DAB tuner correctly, then reset the unit. (☞ page 3) • "Antenna Power NG" appears on the monitor. Check the cords and connections. • The iPod/D. player does not turn on or does not work. • Check the connecting cable and - JVC KD-ADV38 | Instructions - Page 228
Continuous Power Output Video Output (composite): 1 Vp-p/75 Ω Other Terminals: Input: LINE IN, VIDEO IN, MIC IN, USB input terminal, Aerial input Output: 2nd AUDIO OUT, VIDEO to 15 000 Hz Stereo Separation: 35 dB MW Frequency Response: DVD, fs=48 kHz: 16 Hz to 22 000 Hz DVD, fs=192 - JVC KD-ADV38 | Instructions - Page 229
. Current: Less than 500 mA/5 V Version: Bluetooth 1.2 certified Output Power: +4 dBm Max. (Power class 2) Service Area: Within 10 m Profile: HSP (Headset Profile) HFP (Hands-Free Profile) A2DP (Advanced Audio Distribution Profile) AVRCP (Audio/Video Remote Control Profile) SPP (Serial Port - JVC KD-ADV38 | Instructions - Page 230
Having TROUBLE with operation? Please reset your unit Refer to page of How to reset your unit B 12, 3 221-8520 EN, RU, UK © 2007 Victor Company of Japan, Limited 0207MNMMDWJEIN - JVC KD-ADV38 | Instructions - Page 231
Control panel Dashboard Parts list for installation and connection The following parts are provided for this unit. After checking them, please set them correctly A / B Hard case/Control panel C Sleeve D Trim plate E Power cord F Audio/video cord Trim plate is detached on - JVC KD-ADV38 | Instructions - Page 232
optional stay Fire wall Stay (option Dashboard Screw (option When installing the unit without using the sleeve In a car having the "Required space for installation" (see page 1), first remove the car radio and install the unit in its place 1 1. Flat type screws-M5 × 8 mm *2 M5 - JVC KD-ADV38 | Instructions - Page 233
або Opel (Vauxhall) You may need to modify the wiring of the supplied power cord as illustrated. • Contact your authorized car dealer before installing this unit. Original wiring Modified wiring 1 1 1 ISO connector of the supplied power cord ISO ISO View from the lead side - JVC KD-ADV38 | Instructions - Page 234
operation of this unit prior to installation, this lead must be connected, otherwise power cannot be turned on. *4 *4 USB cable USB USB (see diagram 15 A fuse 15 A 15 А *3 Not included for this unit *3 3 Black To metallic body or chassis of the car Ignition switch Yellow - JVC KD-ADV38 | Instructions - Page 235
INSTRUCTIONS (separate volume). cм. стр. 53 Cм. стр. 56 53 56 Remote lead Remote lead (Blue with white stripe Y-connector (not supplied for this unit Y Y To the remote lead of other equipment or power aerial if any Rear speakers JVC Amplifier JVC JVC Front - JVC KD-ADV38 | Instructions - Page 236
unit is turned off. • To use JVC CD changer, Apple iPod or JVC D. player, set "External Input" to "Changer/iPod/D. Player" (see page 55 of the INSTRUCTIONS Audio cord (not supplied External component USB devices USB / USB or JVC DAB tuner Тюнер DAB JVC JVC 3.5 mm stereo - JVC KD-ADV38 | Instructions - Page 237
ENGLISH DVD/CD RECEIVER KD-AVX33 For canceling the display demonstration, see page 5. For installation and connections, refer to the separate manual. INSTRUCTIONS LVT1708-002A [U] - JVC KD-ADV38 | Instructions - Page 238
to qualified service personnel. 3. CAUTION: Visible and/or invisible class 1M laser radiation when open. Do not view directly with optical instruments. 4. REPRODUCTION OF LABEL: CAUTION LABEL, PLACED OUTSIDE THE UNIT. WARNINGS: To prevent accidents and damage • DO NOT install any unit and wire any - JVC KD-ADV38 | Instructions - Page 239
(RM-RK251) ...... 8 Listening to the radio 10 Disc operations 13 Dual Zone operations 26 USB operations 29 Bluetooth® operations- Cellular phone/audio player .......... 31 EXTERNAL DEVICES Listening to the CD changer 38 Listening to the iPod/D. player ......... 40 Listening to other external - JVC KD-ADV38 | Instructions - Page 240
ENGLISH Playable disc type Disc type DVD Recording format, file type, etc. DVD Video (Region Code: 3)*1 Playable DVD Audio DVD-ROM DVD Recordable/Rewritable DVD Video (DVD-R*2/-RW, +R/+RW*3) • DVD Video: UDF bridge • DVD-VR DVD-VR (non-CPRM only) DivX/MPEG1/MPEG2 • DivX/MPEG1/MPEG2/JPEG/ - JVC KD-ADV38 | Instructions - Page 241
unit; however, the buttons on the remote controller can work in the same way if they have the same names or marks. Setup menu icon AV Menu Setup ENT Enter Currently selected menu Indication language: ~ Turn on the power. Ÿ Display . ! Enter the menu. In this manual, English - JVC KD-ADV38 | Instructions - Page 242
menu. fl Select . & Activate the screen. ‡ Select the setting. • Off: The clock time is not displayed while playing back a video source. • On: The clock time is displayed while playing back - JVC KD-ADV38 | Instructions - Page 243
. TUNER = DISC (DVD/VCD/CD) = USB =CD-CH, iPod, D.PLAYER, or EXT-IN =Bluetooth Phone =Bluetooth Audio = AV-IN =(back to the beginning) • You cannot select these sources if they are not ready. • Turn on the power. • Turn off the power [Hold]. • Display or erase *1. • Activate Voice - JVC KD-ADV38 | Instructions - Page 244
sensor to bright light (direct sunlight or artificial lighting). Caution: • Do not expose batteries to heat or flame. i ; IMPORTANT: If Dual Zone is activated (☞ page 26), the remote o a s controller functions only for operating the DVD/CD player. 1*1 • Turns on the power. • Attenuates the - JVC KD-ADV38 | Instructions - Page 245
Manual Search For Apple iPod/JVC D. player USB: Stop playback. Bluetooth Phone: Ends the call. Bluetooth Audio: Plays/pauses. On menus: Back. e*2 Adjusts the volume level through the 2nd AUDIO OUT plug. (☞ page 26) r*2 Activates or deactivates Dual Zone. t*1*2 Selects the sound mode. y • DVD Video - JVC KD-ADV38 | Instructions - Page 246
: Hold either 4 or ¢ until "Manual Search" appears on the display, then press it repeatedly. • The ST indicator lights up when receiving an FM stereo broadcast with sufficient signal strength. When an FM stereo broadcast is hard to receive 1 AV Menu Setup ENT Enter 2 AV Menu 4 Mono Off On ENT - JVC KD-ADV38 | Instructions - Page 247
works only for FM bands. You can preset six stations for each band. 1 AV Menu Setup ENT Enter 2 AV Menu Setup ENT Enter 2 AV Menu Mode ENT Enter Mode menu icon 3 Mode Mono DX/Local SSM Title Entry DX detected. • The DX indicator goes off, then the LO indicator lights up. 11 OPERATIONS - JVC KD-ADV38 | Instructions - Page 248
ENGLISH Manual presetting Ex.: Storing FM station of 92.5 MHz into preset number , you can change the FM bands. • Preset List can also be accessed through = . (☞ right ) Selecting preset stations On the remote: 1 2 or On the unit: or 1 FM1 1 87.5 2 89.9 3 97.9 4 92.5 5 108.0 - JVC KD-ADV38 | Instructions - Page 249
disc menu, all tracks in it will be played repeatedly until you change the source or eject the disc. If " " appears on the monitor, the unit cannot accept the operation you have tried to do. • In some cases, without showing " ," operations will not be accepted. Insert the disc. Playback starts - JVC KD-ADV38 | Instructions - Page 250
following discs, press . • Each time you press the button, playback picture and disc information screens appear alternately. Disc type Audio format Surround mode DVD VIDEO DIGITAL MULTI T 01 C 02 0:45:38 CHAP. RPT 3: 45PM 4 ¢ Press: Select chapter Playback mode Hold: Reverse/forward search - JVC KD-ADV38 | Instructions - Page 251
ENGLISH DVD DivX FRONT 2CH T 01 C 02 0:45:38 Current Folder Name Current File Name : Display Folder List For DivX/MPEG: Folder no./Track no./Playing time For JPEG: Folder no./File no. PBC indicator lights up when PBC is in use. ☞ page 43 VCD PBC FLAT 02 0:45:38 3: 45PM 4 ¢ Press: Select - JVC KD-ADV38 | Instructions - Page 252
Title RPT 3: 45PM 4 ¢ Press: Select track Hold: Reverse/forward search*1 Disc title/Artist Name/Track title Track no./Playing time (only for CD Text)*3 Audio format (MP3/WMA/WAV/AAC) ☞ page 43 CD MP3 FLAT T 01 02 0:45:38 Current Folder Name Current File Name.mp3 RPT 3: 45PM 4 ¢ Press - JVC KD-ADV38 | Instructions - Page 253
3 Mode All Off Intro Repeat Random Off Setup ENT Enter 2 AV Menu Mode ENT Enter Mode menu icon 4 Repeat Off Track Folder ENT Set When one of the playback modes is selected, the corresponding indicator lights up on the disc information screen. To cancel, select in step 3 or - JVC KD-ADV38 | Instructions - Page 254
start playing. File List Song011.mp3 Song012.mp3 Song013.mp3 Song014.mp3 Song015.mp3 Off Song016.mp3 ENT • Folder List can also be accessed through = . AV Menu Setup AV Menu ENT Enter List ENT Enter List menu icon 18 - JVC KD-ADV38 | Instructions - Page 255
title (during playback or pause). Using menu driven features 1 2 Select an item you want to start playback. : Select aspect ratio. : Select audio language. 3 *1 : Select subtitle language. : Select view angle. *1 Erases the misentry of the number. *2 Search speed: x2 ] x5 ] x10 ] x20 ] x60 - JVC KD-ADV38 | Instructions - Page 256
). Hold: Reverse/forward search.*6 Select program. : Select play list (during playback or pause). : Select aspect ratio. : Select audio channel (ST: stereo, L: left, R: Right). : Turn on/off subtitle. = = : Select chapter. Select program (when not playing). (twice) = = : Select program/play - JVC KD-ADV38 | Instructions - Page 257
search.*6 (No sound can be heard.) To cancel PBC playback 1 : Select aspect ratio. 2 Start the desired track. : Select audio channel (ST: stereo, L: left, R: = = Right). • To resume PBC, press / . : Stop playback. : Start playback/Pause (if pressed during playback). : Reverse/forward - JVC KD-ADV38 | Instructions - Page 258
can also be used for "USB." MULTI: For multi-channel encoded sources such as Dolby Digital*1, DTS*2, and DVD Audio. (When activated, "MULTI" instructions shown on the monitor. Selecting browsable still picture When a disc including browsable still pictures is detected, the B.S.P indicator lights - JVC KD-ADV38 | Instructions - Page 259
ENT Set • Auto: When multi-channel digital signals come in, "MULTI" surround is activated. When 2-channel or 2.1-channel signals come in, "4CH STEREO" is activated. • Through: All incoming channel signals are sent to the corresponding speakers. • Dolby PLIIMovie: Activates Dolby Pro Logic II Movie - JVC KD-ADV38 | Instructions - Page 260
ENGLISH Operations using the on-screen bar (DVD/VCD/DivX/MPEG1/MPEG2/ JPEG) These operations are possible on the monitor using the remote controller. 1 Display the on-screen bar. (☞ page 25) 2 Select an - JVC KD-ADV38 | Instructions - Page 261
Items shown on the bar vary due to the disc type. 1 Disc type 2 • DVD: Audio signal format • VCD: PBC 3 Playback mode*1 DVD Video: T. RPT: Title repeat C. RPT: Chapter repeat DVD Audio: T. RPT: Track repeat DVD-VR: C. RPT: Chapter repeat PG. RPT: Program repeat DivX/MPEG: T. RPT: Track - JVC KD-ADV38 | Instructions - Page 262
VIDEO OUT and 2nd AUDIO OUT plugs, while listening to any other source than "USB" through the speakers. • When Dual Zone is in use, you can only operate the DVD/CD player using the remote controller. 1 AV DISC." * DVD VIDEO DIGITAL FLAT DUAL-S 2 T 01 C 02 0:45:38 *1 JVC original headphone - JVC KD-ADV38 | Instructions - Page 263
ENGLISH 1 Current folder (highlighted bar) 2 Current folder number/total folder number 3 Folder list * If tag data includes "Jacket Picture" (baseline JPEG), it will be displayed. If you press OSD, the playback mode selection window appears. (☞ below) 4 Selected playback mode (☞ below) 5 Elapsed - JVC KD-ADV38 | Instructions - Page 264
06/25 L-1 Time 19:00 10:30 17:00 13:19 22:00 8:23 Title JVC DVD World 2004 Music Festival children 001 children 002 PLAY LIST No Date 1 07/05/25 2 005 003 001 Length 1:03:16 1:35:25 0:10:23 0:07:19 Title My JVC World Favorite music children001-002 Folder : 144/240 Track 144/198 Page : 4/5 - JVC KD-ADV38 | Instructions - Page 265
You can connect a USB mass storage class device such as a USB memory, Digital Audio player*1, portable HDD, etc. to the unit. ~ Connect a USB device. USB cable from the rear of the unit. • You cannot connect a computer to the USB ( ) terminal of the unit. Ÿ Select "USB". 4 ¢ Press: Select track - JVC KD-ADV38 | Instructions - Page 266
data. • Do not leave a USB device in the car, expose to direct sunlight, or AV Menu Setup ENT Enter 2 AV Menu Mode Mode menu icon ENT Enter 3 Mode All Off Intro Repeat Random Off 4 Repeat Off Track Folder ENT Set When one of the playback modes is selected, the corresponding indicator lights - JVC KD-ADV38 | Instructions - Page 267
) to see the countries where you may use the Bluetooth® function. Bluetooth profile This unit supports the following Bluetooth profiles; HSP (Headset Profile) HFP (Hands-Free Profile) A2DP (Advanced Audio Distribution Profile) AVRCP (Audio/Video Remote Control Profile) SPP (Serial Port Profile) OPP - JVC KD-ADV38 | Instructions - Page 268
Unfound" appears.) 2 Select a device you want to connect. 3 Enter the specific PIN code of the device to the unit. • Refer to the instructions supplied with the device to check the PIN code. 4 Use the Bluetooth device to connect. Now connection is established and you can use the device through the - JVC KD-ADV38 | Instructions - Page 269
... 1 NEW DEVICE Dial Menu Message Open Search Special Device The unit displays the list of the preset devices. 2 Select a device you want to connect. Deleting a registered device 1 Select "Bluetooth Phone" or "Bluetooth Audio," then select a registered device you want to delete. 2 Perform steps - JVC KD-ADV38 | Instructions - Page 270
can adjust the microphone volume level. (☞ page 54) To end the call or reject an incoming call Hold any button (except ATT or +/-). Name and phone number (if acquired) The source is automatically changed to "Bluetooth Phone". When is activated... The unit answers the incoming calls - JVC KD-ADV38 | Instructions - Page 271
Service) and is set to (☞ page 54), the unit rings and "Receiving unit. When is set to ... To read the message While "Receiving Message" is displayed... • The source is changed to "Bluetooth to this unit. (Refer to the instruction manual supplied with your - JVC KD-ADV38 | Instructions - Page 272
be also accessed through = = . AV Menu Setup AV Menu ENT Enter Bluetooth ENT Enter Bluetooth menu icon Direct operations number 4. To call a preset number On the remote: On the unit: 1 Preset List 1 11122223333 2 22233336666 3 44455556666 4 09845671234 5 - JVC KD-ADV38 | Instructions - Page 273
operations. For details, ☞ pages 8 and 9. ENGLISH Setup AV Menu ENT Enter List ENT Enter List menu icon Using the Bluetooth audio player Reverse/forward skip POWER]ON Turns Blue when the Bluetooth device is connected. *1 Bluetooth Audio FLAT Connected device name 3: 45PM ☞ page 43 - JVC KD-ADV38 | Instructions - Page 274
: Select track Hold: Reverse/forward search 5 ∞ Press: Select folder (MP3 only) Hold: Display Disc List It is recommended to use a JVC MP3-compatible CD changer with your unit. • You can play only CDs (CD-DA) and MP3 discs. Preparation: Make sure is selected for the external input setting - JVC KD-ADV38 | Instructions - Page 275
Setup ENT Enter 2 AV Menu Mode ENT Enter Mode menu icon 3 Mode All Off Intro Repeat Random Off 4 Repeat Off Track Disc ENT Set When one of the playback modes is selected, the corresponding indicator lights up on the monitor. To cancel, select in step 3 or in step 4. Disc - JVC KD-ADV38 | Instructions - Page 276
the iPod/D. player POWER]ON Track no./Playing time ☞ page 43 4 ¢: Press: Select track Hold: Reverse/forward search 5 ∞ 5 : Enter player's menu ∞ : Pause/stop playback • To resume, press again. It is required to connect the interface adapter (KSPD100 for Apple iPod or KS-PD500 for JVC D. player) to - JVC KD-ADV38 | Instructions - Page 277
VIDEO IN plug so that you can watch the navigation screen (Make sure is selected for ). (☞ page 50) POWER]ON Assigned title (☞ page 44) ☞ page 43 AV-IN FLAT AV is selected for ... • You can use the source "AV-IN" for listening to an audio source connected to the - JVC KD-ADV38 | Instructions - Page 278
to the CD changer jack on the rear using the Line Input Adapter-KS-U57 (not supplied) or AUX Input Adapter-KS-U58 (not supplied). POWER]ON Assigned title (☞ page 44) ☞ page 43 EXT-IN FLAT EXT-INPUT 3: 45PM Preparation: Make sure is selected for the external input setting - JVC KD-ADV38 | Instructions - Page 279
ENGLISH Sound equalization POWER]ON Edit 60.0 Hz +03 ENT Store Selecting sound mode ~ AV Menu Ÿ Setup ENT Enter Equalizer menu icon AV Menu Storing your own adjustment You can store your adjustment into User1, User2, and User3. 1 Repeat steps ~ and Ÿ, then in step !... Equalizer Flat Hard - JVC KD-ADV38 | Instructions - Page 280
ENGLISH Assigning titles to the sources POWER]ON Press: Change character set Hold: Erase title Title Entry Station Name ABC Radio DISP A a 0 Á á ENT Store You can assign titles as follows. FM/AM stations Up to 16 characters-up to 30 stations AV-IN EXT-IN Up to 16 characters • If you try to - JVC KD-ADV38 | Instructions - Page 281
Menu operations POWER]ON Setup Equalizer Sound AV Menu Disc Surround Setup ENT Enter Mode Ex. Changing the setting ~ AV Menu Setup ENT Enter Non-available items will be displayed being shaded. Ÿ Sound menu icon AV Menu Sound ENT Enter List Bluetooth Dual Zone - JVC KD-ADV38 | Instructions - Page 282
Auto : Repeats scrolling (5-second intervals). • Holding DISP (on the unit) scrolls the information regardless of this setting. Tag Display Off : Cancels . (☞ Installation/Connection Manual) *2 Adjustable only when the source is a disc or USB containing pictures or movies, or "AV-IN." 46 - JVC KD-ADV38 | Instructions - Page 283
automatically selected to match to the incoming signals. • For the other video sources: Aspect ratio is fixed to . Regular : For 4:3 [6] *3 Not adjustable for audio sources. *4 After you change the indication language setting, turn off then on the power so that your setting takes effect - JVC KD-ADV38 | Instructions - Page 284
of files. You can store this setting separately for each source -"DISC/ USB." Audio : Plays back audio files. Still Picture : Plays back JPEG files. Video : Plays back DivX/MPEG1/MPEG2 files. DivX Regist. (Registration) This unit has its own Registration Code. Once you have played back a file with - JVC KD-ADV38 | Instructions - Page 285
powerful unit-cm and inch. *5 Selectable only for "DISC" and "USB ." (Playback stops when you select one of the items.) *6 This subwoofer level setting takes effect only when surround is activated. (☞ also page 22, 23) *7 This setting does not take effect for MPEG1/MPEG2 and DivX with MP3 audio - JVC KD-ADV38 | Instructions - Page 286
. Off : Select when no component is connected ("AV-IN" is skipped while selecting the source). Audio&Video : Select when connecting an AV component such as a VCR. Audio : Select when connecting an audio component such as a digital audio player. Camera*8: Select when connecting the rear view camera - JVC KD-ADV38 | Instructions - Page 287
, 120Hz, 150Hz Amplifier Gain You can change the maximum volume level of this unit. Off : Deactivates the built-in amplifier. Low Power : VOL 00 to 30 (Select this if the maximum power of the speakers is less than 50 W.) High Power : VOL 00 to 50 Rear Speaker*13 You can activate/deactivate the - JVC KD-ADV38 | Instructions - Page 288
Only for FM. (DX, Local), ☞ [11] SSM Title Entry Only for FM. ☞ [11] Only for FM/AM stations, AV-IN and EXT-IN. ☞ [44] All Off/Intro/Repeat/Random Only for disc/USB playback and iPod/D. player. ☞ [17, 30, 39, 40] *16 Items listed under vary among the playback sources. List The accessible - JVC KD-ADV38 | Instructions - Page 289
devices. *17 Selectable only for "Bluetooth Phone" or "Bluetooth Audio." Select a device (or "NEW DEVICE") before operating the menu. *18 Selectable only when the device is compatible with SMS. When operating the Bluetooth device, refer also to the instructions supplied with the device. Continued - JVC KD-ADV38 | Instructions - Page 290
message by ringing and displaying "Receiving Message." To read the message, press ENT (☞ page 35). Manual : The unit does not inform you the arrival of a message. MIC Setting*20 Adjust microphone volume connected to the unit. 01, 02, 03 Version*21 The Bluetooth software and hardware versions are - JVC KD-ADV38 | Instructions - Page 291
etc.) to clean discs. Connector Moisture condensation Moisture may condense on the lens inside the unit in the following cases: • After starting the heater in the car. • If it becomes very humid inside the car. Should this occur, the unit may malfunction. In this case, eject the disc and leave the - JVC KD-ADV38 | Instructions - Page 292
in memory • When SSM is over, received stations are preset in No.1 (lowest frequency) to No. 6 (highest frequency). Disc General • In this manual, words "track" and "file" are interchangeably used. • This unit can also play back 8 cm discs. • This unit can only play back audio CD (CD-DA) files if - JVC KD-ADV38 | Instructions - Page 293
less. • This unit supports DivX 6.x, 5.x, 4.x, and 3.11. • Audio stream should conform to MP3 or Dolby Digital. • The file encoded in the interlaced scanning mode may not be played back correctly. • The maximum bit rate for video signals (average) is as follows: - DVD: 4 Mbps - USB: 2 Mbps Playing - JVC KD-ADV38 | Instructions - Page 294
comes out of the subwoofer. • When is selected, downsampling is performed for DVD Video (LPCM only), DVD-VR (LPCM only), and DVD Audio with fs=88.2 kHz/96 kHz and higher. USB • If "No USB Device" appears after removing a device, reattach a device or select another playback source. • When - JVC KD-ADV38 | Instructions - Page 295
visit the following JVC web site: For iPod users: For D. player users: Menu settings • If you change the setting from to while the - JVC KD-ADV38 | Instructions - Page 296
00 • "DVD Logo" is a trademark of DVD Format/Logo video (including DivX® 6) with enhanced playback of DivX® media files and the DivX® Media Format • Microsoft and Windows Media are either registered trademarks or trademarks of Microsoft Corporation in the United States and/or other countries. • iPod - JVC KD-ADV38 | Instructions - Page 297
ENGLISH Language codes (for DVD/DivX language selection) Code Language Code Language AA Afar FA Persian AB Abkhazian FI Finnish AF Afrikaans FJ Fiji AM Ameharic FO Faroese AR Arabic - JVC KD-ADV38 | Instructions - Page 298
the DVD/CD player.) • Change the source. • Start the playback on the external component connected to VIDEO IN plug. • Check the cords and connections. • Signal input is too weak. Reset the unit. (☞ page 3) Store stations manually. (☞ page 12) • Static noise while listening to the radio. Connect - JVC KD-ADV38 | Instructions - Page 299
Elapsed playing time is not correct. • "Not Support" appears on the monitor and track is skipped. Installation/Connection Manual) • Connect the video back using other players. • Readout time varies depending on the USB device. • Do the power then on again. • Do not pull out or connect the USB device - JVC KD-ADV38 | Instructions - Page 300
try to connect again. (☞ page 33) • Echo or noise occurs. Adjust the microphone unit position. • Phone sound quality is poor. • Reduce the distance between the unit and the Bluetooth audio device. • Move the car to place where you can get a better signal reception. • The sound is interrupted - JVC KD-ADV38 | Instructions - Page 301
them again. Check the connection between the adapter and this unit. Reset the iPod or D. player. • Turn on the video component if it is not on. • This unit is not connected to the video component correctly. Connect it correctly. Adjust items in . (☞ page 46) AV-IN 65 REFERENCES - JVC KD-ADV38 | Instructions - Page 302
Power Video Output (composite): 1 Vp-p/75 Ω Other Terminals: Input: LINE IN, VIDEO IN, MIC IN, USB input terminal, Antenna input Output: 2nd AUDIO OUT, VIDEO Hz to 15 000 Hz Stereo Separation: 35 dB AM laser) Frequency Response: DVD, fs=48 kHz: 16 Hz to 22 000 Hz DVD, fs=192 kHz - JVC KD-ADV38 | Instructions - Page 303
. Current: Less than 500 mA/5 V Version: Bluetooth 1.2 certified Output Power: +4 dBm Max. (Power class 2) Service Area: Within 10 m Profile: HSP (Headset Profile) HFP (Hands-Free Profile) A2DP (Advanced Audio Distribution Profile) AVRCP (Audio/Video Remote Control Profile) SPP (Serial Port - JVC KD-ADV38 | Instructions - Page 304
Having TROUBLE with operation? Please reset your unit Refer to page of How to reset your unit EN, CT, TH © 2007 Victor Company of Japan, Limited 0207MNMMDWJEIN - JVC KD-ADV38 | Instructions - Page 305
at JVC car audio dealers. 12 V JVC 12 JVC WARNINGS ᙲѿ • DO NOT install any unit and wire any Power cord F Audio/video cord G Crimp connectors қʪᏃ H Remote controller/Holder I Batteries ྐЖ J Double-sided adhesive tape K Microphone ఐџࡘ L Microphone - JVC KD-ADV38 | Instructions - Page 306
. If you have any questions or require information regarding installation kits, consult your JVC car audio dealer or a company supplying kits. • If you are not sure how to install this unit correctly, have it installed by a qualified technician. • Make sure not to block the fan on the rear - JVC KD-ADV38 | Instructions - Page 307
the wiring harness to the unit. 1 2 3 1 2 3 Rear ground terminal To an external component (see diagram *3 Not included for this unit *3 *3 *4 Before checking the operation of this unit prior to installation, this lead must be connected, otherwise power cannot - JVC KD-ADV38 | Instructions - Page 308
À√◊Õ J Double-sided adhesive tape Adjust the microphone angle Microphone clip ఐџࡘқ Secure the microphone cord using cord cramps (not supplied) if necessary TROUBLESHOOTING • The fuse blows. * Are the red and black leads connected correctly? • Power cannot be turned on. * Is the - JVC KD-ADV38 | Instructions - Page 309
for this unit) Y Y To the remote lead of other equipment JVC Amplifier JVC JVC Subwoofer JVC Amplifier JVC JVC Center speaker *5 Audio cord (not supplied) *5 *5 *6 Firmly attach the ground wire to the metallic body or to the chassis of the car-to the place - JVC KD-ADV38 | Instructions - Page 310
unit is turned off. • To use JVC CD changer, Apple iPod or JVC D. player, set "External Input" to "Changer/iPod/D. Player" (see page 50 of the INSTRUCTIONS). • To use other external components via KS-U57 or KS-U58, set "External Input" to "External Input" (see page 50 of the INSTRUCTIONS). JVC - JVC KD-ADV38 | Instructions - Page 311
DVD/CD RECEIVER KD-AVX33 For canceling the display demonstration, see page 5. For installation and connections, refer to the separate manual. INSTRUCTIONS LVT1708-001A [A] - JVC KD-ADV38 | Instructions - Page 312
to qualified service personnel. 3. CAUTION: Visible and/or invisible class 1M laser radiation when open. Do not view directly with optical instruments. 4. REPRODUCTION OF LABEL: CAUTION LABEL, PLACED OUTSIDE THE UNIT. WARNINGS: To prevent accidents and damage • DO NOT install any unit and wire any - JVC KD-ADV38 | Instructions - Page 313
(RM-RK251) ...... 8 Listening to the radio 10 Disc operations 13 Dual Zone operations 26 USB operations 29 Bluetooth® operations- Cellular phone/audio player .......... 31 EXTERNAL DEVICES Listening to the CD changer 38 Listening to the iPod/D. player ......... 40 Listening to other external - JVC KD-ADV38 | Instructions - Page 314
Playable disc type Disc type DVD Recording format, file type, etc. DVD Video (Region Code: 4)*1 Playable DVD Audio DVD-ROM DVD Recordable/Rewritable DVD Video (DVD-R*2/-RW, +R/+RW*3) • DVD Video: UDF bridge • DVD-VR DVD-VR (non-CPRM only) DivX/MPEG1/MPEG2 • DivX/MPEG1/MPEG2/JPEG/MP3/ JPEG - JVC KD-ADV38 | Instructions - Page 315
unit; however, the buttons on the remote controller can work in the same way if they have the same names or marks. Setup menu icon AV Menu Setup ENT Enter Currently selected menu Indication language: ~ Turn on the power. Ÿ Display . ! Enter the menu. In this manual, English - JVC KD-ADV38 | Instructions - Page 316
menu. fl Select . & Activate the screen. ‡ Select the setting. • Off: The clock time is not displayed while playing back a video source. • On: The clock time is displayed while playing back - JVC KD-ADV38 | Instructions - Page 317
. TUNER = DISC (DVD/VCD/CD) = USB =CD-CH, iPod, D.PLAYER, or EXT-IN =Bluetooth Phone =Bluetooth Audio = AV-IN =(back to the beginning) • You cannot select these sources if they are not ready. • Turn on the power. • Turn off the power [Hold]. • Display or erase *1. • Activate Voice - JVC KD-ADV38 | Instructions - Page 318
sensor to bright light (direct sunlight or artificial lighting). Caution: • Do not expose batteries to heat or flame. i ; IMPORTANT: If Dual Zone is activated (☞ page 26), the remote o a s controller functions only for operating the DVD/CD player. 1*1 • Turns on the power. • Attenuates the - JVC KD-ADV38 | Instructions - Page 319
Manual Search For Apple iPod/JVC D. player USB: Stop playback. Bluetooth Phone: Ends the call. Bluetooth Audio: Plays/pauses. On menus: Back. e*2 Adjusts the volume level through the 2nd AUDIO OUT plug. (☞ page 26) r*2 Activates or deactivates Dual Zone. t*1*2 Selects the sound mode. y • DVD Video - JVC KD-ADV38 | Instructions - Page 320
: Hold either 4 or ¢ until "Manual Search" appears on the display, then press it repeatedly. • The ST indicator lights up when receiving an FM stereo broadcast with sufficient signal strength. When an FM stereo broadcast is hard to receive 1 AV Menu Setup ENT Enter 2 AV Menu 4 Mono Off On ENT - JVC KD-ADV38 | Instructions - Page 321
works only for FM bands. You can preset six stations for each band. 1 AV Menu Setup ENT Enter 2 AV Menu Setup ENT Enter 2 AV Menu Mode ENT Enter Mode menu icon 3 Mode Mono DX/Local SSM Title Entry DX detected. • The DX indicator goes off, then the LO indicator lights up. 11 OPERATIONS - JVC KD-ADV38 | Instructions - Page 322
Manual presetting Ex.: Storing FM station of 92.5 MHz into preset number 4 of button, you can change the FM bands. • Preset List can also be accessed through = . (☞ right ) Selecting preset stations On the remote: 1 2 or On the unit: or 1 FM1 1 87.5 2 89.9 3 97.9 4 92.5 5 108.0 6 - JVC KD-ADV38 | Instructions - Page 323
disc menu, all tracks in it will be played repeatedly until you change the source or eject the disc. If " " appears on the monitor, the unit cannot accept the operation you have tried to do. • In some cases, without showing " ," operations will not be accepted. Insert the disc. Playback starts - JVC KD-ADV38 | Instructions - Page 324
following discs, press . • Each time you press the button, playback picture and disc information screens appear alternately. Disc type Audio format Surround mode DVD VIDEO DIGITAL MULTI T 01 C 02 0:45:38 CHAP. RPT 3: 45PM 4 ¢ Press: Select chapter Playback mode Hold: Reverse/forward search - JVC KD-ADV38 | Instructions - Page 325
DVD DivX FRONT 2CH T 01 C 02 0:45:38 Current Folder Name Current File Name.avi Hold: Display Folder List For DivX/MPEG: Folder no./Track no./Playing time For JPEG: Folder no./File no. PBC indicator lights up when PBC is in use. ☞ page 43 VCD PBC FLAT 02 0:45:38 3: 45PM 4 ¢ Press: Select - JVC KD-ADV38 | Instructions - Page 326
Title RPT 3: 45PM 4 ¢ Press: Select track Hold: Reverse/forward search*1 Disc title/Artist Name/Track title Track no./Playing time (only for CD Text)*3 Audio format (MP3/WMA/WAV/AAC) ☞ page 43 CD MP3 FLAT T 01 02 0:45:38 Current Folder Name Current File Name.mp3 RPT 3: 45PM 4 ¢ Press - JVC KD-ADV38 | Instructions - Page 327
3 Mode All Off Intro Repeat Random Off Setup ENT Enter 2 AV Menu Mode ENT Enter Mode menu icon 4 Repeat Off Track Folder ENT Set When one of the playback modes is selected, the corresponding indicator lights up on the disc information screen. To cancel, select in step 3 or - JVC KD-ADV38 | Instructions - Page 328
start playing. File List Song011.mp3 Song012.mp3 Song013.mp3 Song014.mp3 Song015.mp3 Off Song016.mp3 ENT • Folder List can also be accessed through = . AV Menu Setup AV Menu ENT Enter List ENT Enter List menu icon 18 - JVC KD-ADV38 | Instructions - Page 329
title (during playback or pause). Using menu driven features 1 2 Select an item you want to start playback. : Select aspect ratio. : Select audio language. 3 *1 : Select subtitle language. : Select view angle. *1 Erases the misentry of the number. *2 Search speed: x2 ] x5 ] x10 ] x20 ] x60 - JVC KD-ADV38 | Instructions - Page 330
). Hold: Reverse/forward search.*6 Select program. : Select play list (during playback or pause). : Select aspect ratio. : Select audio channel (ST: stereo, L: left, R: Right). : Turn on/off subtitle. = = : Select chapter. Select program (when not playing). (twice) = = : Select program/play - JVC KD-ADV38 | Instructions - Page 331
Hold: Reverse/forward search.*6 (No 1 sound can be heard.) : Select aspect ratio. 2 Start the desired track. : Select audio channel (ST: stereo, L: left, R: Right). = = • To resume PBC, press / . : Stop playback. : Start playback/Pause (if pressed during playback). : Reverse/forward - JVC KD-ADV38 | Instructions - Page 332
can also be used for "USB." MULTI: For multi-channel encoded sources such as Dolby Digital*1, DTS*2, and DVD Audio. (When activated, "MULTI" instructions shown on the monitor. Selecting browsable still picture When a disc including browsable still pictures is detected, the B.S.P indicator lights - JVC KD-ADV38 | Instructions - Page 333
ENT Set • Auto: When multi-channel digital signals come in, "MULTI" surround is activated. When 2-channel or 2.1-channel signals come in, "4CH STEREO" is activated. • Through: All incoming channel signals are sent to the corresponding speakers. • Dolby PLIIMovie: Activates Dolby Pro Logic II Movie - JVC KD-ADV38 | Instructions - Page 334
Operations using the on-screen bar (DVD/VCD/DivX/MPEG1/MPEG2/ JPEG) These operations are possible on the monitor using the remote controller. 1 Display the on-screen bar. (☞ page 25) 2 Select an - JVC KD-ADV38 | Instructions - Page 335
Items shown on the bar vary due to the disc type. 1 Disc type 2 • DVD: Audio signal format • VCD: PBC 3 Playback mode*1 DVD Video: T. RPT: Title repeat C. RPT: Chapter repeat DVD Audio: T. RPT: Track repeat DVD-VR: C. RPT: Chapter repeat PG. RPT: Program repeat DivX/MPEG: T. RPT: Track - JVC KD-ADV38 | Instructions - Page 336
VIDEO OUT and 2nd AUDIO OUT plugs, while listening to any other source than "USB" through the speakers. • When Dual Zone is in use, you can only operate the DVD/CD player using the remote controller. 1 AV DISC." * DVD VIDEO DIGITAL FLAT DUAL-S 2 T 01 C 02 0:45:38 *1 JVC original headphone - JVC KD-ADV38 | Instructions - Page 337
1 Current folder (highlighted bar) 2 Current folder number/total folder number 3 Folder list * If tag data includes "Jacket Picture" (baseline JPEG), it will be displayed. If you press OSD, the playback mode selection window appears. (☞ below) 4 Selected playback mode (☞ below) 5 Elapsed playing - JVC KD-ADV38 | Instructions - Page 338
06/25 L-1 Time 19:00 10:30 17:00 13:19 22:00 8:23 Title JVC DVD World 2004 Music Festival children 001 children 002 PLAY LIST No Date 1 07/05/25 2 005 003 001 Length 1:03:16 1:35:25 0:10:23 0:07:19 Title My JVC World Favorite music children001-002 Folder : 144/240 Track 144/198 Page : 4/5 - JVC KD-ADV38 | Instructions - Page 339
You can connect a USB mass storage class device such as a USB memory, Digital Audio player*1, portable HDD, etc. to the unit. ~ Connect a USB device. USB cable from the rear of the unit. • You cannot connect a computer to the USB ( ) terminal of the unit. Ÿ Select "USB". 4 ¢ Press: Select track - JVC KD-ADV38 | Instructions - Page 340
data. • Do not leave a USB device in the car, expose to direct sunlight, or AV Menu Setup ENT Enter 2 AV Menu Mode Mode menu icon ENT Enter 3 Mode All Off Intro Repeat Random Off 4 Repeat Off Track Folder ENT Set When one of the playback modes is selected, the corresponding indicator lights - JVC KD-ADV38 | Instructions - Page 341
) to see the countries where you may use the Bluetooth® function. Bluetooth profile This unit supports the following Bluetooth profiles; HSP (Headset Profile) HFP (Hands-Free Profile) A2DP (Advanced Audio Distribution Profile) AVRCP (Audio/Video Remote Control Profile) SPP (Serial Port Profile) OPP - JVC KD-ADV38 | Instructions - Page 342
Unfound" appears.) 2 Select a device you want to connect. 3 Enter the specific PIN code of the device to the unit. • Refer to the instructions supplied with the device to check the PIN code. 4 Use the Bluetooth device to connect. Now connection is established and you can use the device through the - JVC KD-ADV38 | Instructions - Page 343
... 1 NEW DEVICE Dial Menu Message Open Search Special Device The unit displays the list of the preset devices. 2 Select a device you want to connect. Deleting a registered device 1 Select "Bluetooth Phone" or "Bluetooth Audio," then select a registered device you want to delete. 2 Perform steps - JVC KD-ADV38 | Instructions - Page 344
can adjust the microphone volume level. (☞ page 54) To end the call or reject an incoming call Hold any button (except ATT or +/-). Name and phone number (if acquired) The source is automatically changed to "Bluetooth Phone". When is activated... The unit answers the incoming calls - JVC KD-ADV38 | Instructions - Page 345
Service) and is set to (☞ page 54), the unit rings and "Receiving unit. When is set to ... To read the message While "Receiving Message" is displayed... • The source is changed to "Bluetooth to this unit. (Refer to the instruction manual supplied with your - JVC KD-ADV38 | Instructions - Page 346
be also accessed through = = . AV Menu Setup AV Menu ENT Enter Bluetooth ENT Enter Bluetooth menu icon Direct operations number 4. To call a preset number On the remote: On the unit: 1 Preset List 1 11122223333 2 22233336666 3 44455556666 4 09845671234 5 - JVC KD-ADV38 | Instructions - Page 347
phone operations. For details, ☞ pages 8 and 9. Setup AV Menu ENT Enter List ENT Enter List menu icon Using the Bluetooth audio player Reverse/forward skip POWER]ON Turns Blue when the Bluetooth device is connected. *1 Bluetooth Audio FLAT Connected device name 3: 45PM ☞ page 43 - JVC KD-ADV38 | Instructions - Page 348
: Select track Hold: Reverse/forward search 5 ∞ Press: Select folder (MP3 only) Hold: Display Disc List It is recommended to use a JVC MP3-compatible CD changer with your unit. • You can play only CDs (CD-DA) and MP3 discs. Preparation: Make sure is selected for the external input setting - JVC KD-ADV38 | Instructions - Page 349
Setup ENT Enter 2 AV Menu Mode ENT Enter Mode menu icon 3 Mode All Off Intro Repeat Random Off 4 Repeat Off Track Disc ENT Set When one of the playback modes is selected, the corresponding indicator lights up on the monitor. To cancel, select in step 3 or in step 4. Disc - JVC KD-ADV38 | Instructions - Page 350
the iPod/D. player POWER]ON Track no./Playing time ☞ page 43 4 ¢: Press: Select track Hold: Reverse/forward search 5 ∞ 5 : Enter player's menu ∞ : Pause/stop playback • To resume, press again. It is required to connect the interface adapter (KSPD100 for Apple iPod or KS-PD500 for JVC D. player) to - JVC KD-ADV38 | Instructions - Page 351
VIDEO IN plug so that you can watch the navigation screen (Make sure is selected for ). (☞ page 50) POWER]ON Assigned title (☞ page 44) ☞ page 43 AV-IN FLAT AV is selected for ... • You can use the source "AV-IN" for listening to an audio source connected to the - JVC KD-ADV38 | Instructions - Page 352
to the CD changer jack on the rear using the Line Input Adapter-KS-U57 (not supplied) or AUX Input Adapter-KS-U58 (not supplied). POWER]ON Assigned title (☞ page 44) ☞ page 43 EXT-IN FLAT EXT-INPUT 3: 45PM Preparation: Make sure is selected for the external input setting - JVC KD-ADV38 | Instructions - Page 353
Sound equalization POWER]ON Edit 60.0 Hz +03 ENT Store Selecting sound mode ~ AV Menu Ÿ Setup ENT Enter Equalizer menu icon AV Menu Storing your own adjustment You can store your adjustment into User1, User2, and User3. 1 Repeat steps ~ and Ÿ, then in step !... Equalizer Flat Hard Rock R&B - JVC KD-ADV38 | Instructions - Page 354
Assigning titles to the sources POWER]ON Press: Change character set Hold: Erase title Title Entry Station Name ABC Radio DISP A a 0 Á á ENT Store You can assign titles as follows. FM/AM stations Up to 16 characters-up to 30 stations AV-IN EXT-IN Up to 16 characters • If you try to assign a - JVC KD-ADV38 | Instructions - Page 355
Menu operations POWER]ON Setup Equalizer Sound AV Menu Disc Surround Setup ENT Enter Mode Ex. Changing the setting ~ AV Menu Setup ENT Enter Non-available items will be displayed being shaded. Ÿ Sound menu icon AV Menu Sound ENT Enter List Bluetooth Dual Zone ! - JVC KD-ADV38 | Instructions - Page 356
Auto : Repeats scrolling (5-second intervals). • Holding DISP (on the unit) scrolls the information regardless of this setting. Tag Display Off : Cancels . (☞ Installation/Connection Manual) *2 Adjustable only when the source is a disc or USB containing pictures or movies, or "AV-IN." 46 - JVC KD-ADV38 | Instructions - Page 357
automatically selected to match to the incoming signals. • For the other video sources: Aspect ratio is fixed to . Regular : For 4:3 [6] *3 Not adjustable for audio sources. *4 After you change the indication language setting, turn off then on the power so that your setting takes effect - JVC KD-ADV38 | Instructions - Page 358
of files. You can store this setting separately for each source -"DISC/ USB." Audio : Plays back audio files. Still Picture : Plays back JPEG files. Video : Plays back DivX/MPEG1/MPEG2 files. DivX Regist. (Registration) This unit has its own Registration Code. Once you have played back a file with - JVC KD-ADV38 | Instructions - Page 359
powerful unit-cm and inch. *5 Selectable only for "DISC" and "USB ." (Playback stops when you select one of the items.) *6 This subwoofer level setting takes effect only when surround is activated. (☞ also page 22, 23) *7 This setting does not take effect for MPEG1/MPEG2 and DivX with MP3 audio - JVC KD-ADV38 | Instructions - Page 360
. Off : Select when no component is connected ("AV-IN" is skipped while selecting the source). Audio&Video : Select when connecting an AV component such as a VCR. Audio : Select when connecting an audio component such as a digital audio player. Camera*8: Select when connecting the rear view camera - JVC KD-ADV38 | Instructions - Page 361
, 120Hz, 150Hz Amplifier Gain You can change the maximum volume level of this unit. Off : Deactivates the built-in amplifier. Low Power : VOL 00 to 30 (Select this if the maximum power of the speakers is less than 50 W.) High Power : VOL 00 to 50 Rear Speaker*13 You can activate/deactivate the - JVC KD-ADV38 | Instructions - Page 362
Only for FM. (DX, Local), ☞ [11] SSM Title Entry Only for FM. ☞ [11] Only for FM/AM stations, AV-IN and EXT-IN. ☞ [44] All Off/Intro/Repeat/Random Only for disc/USB playback and iPod/D. player. ☞ [17, 30, 39, 40] *16 Items listed under vary among the playback sources. List The accessible - JVC KD-ADV38 | Instructions - Page 363
devices. *17 Selectable only for "Bluetooth Phone" or "Bluetooth Audio." Select a device (or "NEW DEVICE") before operating the menu. *18 Selectable only when the device is compatible with SMS. When operating the Bluetooth device, refer also to the instructions supplied with the device. Continued - JVC KD-ADV38 | Instructions - Page 364
message by ringing and displaying "Receiving Message." To read the message, press ENT (☞ page 35). Manual : The unit does not inform you the arrival of a message. MIC Setting*20 Adjust microphone volume connected to the unit. 01, 02, 03 Version*21 The Bluetooth software and hardware versions are - JVC KD-ADV38 | Instructions - Page 365
etc.) to clean discs. Connector Moisture condensation Moisture may condense on the lens inside the unit in the following cases: • After starting the heater in the car. • If it becomes very humid inside the car. Should this occur, the unit may malfunction. In this case, eject the disc and leave the - JVC KD-ADV38 | Instructions - Page 366
in memory • When SSM is over, received stations are preset in No.1 (lowest frequency) to No. 6 (highest frequency). Disc General • In this manual, words "track" and "file" are interchangeably used. • This unit can also play back 8 cm discs. • This unit can only play back audio CD (CD-DA) files if - JVC KD-ADV38 | Instructions - Page 367
less. • This unit supports DivX 6.x, 5.x, 4.x, and 3.11. • Audio stream should conform to MP3 or Dolby Digital. • The file encoded in the interlaced scanning mode may not be played back correctly. • The maximum bit rate for video signals (average) is as follows: - DVD: 4 Mbps - USB: 2 Mbps Playing - JVC KD-ADV38 | Instructions - Page 368
comes out of the subwoofer. • When is selected, downsampling is performed for DVD Video (LPCM only), DVD-VR (LPCM only), and DVD Audio with fs=88.2 kHz/96 kHz and higher. USB • If "No USB Device" appears after removing a device, reattach a device or select another playback source. • When - JVC KD-ADV38 | Instructions - Page 369
visit the following JVC web site: For iPod users: For D. player users: Menu settings • If you change the setting from to while the - JVC KD-ADV38 | Instructions - Page 370
00 • "DVD Logo" is a trademark of DVD Format/Logo video (including DivX® 6) with enhanced playback of DivX® media files and the DivX® Media Format • Microsoft and Windows Media are either registered trademarks or trademarks of Microsoft Corporation in the United States and/or other countries. • iPod - JVC KD-ADV38 | Instructions - Page 371
Language codes (for DVD/DivX language selection) Code Language Code Language AA Afar FA Persian AB Abkhazian FI Finnish AF Afrikaans FJ Fiji AM Ameharic FO Faroese AR Arabic - JVC KD-ADV38 | Instructions - Page 372
the DVD/CD player.) • Change the source. • Start the playback on the external component connected to VIDEO IN plug. • Check the cords and connections. • Signal input is too weak. Reset the unit. (☞ page 3) Store stations manually. (☞ page 12) • Static noise while listening to the radio. Connect - JVC KD-ADV38 | Instructions - Page 373
Elapsed playing time is not correct. • "Not Support" appears on the monitor and track is skipped. Installation/Connection Manual) • Connect the video back using other players. • Readout time varies depending on the USB device. • Do the power then on again. • Do not pull out or connect the USB device - JVC KD-ADV38 | Instructions - Page 374
try to connect again. (☞ page 33) • Echo or noise occurs. Adjust the microphone unit position. • Phone sound quality is poor. • Reduce the distance between the unit and the Bluetooth audio device. • Move the car to place where you can get a better signal reception. • The sound is interrupted - JVC KD-ADV38 | Instructions - Page 375
them again. Check the connection between the adapter and this unit. Reset the iPod or D. player. • Turn on the video component if it is not on. • This unit is not connected to the video component correctly. Connect it correctly. Adjust items in . (☞ page 46) AV-IN 65 REFERENCES - JVC KD-ADV38 | Instructions - Page 376
Power Video Output (composite): 1 Vp-p/75 Ω Other Terminals: Input: LINE IN, VIDEO IN, MIC IN, USB input terminal, Antenna input Output: 2nd AUDIO OUT, VIDEO Hz to 15 000 Hz Stereo Separation: 35 dB AM laser) Frequency Response: DVD, fs=48 kHz: 16 Hz to 22 000 Hz DVD, fs=192 kHz - JVC KD-ADV38 | Instructions - Page 377
. Current: Less than 500 mA/5 V Version: Bluetooth 1.2 certified Output Power: +4 dBm Max. (Power class 2) Service Area: Within 10 m Profile: HSP (Headset Profile) HFP (Hands-Free Profile) A2DP (Advanced Audio Distribution Profile) AVRCP (Audio/Video Remote Control Profile) SPP (Serial Port - JVC KD-ADV38 | Instructions - Page 378
Having TROUBLE with operation? Please reset your unit Refer to page of How to reset your unit EN © 2007 Victor Company of Japan, Limited 0207MNMMDWJEIN - JVC KD-ADV38 | Instructions - Page 379
KD-AVX33 Installation/Connection Manual LVT1708-004A [A] This unit is designed to operate on 12 V DC, NEGATIVE ground electrical systems. If your vehicle does not have this system, a voltage inverter is required, which can be purchased at JVC car audio dealers. WARNINGS • DO NOT install any unit - JVC KD-ADV38 | Instructions - Page 380
˚ Removing the unit Before removing the unit, release the rear section. Install the unit at an angle of less than 30˚. When installing the unit without using the sleeve In a car having the "Required space for installation" (see page 1), first remove the car radio and install the unit in its place - JVC KD-ADV38 | Instructions - Page 381
speakers, check the speaker wiring in your car. Rear ground terminal USB cable (see diagram ) To an external component (see diagram ) *3 Not included for this unit *4 Before checking the operation of this unit prior to installation, this lead must be connected, otherwise power cannot be turned on - JVC KD-ADV38 | Instructions - Page 382
KS-PD100 or KS-PD500 or KS-U57*8 or KS-U58*9 JVC CD changer Apple iPod USB devices JVC D. player USB cable- approx.1.2 m 3.5 mm stereo mini plug External component You cannot connect a computer to the USB ( ) terminal of the unit. External component *8 Line Input Adapter KS-U57 (separately
-
 1
1 -
 2
2 -
 3
3 -
 4
4 -
 5
5 -
 6
6 -
 7
7 -
8
-
9
-
10
-
11
-
12
-
13
-
14
-
15
-
16
-
17
-
18
-
19
-
20
-
21
-
22
-
23
-
24
-
25
-
26
-
27
-
28
-
29
-
30
-
31
-
32
-
33
-
34
-
35
-
36
-
37
-
38
-
39
-
40
-
41
-
42
-
43
-
44
-
45
-
46
-
47
-
48
-
49
-
50
-
51
-
52
-
53
-
54
-
55
-
56
-
57
-
58
-
59
-
60
-
61
-
62
-
63
-
64
-
65
-
66
-
67
-
68
-
69
-
70
-
71
-
72
-
73
-
74
-
75
-
76
-
77
-
78
-
79
-
80
-
81
-
82
-
83
-
84
-
85
-
86
-
87
-
88
-
89
-
90
-
91
-
92
-
93
-
94
-
95
-
96
-
97
-
98
-
99
-
100
-
101
-
102
-
103
-
104
-
105
-
106
-
107
-
108
-
109
-
110
-
111
-
112
-
113
-
114
-
115
-
116
-
117
-
118
-
119
-
120
-
121
-
122
-
123
-
124
-
125
-
126
-
127
-
128
-
129
-
130
-
131
-
132
-
133
-
134
-
135
-
136
-
137
-
138
-
139
-
140
-
141
-
142
-
143
-
144
-
145
-
146
-
147
-
148
-
149
-
150
-
151
-
152
-
153
-
154
-
155
-
156
-
157
-
158
-
159
-
160
-
161
-
162
-
163
-
164
-
165
-
166
-
167
-
168
-
169
-
170
-
171
-
172
-
173
-
174
-
175
-
176
-
177
-
178
-
179
-
180
-
181
-
182
-
183
-
184
-
185
-
186
-
187
-
188
-
189
-
190
-
191
-
192
-
193
-
194
-
195
-
196
-
197
-
198
-
199
-
200
-
201
-
202
-
203
-
204
-
205
-
206
-
207
-
208
-
209
-
210
-
211
-
212
-
213
-
214
-
215
-
216
-
217
-
218
-
219
-
220
-
221
-
222
-
223
-
224
-
225
-
226
-
227
-
228
-
229
-
230
-
231
-
232
-
233
-
234
-
235
-
236
-
237
-
238
-
239
-
240
-
241
-
242
-
243
-
244
-
245
-
246
-
247
-
248
-
249
-
250
-
251
-
252
-
253
-
254
-
255
-
256
-
257
-
258
-
259
-
260
-
261
-
262
-
263
-
264
-
265
-
266
-
267
-
268
-
269
-
270
-
271
-
272
-
273
-
274
-
275
-
276
-
277
-
278
-
279
-
280
-
281
-
282
-
283
-
284
-
285
-
286
-
287
-
288
-
289
-
290
-
291
-
292
-
293
-
294
-
295
-
296
-
297
-
298
-
299
-
300
-
301
-
302
-
303
-
304
-
305
-
306
-
307
-
308
-
309
-
310
-
311
-
312
-
313
-
314
-
315
-
316
-
317
-
318
-
319
-
320
-
321
-
322
-
323
-
324
-
325
-
326
-
327
-
328
-
329
-
330
-
331
-
332
-
333
-
334
-
335
-
336
-
337
-
338
-
339
-
340
-
341
-
342
-
343
-
344
-
345
-
346
-
347
-
348
-
349
-
350
-
351
-
352
-
353
-
354
-
355
-
356
-
357
-
358
-
359
-
360
-
361
-
362
-
363
-
364
-
365
-
366
-
367
-
368
-
369
-
370
-
371
-
372
-
373
-
374
-
375
-
376
-
377
-
378
-
379
-
380
-
381
-
382
 |
 |
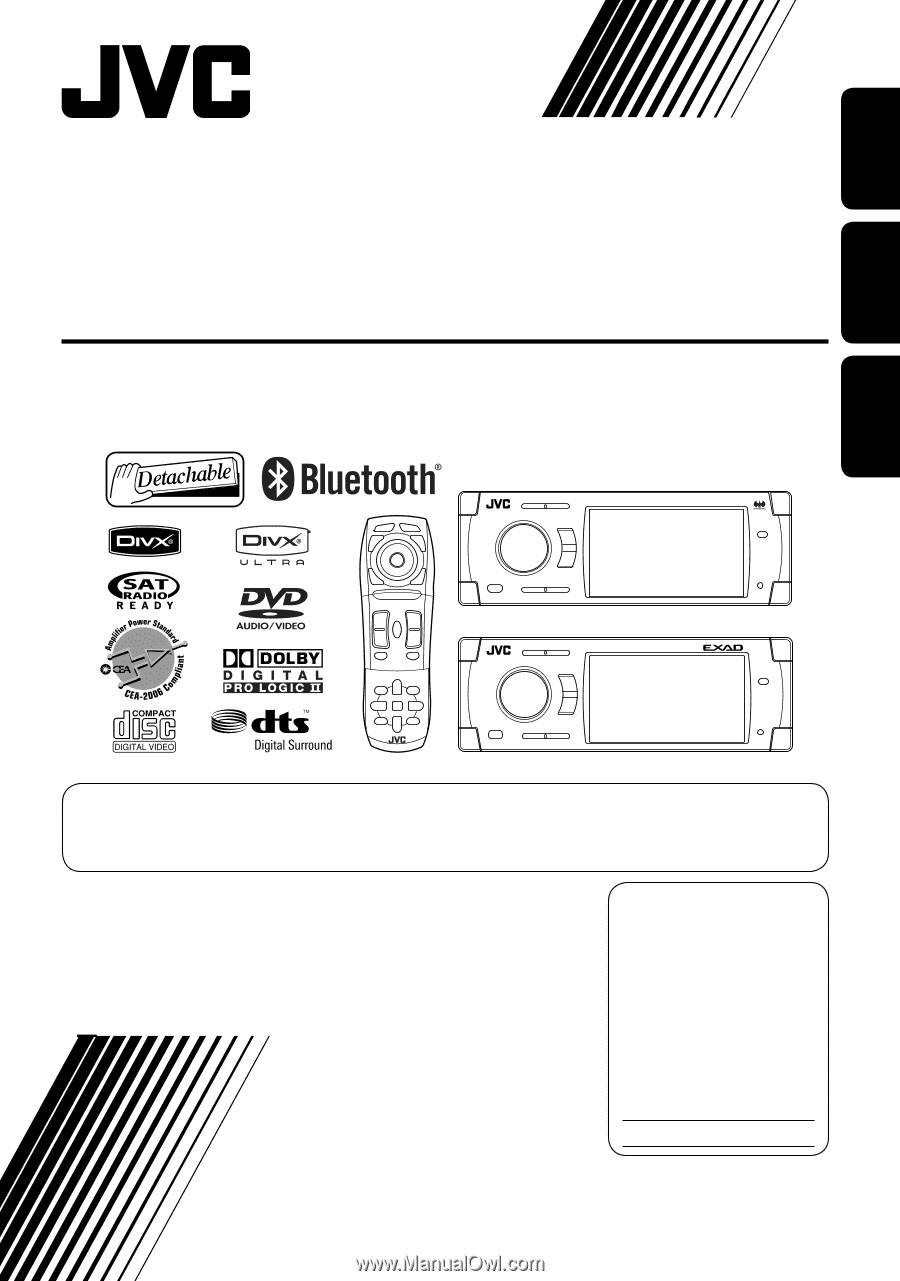
ENGLISH
FRANÇAIS
ESPAÑOL
KD-ADV38/KD-AVX33
For installation and connections, refer to the separate manual.
Para la instalación y las conexiones, refiérase al manual separado.
Pour l’installation et les raccordements, se référer au manuel séparé.
INSTRUCTIONS
MANUAL DE INSTRUCCIONES
MANUEL D’INSTRUCTIONS
LVT1658-001A
[J]
For canceling the display demonstration, see page 5.
Para cancelar la demonstración en pantalla, consulte la página 5.
Pour annuler la démonstration des affichages, référez-vous à la page 5.
DVD/CD RECEIVER
RECEPTOR CON DVD/CD
RÉCEPTEUR DVD/CD
KD-AVX33
KD-ADV38
For customer Use:
Enter below the Model No.
and Serial No. which are
located on the top or bottom
of the cabinet. Retain this
information for future
reference.
Model No.
Serial No.