Kenmore 9991 Use and Care Guide
Kenmore 9991 - Elite 30 in. Induction Range Manual
 |
View all Kenmore 9991 manuals
Add to My Manuals
Save this manual to your list of manuals |
Kenmore 9991 manual content summary:
- Kenmore 9991 | Use and Care Guide - Page 1
TM ELECTRIC RANGE Slide-in models I ESTUFA ELECTRICA Modelos deslizables FI+I Sears, Roebuck and Co., Hoffman Estates, IL 60179 U.S.A. Visit our website: www.sears.com P/N 318200817 Rev.A (9907} - Kenmore 9991 | Use and Care Guide - Page 2
these instructions and your sales receipt for future reference. Slide-in Range Warranty Range, Buy a Sears Maintenance Agreement. "We Service What We Sell" is our assurance to you that you can depend on Sears for service. Your Kenmore appliance has added value when consider that Sears has service - Kenmore 9991 | Use and Care Guide - Page 3
, and local code requirements. Install only per installation instructions provided in the literature package for this range. Ask your dealer to recommend a qualified technician and an authorized repair service. Know how to disconnect the power to the range at the circuit breaker or fuse box in case - Kenmore 9991 | Use and Care Guide - Page 4
in injury. , Remove the oven door from any unused range if it is to be stored or discarded. IMPORTANT--Do hours before connecting it to the power supply. IMPORTANT INSTRUCTIONS FOR USING YOUR COOKTOP . Know which knob controls utensils are suitable for rangetop service without breaking due to the - Kenmore 9991 | Use and Care Guide - Page 5
before removing and replacing light bulb. IMPORTANT INSTRUCTIONS FOR CLEANINGYOUR RANGE Clean the range regularly to keep all parts free of the self-cleaning cycle, only clean the parts listed in this Use and Care Guide. Before self cleaning the oven, remove the broiler pan and any utensils or foods - Kenmore 9991 | Use and Care Guide - Page 6
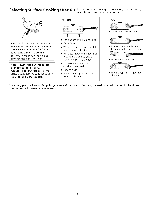
a ruler across the bottom. There should be no gap between the pan and ruler. Note: Always use a utensil for its intended purpose. Follow manufacturer's instructions. Some utensils were not made to be used in the oven or on the cooktop. tt e Flat bottom and straight sides. • Tight fitting lids - Kenmore 9991 | Use and Care Guide - Page 7
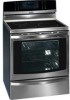
Range features Electronic Oven Controls Warmer Drawer with Clock and Kitchen Timer Warmer Zone Warmer Drawer Indicator Warmer Zone Indicator Dual Interior Oven Lights Self-Cleaning Oven Adjustable Oven Racks 1 Piece Door Handle (1)Broit Pan (1) Insert (1) Searing Grill Warmer Drawer with Rack - Kenmore 9991 | Use and Care Guide - Page 8
the utensil is too small for the unit. The control knob does not have to be set exactly on a particular mark. Use the marks as a guide and adjust the control knob as 7 needed. The hot surface and surface indicator lights will glow. Note: A built-in protector will automatically turn off the - Kenmore 9991 | Use and Care Guide - Page 9
with the outerelement. SMALL BURNER • O=F LAR®E BURNER le Indicator Lights There are 2 different surface control lights that will glow on your range: Surface Indicator Lights and Hot Surface Indicator Lights. , The surface indicator lights, located on the control panel, glow when any surface - Kenmore 9991 | Use and Care Guide - Page 10
Surface Cooking FEATURE OVERVIEW . Setting Warmer Zone Controls (some models) To Operate the Warmer (Warm & Ready TM) Zone The purpose of the warmer zone is to keep hot cooked foods at serving temperature. Use the warmer zone to keep cooked foods hot such as: vegetables, gravies, casseroles, soups, - Kenmore 9991 | Use and Care Guide - Page 11
rack and slide out. To replace an oven rack, fit the rack onto the guides on the oven walls. Tilt the front of the rack upward and slide the Setting Oven Controls For oven settings, refer to the Electronic Oven Control Guide. Be sure the oven is unplugged and all parts are COOL before replacing - Kenmore 9991 | Use and Care Guide - Page 12
The warmer drawer is equipped with a catch which may require extra force when opening and closing the drawer. To Operate the Warmer Drawer Your range is equipped with a warmer drawer. keep hot cooked foods at serving temperature. recommended to heat cold food in the warmer The purpose of the - Kenmore 9991 | Use and Care Guide - Page 13
with aluminum foil. 3. For oven temperature and setting, refer to the Electronic Oven Control Guide. The searing grill provided with your new range allows you to grill food in the oven. Do not use the searing grill without the broiler pan and insert. The broiler pan and its insert allow dripping - Kenmore 9991 | Use and Care Guide - Page 14
vary slightly from Baking problems and solutions Baking Problems Cookies and biscuits burn to 4") of space on all sides of pan. • Range not level. " Pan too close to oven wall or If water level is uneven, refer to the installation instructions for leveling the appliance. Be sure to allow 5.1 - Kenmore 9991 | Use and Care Guide - Page 15
oven. Rroilinn Preheating Preheating is suggested when searing rare steaks (remove the broiler pan before preheating. Foods will stick if placed on hot metal.) To preheat, set the oven control(s) to BROIL as instructed in the Electronic Oven Control Guide. Wait for the element to become red-hot - Kenmore 9991 | Use and Care Guide - Page 16
Range Before cleaning any part of the range, be sure all controls are turned OFF and the range recommended. Always follow the manufacturer's instructions. Be sure to rinse the cleaners make the racks glide easier into the rack positions). Searing Grill Porcelain Enamel Broiler Pan and Insert, Door - Kenmore 9991 | Use and Care Guide - Page 17
. They may scratch or metalmark the cooktop. 4. If cooktop should break, do not use cooktop or attempt to clean it. Call your Sears Service Center immediately. 5. Never use rivet or metal stand between the cooking utensil and the ceramic cooktop. The ceramic surface may be scratched, metalmarked - Kenmore 9991 | Use and Care Guide - Page 18
. Do not use cleaner cream to clean porcelain, paint or aluminum because it can damage the surface. Special Cleaning Instructions for MineraI Deposits and Discolorations Problem: Condensation, when cooking, often collects and drips from cookware. The minerals found in water may cause a gray or - Kenmore 9991 | Use and Care Guide - Page 19
process into a colorless vapor. The health of some birds is extremely sensitive to the fumes given off during the self-cleaning cycle of any range. Move birds to another well ventilated room. Setting the Controls for Clean Cycle For setting a self-cleaning cycle, refer to the Electronic Oven - Kenmore 9991 | Use and Care Guide - Page 20
Door Glass Panel: 1. Grasp the sides of the glass panel and carefully insert the glass into the door top moulding. 2. Replace the support rail and the 5 locking screws. 3. Replace the door onto the range. Handle the glass panel with care. When dropped on a corner, the glass panel may shatter. 20 - Kenmore 9991 | Use and Care Guide - Page 21
and push down on the right glide latch. 5. Pull the drawer away from the range. 6. To clean warmer drawer, gently scour with scouring pad, this will remove most the drawer on the drawer. 2. Push the drawer back into the range. with the slots Electrical Shock Hazard can occur and result in - Kenmore 9991 | Use and Care Guide - Page 22
Replace or tighten bulb. See Changing Oven Light in this owner's Guide for instructions. Surface unit does not heat. No power to the appliance. Check steps under "Entire Range or Oven Does Not Operate" in this Avoid Service Checklist. Incorrect control setting. Make sure the correct control is on - Kenmore 9991 | Use and Care Guide - Page 23
Guide. Make sure oven is opened to Broil Stop Position. Meat too close to the element. Reposition the rack to provide proper clearance between the meat and the element. Preheat broil element. Preheat broil element for searing properly. Follow instructions Electronic Oven Control Guide. under "Oven - Kenmore 9991 | Use and Care Guide - Page 24
Notes 24 - Kenmore 9991 | Use and Care Guide - Page 25
CERCANO EN LOS ESTADOS UNIDOS. Esta garantia le otorga derechos legales especificos, y Ud puede tener otros derechos que puedan varias de un estado a otro. Sears Roebuck and Co. Dept. 817 WA Hoffman Estates, IL 60179 ...... Para aumentar el valor de su alcance, compre un Acuerdo de Mantenimiento - Kenmore 9991 | Use and Care Guide - Page 26
fusibles en caso de ernergencia. , Servicio al usuario- No repare o remplace ninguna pieza de su aparato a menos que se Io recomiende los manuales especificamente. Culaquier typo de servicio debe ser hecho por un tecnico calificado. Esto reducira el riesgo de heridas personales o de da6os al - Kenmore 9991 | Use and Care Guide - Page 27
IMPORTANTES INSTRUCCIONES DE SEGURIDAD . No deje a los niffos solos- Los niffos no deben ser dejados solos o sin atencibn donde el aparato est6 funcionando. No les permita sentarse o pararse sobre niguna parte del aparato. " NO TOQUE NINGUNA PARRTE DE LASUPERFICIE DEL APARATO, AREAS CERCA DE - Kenmore 9991 | Use and Care Guide - Page 28
ocasionando da6os y heridas. HORNO CON AUTO-LIMPIEZA Limpie en el ciclo de auto-limpieza unicamente las partes que est_n en la lista del "Manual del usuario". Antes de auto-limpiar el horno, retire la cubeta parrillera y cualquier otro utensilio o comida del horno. Colocaci6n de las rejillas del - Kenmore 9991 | Use and Care Guide - Page 29
Paramejoresresultadoysahorrodeenergiae, scojalos utensiliosquetenganlassiguientecsaracterJsticas: Selecd6n de los utensilios de codna MALOS Las sartenes deben tener bases aplanadas que hagan buen contacto con la superficie completa del quemador.Verifique si son pianos rotando una regla sobre - Kenmore 9991 | Use and Care Guide - Page 30
Caracteristicas de la estufa Control de gaveta de entibiado \ Indicator de gaveta de Controles de horno electronico con reloj y contador de tiempo _ Control de zona deentibiado Indicador de zona de entibiado Luces Interiores Dobles del homo Horno autolimpieza (1)Cubetta parillera (1) Pieza - Kenmore 9991 | Use and Care Guide - Page 31
Programacion de los controles de superficie 1. Coloque la sarten sobre el quemador. 2. Presione y gire la perilla de control del quemador hasta el ajuste deseado. 3. La luz de sepal se encendera cuando uno o mas de un quemador este encendido. Apague siempre el quemador antes de retirar la sarten - Kenmore 9991 | Use and Care Guide - Page 32
Cocci6n de superficie CARATER[ST[CAS BREVES " Plancha de cocinar de vidrio cerarnico SMALL BURNER ® QCF LARGE BURNER UNIDADES DE CALENTAMIENTO IRRADIANTES EXPANDIBLES (algunos modelos) Esta unidad combina las caracteristicas de una peque_a o gran unidad de calentamiento regular. Su ventaja - Kenmore 9991 | Use and Care Guide - Page 33
Para utilizar la zona de entibiado (Warm & Ready TM) El prop6sito de la zona de entibiar es el de rnantener la cornida caliente para servir. Utilice esta zona para alirnentos calientes corno: legurnbres, panes, patiserias y vajillas que se colocan en el homo. Siernpre ernpieze No es recornendado - Kenmore 9991 | Use and Care Guide - Page 34
Programando los controles del homo CARATERISTICAS BREVES Antes de prograrnar los controles del horno Programando los controles del horno Antes de programar los controles del homo Localizad6n de la rejilla de ventilad6n deJ homo El homo esta ventilado detras de la plancha de cocinar. Cuando el - Kenmore 9991 | Use and Care Guide - Page 35
Arreg}ando {a posici6n de {as reji{{as de {a gaveta de entibiar (Warm & Ready TM) La rejilla puede ser utilizada de 2 maneras: . En la posici6n vertical para poder colocar la cornida en la parte superior o inferior de la rejilla (por eiemplo, enrollados o galletas en la parte superior y una cacerola - Kenmore 9991 | Use and Care Guide - Page 36
Cocd6n de convecd6n (algunos rnodelos) Rostizados de convecd6n (algunos rnodelos) Grillador Jncandecente NOTA: El ventilador de convecci6n se apaga autom_ticamente cuando la puerta del horno se abre mientras que el homo est_ en el modo de convecci6n y se termina cuando la puerta se halla cerrrado - Kenmore 9991 | Use and Care Guide - Page 37
Para mejores resultados, caliente el horno antes de hornear galletas, panes, tortas, pasteles o dulces, etc. No necesita precalentar el horno para rostizar la carneo para cocer caserolas. Los tiempos de cocido y las temperaturas que se necesitan para hornear un producto pueden variar lijeramente de - Kenmore 9991 | Use and Care Guide - Page 38
Rostizado El rostizado es un metodo para cocer cortes finos de came aplicando el calor directo debajo del elemento rostizador del horno. Abre lapuertaa laposici6n de "parada del asado" durante elrotizado. Precalentamiento El precalentamiento es sugerido cuando grille pedazos de biftec (retire - Kenmore 9991 | Use and Care Guide - Page 39
Limpieza de diferentes partes de su estufa Antes de limpiar cualquier parte de la estufa, aseg_rese que todos los controles estan apagados y que la estufa esta fr[a. Retire los derrames y las manchas dificiles tan pronto como pueda. La limpieza constante disminuira el esfuerzo de una limpieza a - Kenmore 9991 | Use and Care Guide - Page 40
Limpieza general CARACTERISTICAS BREVES " Lirnpieza de la plancha de cocinar Para limpiar el vidrio de la plancha de cocinar La plancha de cocinar esta dise6ada para hacer que su lirnpieza sea facil. La lirnpieza es facil cuando los derrarnes son lirnpiados inrnediatarnente. Para lirnpiar, frote - Kenmore 9991 | Use and Care Guide - Page 41
Material de limpieza para el vidrio cer&mico de la plancha de cocinar Algunos materiales de limpieza puec{en estar compuestos de un ingrec{iente que puec{e €{a6ar la plancha cocinar. Utilice u nicamente los materiales recomenc{ac{os (vea aquiabajo). La crema de limpieza €{ebe ser utilizac{a - Kenmore 9991 | Use and Care Guide - Page 42
Limpieza general CARACTERISTICAS BREVES " Limpiando el homo auto-limpiable . Programando los controles para el ciclo de limpieza Limpiando el horno auto-limpiable Tenga las siguientes precauciones: Deje enfriar el homo antes de limpiarlo. Use guantes cuando limpie toda parte externa del homo - Kenmore 9991 | Use and Care Guide - Page 43
Para retirar y remp{azar Ja puerta deJ homo 1. Abra la puerta del homo completamente. 2. Tire hacia arriba del tope situado en cada soporte de la bisagra y enganchelo en el ganchodelaspalancasdela bisagra. Esposiblequetengaquehacerun pocode presibn hacia abajo sobre la puerta, para sacar los - Kenmore 9991 | Use and Care Guide - Page 44
LJmpJeza general CARACTERISTICAS BREVES " Para retirar y remplazar la gaveta de entibiar Para retirar y remplazar la gaveta de entibiar (si esta equipada) Para retirar la gaveta de entibiar: 1. _ Apaga el suministro electrico antes de retirar la gaveta de entibiar. 2. Abra la gaveta - Kenmore 9991 | Use and Care Guide - Page 45
del nOmero de anomalia. Pulse CLEAR y consulte un servicio autorizado. Coloque o ajuste la bombilla. Vea "Cambio de la luz del homo" en el Manual del usuario para las instrucciones. No hay sumJnistro electrico al aparato. VerJfique las etapas en "La estufa completa o el horno no funcJonan" que se - Kenmore 9991 | Use and Care Guide - Page 46
de horneo de sus recetas. Si cree que el homo esta muy caliente o muy frio, vea "Ajuste de la temperatura usuario. del homo" en el Manual del Derrames excesivos dentro del horno. Ajuste el ciclo de auto limpieza por un tiempo mas largo. Derrames excesivos dentro del horno. Esto es normal - Kenmore 9991 | Use and Care Guide - Page 47
Notas 47 - Kenmore 9991 | Use and Care Guide - Page 48
you need: Call 6 a.m. - 11 p.m. CST, 7 days a week PartsDirect s° 1-800-366-PART (1-800-366-7278) www.sears.com/partsdirect Para ordenar piezas con entrega a domicilio - 1-800-659-7084 For the location of a Sears Service Center in your area: Call 24 hours a day, 7 days a week 1-800-488-1222 To
-
 1
1 -
 2
2 -
 3
3 -
 4
4 -
 5
5 -
 6
6 -
 7
7 -
8
-
9
-
10
-
11
-
12
-
13
-
14
-
15
-
16
-
17
-
18
-
19
-
20
-
21
-
22
-
23
-
24
-
25
-
26
-
27
-
28
-
29
-
30
-
31
-
32
-
33
-
34
-
35
-
36
-
37
-
38
-
39
-
40
-
41
-
42
-
43
-
44
-
45
-
46
-
47
-
48
 |
 |
TM
ELECTRIC RANGE
Slide-in models
I
ESTUFA ELECTRICA
Modelos
deslizables
FI+I
Sears, Roebuck and Co., Hoffman
Estates, IL 60179 U.S.A.
Visit our website:
www.sears.com
P/N 318200817
Rev.A (9907}