KitchenAid KDRP462LSS Use and Care Guide
KitchenAid KDRP462LSS - 36" Pro-Style Dual Fuel Range Manual
 |
View all KitchenAid KDRP462LSS manuals
Add to My Manuals
Save this manual to your list of manuals |
KitchenAid KDRP462LSS manual content summary:
- KitchenAid KDRP462LSS | Use and Care Guide - Page 1
SERIES DUAL FUEL RANGE Use & Care Guide For questions about features, operation/performance, parts accessories or service, call: 1-800-422-1230 In Canada, call for assistance 1-800-461-5681, for installation and service, call: 1-800-807-6777 or visit our website at... www.kitchenaid.com or www - KitchenAid KDRP462LSS | Use and Care Guide - Page 2
Convection Roast 18 Convection Broil 19 Proofing Bread 19 Keep Warm 19 Timed Cooking 20 RANGE CARE 20 Self-Cleaning Cycle 20 General Cleaning 21 Oven Lights 23 Oven Door 23 TROUBLESHOOTING 23 ASSISTANCE OR SERVICE 25 WARRANTY 26 TABLE DES MATIÈRES SÉCURITÉ DE LA CUISINIÈRE 27 La bride - KitchenAid KDRP462LSS | Use and Care Guide - Page 3
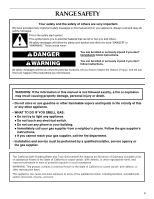
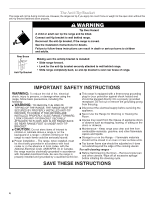
RANGE SAFETY Your safety and the safety of others are very important. We have provided many important safety messages in this manual and on your appliance. Always read and obey all safety messages. This is the safety alert symbol. This symbol alerts you to potential hazards that can kill or hurt - KitchenAid KDRP462LSS | Use and Care Guide - Page 4
s Disconnect the electrical supply before servicing the SECURED BY PROPERLY INSTALLED ANTI-TIP appliance. DEVICES. TO CHECK IF THE DEVICES ARE INSTALLED PROPERLY, SLIDE RANGE FORWARD, LOOK FOR ANTI-TIP BRACKET SECURELY ATTACHED TO FLOOR, AND SLIDE RANGE BACK SO REAR RANGE FOOT IS UNDER ANTI-TIP - KitchenAid KDRP462LSS | Use and Care Guide - Page 5
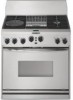
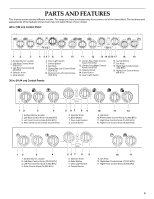
PARTS AND FEATURES This manual covers several different models. The range you have purchased may have Button 17. Set Knob 18. Right Rear Control Knob (15K BTU) 19. Right Front Control Knob (6K BTU) 36 in. (91.44 cm) Control Panels 12 3 4 1. Surface Burner Locator 2. Left Rear Control Knob (15, - KitchenAid KDRP462LSS | Use and Care Guide - Page 6
12 3 4 1. Surface Burner Locator 2. Left Rear Control Knob (15,000 BTU) 3. Left Front Control Knob (6,000 BTU) 4. Griddle Control Knob (15,000 BTU) 30 in. (76.2 cm) Control Panel 5 67 89 5. Selector Knob 6. Enter Button 7. Oven Light Switch 8. Cancel Button 10 11 9. Set Knob 10. Right Rear - KitchenAid KDRP462LSS | Use and Care Guide - Page 7
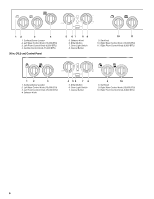
9. Bake Element (not visible) 10. Model and Serial Number (located on center front frame below oven cavity) 11. Pin Connector (located in rear of range, for factory testing only) 12. Right Rear Surface Burner 13. Center Rear Right Surface Burner 14. Right Front Surface Burner 15. Center Front Right - KitchenAid KDRP462LSS | Use and Care Guide - Page 8
Single Oven Range 9 10 1 11 2 12 3 4 13 5 14 6 15 7 8 1. Surface Burner 2. Surface Burner Grate 3. Control Panel 4. Oven Vent 5. Gas Regulator (rear of unit) 6. Door Gasket 7. Bake Element (not - KitchenAid KDRP462LSS | Use and Care Guide - Page 9
anywhere between HI and LO. Use the following chart as a guide when setting heat levels. SETTING RECOMMENDED USE LITE s Light Kit is included with your new range. See the instructions included with the L.P. Gas conversion burners can be lit manually. Hold a lit match near a burner and turn knob - KitchenAid KDRP462LSS | Use and Care Guide - Page 10
, check cap alignment. If the burner still does not light, do not service the sealed burner yourself. Contact a trained repair specialist. Simmer Plate 2 , use the Simmer plate with burner settings in the medium to low range on the cooktop when lower temperatures are needed for simmering, or for - KitchenAid KDRP462LSS | Use and Care Guide - Page 11
Grille (on some models) To Replace: 1. Lift burner assembly out of basin and set aside. 2. Place drip tray on bottom of grille basin and slide the tray forward so that it is located side to side and against the locating feet of the rear spill guard. 1 2 1 2 3 4 3 1. Rear spill guard 2. - KitchenAid KDRP462LSS | Use and Care Guide - Page 12
Wave tray 2. Wave plate 7. Replace grille grate. To Use: 1. Turn on overhead range hood. 2. If desired, apply a light coating of vegetable oil or nonstick cooking be preheated before cooking most foods. Refer to recipe or package instructions. s Remove and clean the grease tray and the area below - KitchenAid KDRP462LSS | Use and Care Guide - Page 13
typically have little or no fat. Cleaning and Storing the Griddle Accessory: REMEMBER: Allow the griddle to cool completely before cleaning. Clean griddle from the surface burners. s Do not wash griddle in the dishwasher. Cookware IMPORTANT: Never leave empty cookware on a hot surface cooking area - KitchenAid KDRP462LSS | Use and Care Guide - Page 14
as a guide for cookware material heating. ELECTRONIC OVEN CONTROL Displays When power is first supplied to the appliance, "PF" will appear. If "PF" appears at any other , press the ENTER button, and follow the clock setting instructions in the "Clock" section. Selector and Set Control Knobs - KitchenAid KDRP462LSS | Use and Care Guide - Page 15
cm) of space around bakeware and oven walls. Use the following chart as a guide. NUMBER OF PAN(S) POSITION ON RACK Aluminum Foil IMPORTANT: Do not line the baking time. Stoneware s Crisp crusts s Follow manufacturer's instructions. Ovenproof glassware, ceramic glass or ceramic s Brown, crisp - KitchenAid KDRP462LSS | Use and Care Guide - Page 16
, is what counts. A meat thermometer is not supplied with this appliance. s Insert the thermometer into the center of the thickest portion of broiling temperatures. s Use only the broiler pan and grid provided with the range. It is designed to drain juices and help prevent spatter and smoke. s - KitchenAid KDRP462LSS | Use and Care Guide - Page 17
2 and 4. When using three racks, place on guides 1, 3 and 5. 1. Turn the SELECTOR knob to CONVECT BAKE. The display will show 325°F (163°C). 2. Turn the SET knob to desired temperature. The convection bake range can be set between 170°F and 500°F (77°C and 260°C). 3. Press the ENTER button to start - KitchenAid KDRP462LSS | Use and Care Guide - Page 18
3. Broil pan 1. Turn the SELECTOR knob to CONVECT ROAST. The display will read 300°F (149°C). 2. Turn the SET knob to desired temperature. The convection roast range can be set between 170°F and 500°F (77°C and 260°C). 3. Press the ENTER button to start, or after 10 seconds, the function will start - KitchenAid KDRP462LSS | Use and Care Guide - Page 19
first proofing, place the dough in a lightly greased bowl and cover loosely with wax paper, coated with shortening. Place on rack guide two, then place broiler pan on guide one. See "Positioning Racks and Bakeware" for diagram. Put 2 cups (500 mL) of boiling water in the broiler pan. Close the - KitchenAid KDRP462LSS | Use and Care Guide - Page 20
so can result in food poisoning or sickness. RANGE CARE Self-Cleaning Cycle WARNING Timed Cooking allows -Cleaning cycle. Failure to follow these instructions can result in burns. IMPORTANT: The in longer cleaning and more smoke. Keep the kitchen well-ventilated during the Self-Cleaning cycle to - KitchenAid KDRP462LSS | Use and Care Guide - Page 21
cool. Always follow label instructions on cleaning products. Soap as soon as the entire appliance is cool. These spills Polish (not included): See "Assistance or Service" section to order. s Liquid detergent or Self-Cleaning cycle. Do not clean in dishwasher. s Nonabrasive plastic scrubbing pad and - KitchenAid KDRP462LSS | Use and Care Guide - Page 22
. If this happens, a light coating of vegetable oil applied to the rack guides will help them slide. s Steel-wool pad BROILER PAN AND GRID Do not pad. s Oven cleaner: Follow product label instructions. Porcelain enamel only, not chrome s Dishwasher GRILLE MODULE For more information, see "Grille" - KitchenAid KDRP462LSS | Use and Care Guide - Page 23
manual light switch is in range or reconnect power. Oven Door For normal range use, it is not suggested to remove the oven door. However, if necessary, follow these instructions TROUBLESHOOTING Try the solutions suggested here first in order to avoid the cost of an unnecessary service The appliance - KitchenAid KDRP462LSS | Use and Care Guide - Page 24
Cooktop Controls" section. s Is the appliance level? Level the appliance. See the Installation Instructions. Grille and Griddle results not what number? Clear the display. See "Display(s)" section. If it reappears, call for service. Self-Cleaning Cycle will not operate s Is the oven door open? Close - KitchenAid KDRP462LSS | Use and Care Guide - Page 25
p.m. (EST). Our consultants provide assistance with: s Features and specifications on our full line of appliances. s Referrals to local dealers. For parts, accessories and service in Canada Call 1-800-807-6777. KitchenAid designated service technicians are trained to fulfill the product warranty and - KitchenAid KDRP462LSS | Use and Care Guide - Page 26
this appliance is operated and maintained according to instructions attached to or furnished with the product, KitchenAid will pay for factory specified parts and repair labor costs to correct defects in materials or workmanship. Service must be provided by a KitchenAid designated service company - KitchenAid KDRP462LSS | Use and Care Guide - Page 27
instructions. AVERTISSEMENT Risque possible de décès ou de blessure grave si vous ne suivez pas les instructions se produire en cas de non-respect des instructions. AVERTISSEMENT : Pour votre sécurité, les gaz d'un téléphone voisin. Suivre ses instructions. • À défaut de joindre votre fournisseur - KitchenAid KDRP462LSS | Use and Care Guide - Page 28
La bride antibasculement Dans les conditions de service normales, la cuisinière ne bascule pas bride antibasculement si la cuisinière est déplacée. Voir détails dans les instructions d'installation. Le non-respect de ces instructions peut causer un décès ou des brûlures graves aux enfants et aux - KitchenAid KDRP462LSS | Use and Care Guide - Page 29
8. Bouton de réglage 9. Bouton de commande arrière gauche centrale (15K BTU) 10. Bouton de commande avant gauche centrale (15K BTU) Tableaux des commandes de 36 po (91.44 cm) 11 12 13 14 15 16 17 18 19 11. Bouton de commande arrière droit central (15K BTU) 12. Bouton - KitchenAid KDRP462LSS | Use and Care Guide - Page 30
12 3 4 5 67 89 1. Témoin de brûleur de surface 2. Commande arrière gauche (15 000 BTU) 3. Commande avant gauche (6 000 BTU) 4. Commande de plaque à frire (15 000 BTU) 5. Sélecteur 6. Bouton d'entrée 7. Interrupteur de lampe du four 8. Bouton d'annulation Tableau des commandes de 30 po (76.2 - KitchenAid KDRP462LSS | Use and Care Guide - Page 31
Cuisinière à double four 11 12 13 14 1 15 2 16 3 4 17 5 18 6 19 7 8 9 10 1. Brûleur de surface arrière gauche central 2. Brûleur de surface arrière gauche 3. Brûleur de surface avant gauche central 4. Brûleur de surface avant gauche 5. Tableau de commande 6. Évent du four 7. Détendeur - KitchenAid KDRP462LSS | Use and Care Guide - Page 32
Cuisinière à single four 9 10 1 11 2 12 3 4 13 5 14 6 15 7 8 1. Brûleur de surface 2. Grille de brûleur de surface 3. Tableau de commande 4. Évent du four 5. Détendeur de gaz (arrière de la cuisinière) 6. Joint d'étanchéité de la porte 7. Élément de cuisson au four (non visible) 8. - KitchenAid KDRP462LSS | Use and Care Guide - Page 33
importe quelle position entre HI et LO. Utiliser le tableau suivant comme guide de températures. RÉGLAGE UTILISATION RECOMMANDÉE LITE s Pour allumer le les réglages lorsque la cuisson est terminée. Le non-respect de ces instructions peut causer un décès ou un incendie. IMPORTANT : La table de - KitchenAid KDRP462LSS | Use and Care Guide - Page 34
de mijotage ont été conçues de sorte qu'elles s'adaptent convenablement et en sécurité sur la grille (tel qu'indiqué). Voir la section "Assistance ou service" pour soumettre une commande. 34 - KitchenAid KDRP462LSS | Use and Care Guide - Page 35
les aliments. Se référer au "Tableau de cuisson au gril" pour les durées et réglages de cuisson. Lors de l'utilisation du gril, suivre les instructions ci-dessous : s Ne pas laisser le gril sans surveillance pendant la cuisson. s Ne pas utiliser de papier d'aluminium, de charbon de bois ou copeaux - KitchenAid KDRP462LSS | Use and Care Guide - Page 36
plaque à frire devrait être préchauffée avant la cuisson de la plupart des aliments. Voir les instructions sur l'emballage ou dans les recettes. s Enlever et nettoyer le plateau ramasse-gouttes; nettoyer aussi la zone é, utiliser un appoint de matière grasse ou de shortening lors de la cuisson. 36 - KitchenAid KDRP462LSS | Use and Care Guide - Page 37
. s Pour plus de renseignements, contacter Agriculture Canada. Les compagnies qui fabriquent des produits pour la préparation de conserves à la maison peuvent aussi offrir de l'aide. 37 - KitchenAid KDRP462LSS | Use and Care Guide - Page 38
aura les propriétés de l'aluminium. Utiliser le tableau suivant comme guide pour les caractéristiques du matériau d'ustensile de cuisson. position RESET (remise en marche), appuyer sur le bouton ENTER et suivre les instructions de réglage de l'horloge dans la section "Horloge". Boutons de sélection - KitchenAid KDRP462LSS | Use and Care Guide - Page 39
'à la butée d'arrêt, soulever le rebord avant et la tirer pour la sortir du four. Se servir de l'illustration et du tableau suivants comme guide. ALIMENTS POSITION DE LA GRILLE Tartes congelées, gros rôtis, dindes, gâteaux des anges 1 ou 2 Gâteaux Bundt, la plupart des pains éclairs, 2 pains - KitchenAid KDRP462LSS | Use and Care Guide - Page 40
é dans la recette. Se servir du tableau suivant comme guide. USTENSILES DE CUISSON/ RÉSULTATS RECOMMANDATIONS Aluminium légèrement coloré temps de cuisson. Plats en grès s Croûtes croustillantes s Suivre les instructions du fabricant. Plats en verre, vitrocéramique ou céramique allant au four - KitchenAid KDRP462LSS | Use and Care Guide - Page 41
Cuisson au gril 1 1. Élément du gril (exemple seulement) La cuisson au gril utilise une chaleur radiante directe pour cuire les aliments. Le changement de température lors de la cuisson au gril permet un contrôle plus précis lors de la cuisson. Plus la température est basse, plus la cuisson est - KitchenAid KDRP462LSS | Use and Care Guide - Page 42
Cuisson par convection Dans un four à convection, l'air chaud que fait circuler le ventilateur distribue continuellement la chaleur plus uniformément que le mouvement naturel de l'air dans un four thermique standard. Ce déplacement de l'air chaud maintient une température uniforme dans tout le four, - KitchenAid KDRP462LSS | Use and Care Guide - Page 43
Rôtissage par convection : Avant le rôtissage par convection, placer les grilles tel qu'indiqué dans la section "Positionnement des grilles et des ustensiles de cuisson". Il n'est pas nécessaire de préchauffer le four avant d'y placer l'aliment, excepté si la recette le recommande. Utiliser la - KitchenAid KDRP462LSS | Use and Care Guide - Page 44
d'empoisonnement alimentaire Ne pas laisser des aliments dans un four plus d'une heure avant ou après la cuisson. Le non-respect de cette instruction peut causer un empoisonnement alimentaire ou une maladie. La fonction Keep Warm (garder au chaud) permet aux aliments chauds de demeurer chauds avant - KitchenAid KDRP462LSS | Use and Care Guide - Page 45
d'empoisonnement alimentaire Ne pas laisser des aliments dans un four plus d'une heure avant ou après la cuisson. Le non-respect de cette instruction peut causer un empoisonnement alimentaire ou une maladie. La cuisson minutée permet de régler le four pour s'allumer à une certaine heure du jour - KitchenAid KDRP462LSS | Use and Care Guide - Page 46
le four et la table de cuisson ont refroidi. Toujours suivre les instructions sur les étiquettes des produits nettoyants. Du savon, de l'eau poli pour acier inoxydable (non inclus) : Voir la section "Assistance ou service" pour soumettre une commande. s Détergent liquide ou nettoyant tout-usage : - KitchenAid KDRP462LSS | Use and Care Guide - Page 47
BRÛLEURS DE SURFACE Modèles à brûleurs scellés Voir la section "Brûleurs de surface scellés". BOUTONS DE COMMANDE DE LA TABLE DE CUISSON Ne pas utiliser de la laine d'acier, des produits de nettoyage abrasifs ou un nettoyant à four. Ne pas les immerger les boutons. Lors de la réinstallation des - KitchenAid KDRP462LSS | Use and Care Guide - Page 48
humide ou tampon non abrasif. Porte du four Il n'est pas suggéré d'enlever la porte du four pour une utilisation normale. Toutefois, suivre les instructions suivantes au besoin. La porte du four est lourde. Enlèvement : 1. Ouvrir la porte du four complètement. 2. Relever le verrou de charnière - KitchenAid KDRP462LSS | Use and Care Guide - Page 49
table de cuisson." s L'appareil est-il d'aplomb? Niveler l'appareil. Voir les instructions d'installation. Les résultats de cuisson avec le gril ou la plaque à frire ne la section "Affichage(s)". Si le signal réapparaît, appeler le service. Le programme d'autonettoyage ne fonctionne pas s La porte du - KitchenAid KDRP462LSS | Use and Care Guide - Page 50
SERVICE Avant de faire un appel pour assistance ou service, consulter la section "Dépannage". Ce guide peut vous faire économiser le coût d'une visite de service. Si vous avez encore besoin d'aide, suivre les instructions la fabrication de chaque nouvel appareil KITCHENAID®. Pour obtenir des pièces - KitchenAid KDRP462LSS | Use and Care Guide - Page 51
ménager est utilisé et entretenu conformément aux instructions fournies avec le produit, KitchenAid paiera pour les pièces spécifiées par le aide additionnelle peut être trouvée en vérifiant la section "Assistance ou Service" ou en téléphonant au centre d'interaction avec la clientèle KitchenAid - KitchenAid KDRP462LSS | Use and Care Guide - Page 52
© 2003. All rights reserved. Tous droits réservés. ® Registered Trademark/TM Trademark of KitchenAid, U.S.A., KitchenAid Canada licensee in Canada ® Marque déposée/TM Marque de commerce de KitchenAid, U.S.A., Emploi licencié par KitchenAid Canada au Canada 8/03 Printed in U.S.A. Imprimé aux É.-U.
-
 1
1 -
 2
2 -
 3
3 -
 4
4 -
 5
5 -
 6
6 -
 7
7 -
8
-
9
-
10
-
11
-
12
-
13
-
14
-
15
-
16
-
17
-
18
-
19
-
20
-
21
-
22
-
23
-
24
-
25
-
26
-
27
-
28
-
29
-
30
-
31
-
32
-
33
-
34
-
35
-
36
-
37
-
38
-
39
-
40
-
41
-
42
-
43
-
44
-
45
-
46
-
47
-
48
-
49
-
50
-
51
-
52
 |
 |
PROFESSIONAL COOKING SERIES
DUAL FUEL RANGE
Use & Care Guide
For questions about features, operation/performance, parts accessories or service, call:
1-800-422-1230
In Canada, call for assistance
1-800-461-5681
, for installation and service, call:
1-800-807-6777
or visit our website at...
www.kitchenaid.com
or
www.KitchenAid.ca
CUISINIÈRE À DOUBLE COMBUSTIBLE,
SÉRIE PROFESSIONNELLE
Guide d’utilisation et d’entretien
Au Canada, pour assistance composez le
1-800-461-5681
, pour installation ou service composez le
1-800-807-6777
ou visitez notre site web à...
www.KitchenAid.ca
Table of Contents/Table des matières
.............................................................................
2
Models/Modèles KDRP407 KDRP462 KDRP463 KDRP467 KDRP487
8301284