KitchenAid KDRP462LSS Use and Care Guide - Page 11
Grille
 |
View all KitchenAid KDRP462LSS manuals
Add to My Manuals
Save this manual to your list of manuals |
Page 11 highlights
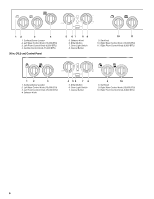
Grille (on some models) To Replace: 1. Lift burner assembly out of basin and set aside. 2. Place drip tray on bottom of grille basin and slide the tray forward so that it is located side to side and against the locating feet of the rear spill guard. 1 2 1 2 3 4 3 1. Rear spill guard 2. Locating feet 3. Drip tray 3. Insert the front spill guard feet into the slots in the rear spill guard. The rear flange will rest on the burner box. 5 6 1. Grille Grate 2. Wave Tray 3. Wave Plate 4. Burner Assembly 5. Front Spill Guard 6. Drip Tray The grille module consists of a cast-iron grate, a wave tray, a wave plate, a burner assembly, a front spill guard and a drip tray. It is used to grill foods. Refer to the "Grille Chart" for cook times and settings. When using the grille, follow the guidelines below. s Do not leave the grille unattended while cooking. s Do not use aluminum foil, charcoal or wood chips. s Trim excess fat to reduce spattering. Slit the remaining fat on the edges to prevent curling. s Allow space between food on the grille. Crowding food will result in uneven cooking. s Use a metal spatula or tongs to turn food. s Steaks, chops and hamburgers should be turned only once to prevent loss of juices. s For even cooking, foods such as chicken quarters should be turned several times. s To check for doneness of meats and poultry, use an instant read thermometer or make a small cut in the center of the food. This will prevent loss of juices. REMEMBER: Before removing or replacing grille, make sure the control knobs are turned to OFF. Allow the grille to cool completely before handling. To Remove: 1. Remove grille grate. 2. Remove wave tray and wave plate. 3. Remove burner assembly. 4. Remove front spill guard. 5. Remove drip tray. 6. Clean basin. See "General Cleaning" section. 1 2 1. Front spill guard 2. Feet and slots 4. Place burner assembly over spill guard, making sure burner's rear flange is seated in slot. 5. Install the wave tray into the grille. The tab in the left rear corner of the bay must fit through the slot in the left rear corner of the wave tray. 1 2 1. Slot for locating tab 2. Locating tab 11
-
 1
1 -
2
-
3
-
4
-
5
-
 6
6 -
 7
7 -
 8
8 -
 9
9 -
 10
10 -
 11
11 -
 12
12 -
 13
13 -
 14
14 -
 15
15 -
 16
16 -
17
-
18
-
19
-
20
-
21
-
22
-
23
-
24
-
25
-
26
-
27
-
28
-
29
-
30
-
31
-
32
-
33
-
34
-
35
-
36
-
37
-
38
-
39
-
40
-
41
-
42
-
43
-
44
-
45
-
46
-
47
-
48
-
49
-
50
-
51
-
52
 |
 |
