Konica Minolta Kodak i620 User Guide - Page 25
Calibrating the scanner, Image calibration
 |
View all Konica Minolta Kodak i620 manuals
Add to My Manuals
Save this manual to your list of manuals |
Page 25 highlights
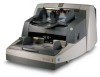
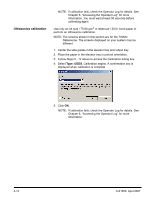
Calibrating the scanner Image calibration There are two types of calibration that can be performed on the i600 Series Scanners: Image calibration and Ultrasonics calibration. • Image calibration: optimizes the optical system in your scanner in order to achieve the best overall quality of scanned images. Frequent calibration is not needed or recommended. IMPORTANT: If the White Background Accessory is installed, it must be replaced with the black background strip, and the scanner must be rebooted prior to calibration. • Ultrasonics calibration: ensures that the ultrasonics system that detects multi-feeds and document edges is properly adjusted for best performance. Frequent calibration is not needed or recommended. Use the calibration target provided with your scanner. Be sure to use a good, clean calibration target. Additional calibration targets can be ordered. See Chapter 5, "Supplies and accessories" for ordering information. NOTE: The screens shown in this section are for the TWAIN Datasource. The screens displayed on your system may be different. 1. Open the pod and clean the imaging guides. Refer to the maintenance procedures in Chapter 5. 2. If the lamps have not been on, allow the lamps to warm up for 90 seconds. 3. Center the side guides in the elevator tray and output tray. 4. Place the calibration target in the elevator tray. 5. Open the Scan Validation Tool. 6. Select Kodak Scanner: i600. A-61500 April 2007 3-11
-
 1
1 -
2
-
3
-
4
-
5
-
6
-
7
-
8
-
9
-
10
-
11
-
12
-
13
-
14
-
15
-
16
-
17
-
18
-
19
-
 20
20 -
 21
21 -
 22
22 -
 23
23 -
 24
24 -
 25
25 -
 26
26 -
 27
27 -
 28
28 -
 29
29 -
 30
30 -
31
-
32
-
33
-
34
-
35
-
36
-
37
-
38
-
39
-
40
-
41
-
42
-
43
-
44
-
45
-
46
-
47
-
48
-
49
-
50
-
51
-
52
-
53
-
54
-
55
-
56
-
57
-
58
-
59
-
60
-
61
-
62
-
63
-
64
-
65
-
66
-
67
-
68
-
69
-
70
 |
 |
