Konica Minolta PS7000 PS7000 Operator Manual (Printer Version) - Page 102
distribute the toner inside., Slide the pins located on both sides
 |
View all Konica Minolta PS7000 manuals
Add to My Manuals
Save this manual to your list of manuals |
Page 102 highlights
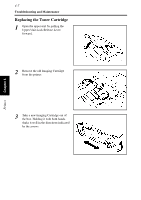
4 Remove the seal from the Imaging Cartridge by pulling it steadily straight out. 4-8 Troubleshooting and Maintenance 5 Shake the Imaging Cartridge four or five more times as shown to evenly distribute the toner inside. Printer Chapter 4 6 Slide the pins located on both sides of the Imaging Cartridge into the grooves of the printer as shown and gently push the Imaging Cartridge securely into place.
-
 1
1 -
2
-
3
-
4
-
5
-
6
-
7
-
8
-
9
-
10
-
11
-
12
-
13
-
14
-
15
-
16
-
17
-
18
-
19
-
20
-
21
-
22
-
23
-
24
-
25
-
26
-
27
-
28
-
29
-
30
-
31
-
32
-
33
-
34
-
35
-
36
-
37
-
38
-
39
-
40
-
41
-
42
-
43
-
44
-
45
-
46
-
47
-
48
-
49
-
50
-
51
-
52
-
53
-
54
-
55
-
56
-
57
-
58
-
59
-
60
-
61
-
62
-
63
-
64
-
65
-
66
-
67
-
68
-
69
-
70
-
71
-
72
-
73
-
74
-
75
-
76
-
77
-
78
-
79
-
80
-
81
-
82
-
83
-
84
-
85
-
86
-
87
-
88
-
89
-
90
-
91
-
92
-
93
-
94
-
95
-
96
-
 97
97 -
 98
98 -
 99
99 -
 100
100 -
 101
101 -
 102
102 -
 103
103 -
 104
104 -
 105
105 -
 106
106 -
 107
107 -
108
-
109
-
110
-
111
-
112
-
113
-
114
-
115
-
116
-
117
-
118
-
119
-
120
-
121
-
122
-
123
-
124
 |
 |

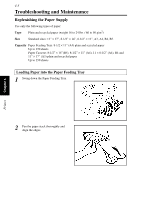
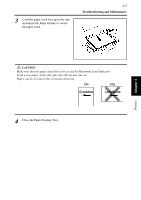
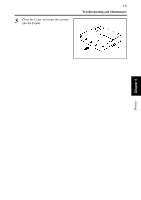
Troubleshooting and Maintenance
4-8
Printer
Chapter 4
Remove the seal from the Imaging
Cartridge by pulling it steadily straight
out.
Shake the Imaging Cartridge four or
five more times as shown to evenly
distribute the toner inside.
Slide the pins located on both sides of
the Imaging Cartridge into the grooves
of the printer as shown and gently push
the Imaging Cartridge securely into
place.
4
5
6