Konica Minolta PS7000 PS7000 Operator Manual (Printer Version) - Page 56
Main menu: In Metric
 |
View all Konica Minolta PS7000 manuals
Add to My Manuals
Save this manual to your list of manuals |
Page 56 highlights
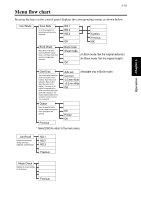
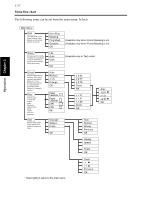
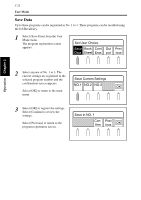
Main menu: In Metric 3-18 Menu flow chart Operation Chapter 3 Main Menu Edit Turns the Center Erase, Frame Masking, Finger Masking, and Centering functions on and off. Expo Sets exposure for scanning. In addition to turning [Auto] on and off, nine levels of exposure can be selected using [Lite] or [Dark]. Zoom Sets the magnification for scanning. Select [Auto] (automatic adjustment), [Reduce], [x 1.0], or [Enlarge] (enlargement). You can specify the magnification when [Reduce] or [Enlarge] is selected. Size Sets the paper on which the image is output. Specify the paper size and output direction (portrait or landscape). Out Sets the image quality, original type and the number of copies to be output. Cent Eras Masking Fing Mask Center OK Lite Auto Dark OK Auto Reduce x 1.0 Enlarge OK Paper Cassette Paper Cassette A4 A4 OK Org.type Output Prints OK (Available only when Frame Masking is on) (Available only when Frame Masking is on) (Available only in Text mode) x 0.71 x 0.82 x 0.87 Zoom OK A2 ¤AA33 A3 ¤AA44 B4 ¤AA44 A3 ¤BB44 A4 ¤BB55 x 1.15 x 1.22 x 1.41 Zoom OK B4 A3 B5 A4 A4 B4 A4 A3 B5 B4 Auto -0.01 x 1.0 +0.01 OK Auto Normal Glossy Previous OK Quality Speed Previous OK * Select [OK] to return to the main menu. Clear -1 +1 Previous OK
-
 1
1 -
2
-
3
-
4
-
5
-
6
-
7
-
8
-
9
-
10
-
11
-
12
-
13
-
14
-
15
-
16
-
17
-
18
-
19
-
20
-
21
-
22
-
23
-
24
-
25
-
26
-
27
-
28
-
29
-
30
-
31
-
32
-
33
-
34
-
35
-
36
-
37
-
38
-
39
-
40
-
41
-
42
-
43
-
44
-
45
-
46
-
47
-
48
-
49
-
50
-
 51
51 -
 52
52 -
 53
53 -
 54
54 -
 55
55 -
 56
56 -
 57
57 -
 58
58 -
 59
59 -
 60
60 -
 61
61 -
62
-
63
-
64
-
65
-
66
-
67
-
68
-
69
-
70
-
71
-
72
-
73
-
74
-
75
-
76
-
77
-
78
-
79
-
80
-
81
-
82
-
83
-
84
-
85
-
86
-
87
-
88
-
89
-
90
-
91
-
92
-
93
-
94
-
95
-
96
-
97
-
98
-
99
-
100
-
101
-
102
-
103
-
104
-
105
-
106
-
107
-
108
-
109
-
110
-
111
-
112
-
113
-
114
-
115
-
116
-
117
-
118
-
119
-
120
-
121
-
122
-
123
-
124
 |
 |
