Konica Minolta PS7000 PS7000 Operator Manual (Printer Version) - Page 79
Enlarge, x 1.0, Set Magnification, Set Enlargement Ratio, Set Zoom Ratio
 |
View all Konica Minolta PS7000 manuals
Add to My Manuals
Save this manual to your list of manuals |
Page 79 highlights
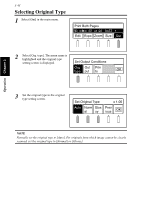
3-41 Setting magnification Enlarge The original is scanned and the image is enlarged. The enlargement ratio can be specified by the user. 1 Select [Enlarge]. The menu name is highlighted and the enlargement setting screen is displayed. Select [OK] to return to the main menu. Set Magnification x 1.00 Auto Re x 1.0 Enla duce rge OK Operation Chapter 3 2 Select the magnification. Select [OK] to return to the main menu. Select [Zoom] to display the zoom setting screen. Set Enlargement Ratio x 1.00 x1.15 x1.22 x1.41 Zoom B4 A3 B5 A4 A4 B4 A4 A3 B5 B4 OK The desired magnification can be set from 0.50 to 2.00 in 0.01 increments. The value increases or decreases continuously while the key is held down. The set value is displayed in the message area. Set Zoom Ratio x 1.00 Auto -0.01 x 1.0 +0.01 OK Select [Auto] to automatically adjust the magnification as described in "Auto" on page 3-36. Magnification is not changed (x 1.00) when [x 1.0] is selected. Select [OK] to return to the main menu. The fixed magnifications for reduction/enlargement can also be set to x0.50, x0.71 / x1.41, x2.00. For the setting information, contact your authorized Dealer.
-
 1
1 -
2
-
3
-
4
-
5
-
6
-
7
-
8
-
9
-
10
-
11
-
12
-
13
-
14
-
15
-
16
-
17
-
18
-
19
-
20
-
21
-
22
-
23
-
24
-
25
-
26
-
27
-
28
-
29
-
30
-
31
-
32
-
33
-
34
-
35
-
36
-
37
-
38
-
39
-
40
-
41
-
42
-
43
-
44
-
45
-
46
-
47
-
48
-
49
-
50
-
51
-
52
-
53
-
54
-
55
-
56
-
57
-
58
-
59
-
60
-
61
-
62
-
63
-
64
-
65
-
66
-
67
-
68
-
69
-
70
-
71
-
72
-
73
-
 74
74 -
 75
75 -
 76
76 -
 77
77 -
 78
78 -
 79
79 -
 80
80 -
 81
81 -
 82
82 -
 83
83 -
 84
84 -
85
-
86
-
87
-
88
-
89
-
90
-
91
-
92
-
93
-
94
-
95
-
96
-
97
-
98
-
99
-
100
-
101
-
102
-
103
-
104
-
105
-
106
-
107
-
108
-
109
-
110
-
111
-
112
-
113
-
114
-
115
-
116
-
117
-
118
-
119
-
120
-
121
-
122
-
123
-
124
 |
 |
