Konica Minolta PS7000 PS7000 Operator Manual (Printer Version) - Page 91
SCSI port settings, Select Function, Set SCSI ID
 |
View all Konica Minolta PS7000 manuals
Add to My Manuals
Save this manual to your list of manuals |
Page 91 highlights
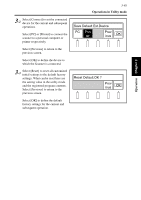
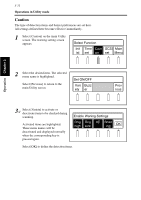
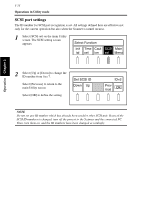
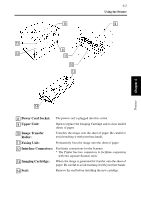
3-53 Operations in Utility mode SCSI port settings The ID number for SCSI port recognition is set. All settings defined here are effective not only for the current operation but also when the Scanner is turned on next. 1 Select [SCSI set] on the main Utility screen. The SCSI setting screen appears. Select Function Init Time Caut SCSI Main ial set ion set Menu Operation Chapter 3 2 Select [Up] or [Down] to change the ID number from 0 to 7. Select [Previous] to return to the main Utility screen. Select [OK] to define the setting. Set SCSI ID Down Up ID=2 Prev ious OK NOTE Do not set any ID number which has already been used for other SCSI unit. If any of the SCSI ID numbers is changed, turn off the powers to the Scanner and the connected PC. Then, turn them on, and the ID numbers have been changed accordingly.
-
 1
1 -
2
-
3
-
4
-
5
-
6
-
7
-
8
-
9
-
10
-
11
-
12
-
13
-
14
-
15
-
16
-
17
-
18
-
19
-
20
-
21
-
22
-
23
-
24
-
25
-
26
-
27
-
28
-
29
-
30
-
31
-
32
-
33
-
34
-
35
-
36
-
37
-
38
-
39
-
40
-
41
-
42
-
43
-
44
-
45
-
46
-
47
-
48
-
49
-
50
-
51
-
52
-
53
-
54
-
55
-
56
-
57
-
58
-
59
-
60
-
61
-
62
-
63
-
64
-
65
-
66
-
67
-
68
-
69
-
70
-
71
-
72
-
73
-
74
-
75
-
76
-
77
-
78
-
79
-
80
-
81
-
82
-
83
-
84
-
85
-
 86
86 -
 87
87 -
 88
88 -
 89
89 -
 90
90 -
 91
91 -
 92
92 -
 93
93 -
 94
94 -
 95
95 -
 96
96 -
97
-
98
-
99
-
100
-
101
-
102
-
103
-
104
-
105
-
106
-
107
-
108
-
109
-
110
-
111
-
112
-
113
-
114
-
115
-
116
-
117
-
118
-
119
-
120
-
121
-
122
-
123
-
124
 |
 |
