Konica Minolta bizhub C550 PageScope Authentication Manager User Manual - Page 58
Text tab-delimited format .txt
 |
View all Konica Minolta bizhub C550 manuals
Add to My Manuals
Save this manual to your list of manuals |
Page 58 highlights
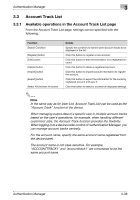
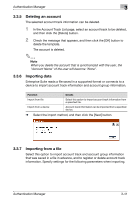
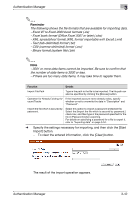
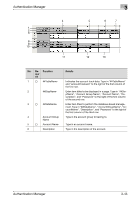
Authentication Manager 3 2 Reminder The following shows the file formats that are available for importing data. - Excel 97 to Excel 2003 book formats (.xls) - Excel book format (Office Excel 2007 or later) (.xlsx) - XML spreadsheet format (XML format importable with Excel) (.xml) - Text (tab-delimited) format (.txt) - CSV (comma-delimited) format (.csv) - Binary format (system file) (.bin) 2 Note - 3001 or more data items cannot be imported. Be sure to confirm that the number of data items is 3000 or less. - If there are too many data items, it may take time to register them. Function Details Import File Path Type in the path to the file to be imported. The file path can also be specified by clicking the [Browse] button. Operation for Already Existing Ac- If the imported account name already exists, specify count Tracks whether or not to overwrite the data in "Description" and "Password". Import the file which is secured by password. Select this option to import a password-protected file. Select the [Import the file which is secured by password.] check box, and then type in the password specified for the file in [Password] when exporting. For details on specifying a password for a file to export it, refer to "Exporting data" on page 3-54. % Specify the settings necessary for importing, and then click the [Start Import] button. - To clear the entered information, click the [Clear] button. The result of the import operation appears. Authentication Manager 3-42
-
 1
1 -
2
-
3
-
4
-
5
-
6
-
7
-
8
-
9
-
10
-
11
-
12
-
13
-
14
-
15
-
16
-
17
-
18
-
19
-
20
-
21
-
22
-
23
-
24
-
25
-
26
-
27
-
28
-
29
-
30
-
31
-
32
-
33
-
34
-
35
-
36
-
37
-
38
-
39
-
40
-
41
-
42
-
43
-
44
-
45
-
46
-
47
-
48
-
49
-
50
-
51
-
52
-
 53
53 -
 54
54 -
 55
55 -
 56
56 -
 57
57 -
 58
58 -
 59
59 -
 60
60 -
 61
61 -
 62
62 -
 63
63 -
64
-
65
-
66
-
67
-
68
-
69
-
70
-
71
-
72
-
73
-
74
-
75
-
76
-
77
-
78
-
79
-
80
-
81
-
82
-
83
-
84
-
85
-
86
-
87
-
88
-
89
-
90
-
91
-
92
-
93
-
94
-
95
-
96
-
97
-
98
-
99
-
100
-
101
-
102
-
103
-
104
-
105
-
106
-
107
-
108
-
109
-
110
-
111
-
112
-
113
-
114
-
115
-
116
-
117
-
118
-
119
-
120
-
121
-
122
-
123
-
124
-
125
-
126
-
127
-
128
-
129
-
130
-
131
-
132
-
133
-
134
-
135
-
136
-
137
-
138
-
139
-
140
-
141
-
142
-
143
-
144
-
145
-
146
-
147
-
148
-
149
-
150
-
151
-
152
-
153
-
154
-
155
-
156
-
157
-
158
-
159
-
160
-
161
-
162
-
163
-
164
-
165
-
166
-
167
-
168
-
169
-
170
-
171
-
172
-
173
-
174
-
175
-
176
-
177
-
178
 |
 |