Konica Minolta bizhub C754 Setup Utility for RightFax User Guide - Page 22
Using an application, Setup Utility for RightFax
 |
View all Konica Minolta bizhub C754 manuals
Add to My Manuals
Save this manual to your list of manuals |
Page 22 highlights
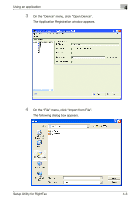
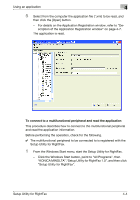
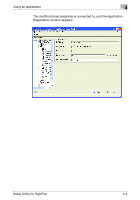
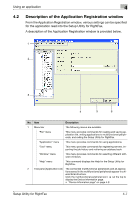
Using an application 4 No. Item 3 Applications Application icon ( ) Server icon ( ) Extension icon ( ) Scan icon ( ) Notification icon ( ) 4 Settings pane 5 [Write] button 6 [Close] button Description The settings that can be specified for an application are displayed. Click an icon to display the available settings in the settings pane on the right side of the window. Click this icon to display the Application Information page. • "Application Information page" on page 4-10 Click this icon to display the Server Setting page. The information for the linked RightFax server can be specified. • "Server Setting page" on page 4-11 Click this icon to display the Extension Setting page. Extension settings can be specified. • "Extension Setting page" on page 4-13 Click this icon to display the Scan Setting page. Scanning settings can be specified. • "Scan Setting page" on page 4-20 Click this icon to display the Notification Setting page. The method of receiving notifications from the RightFax server can be specified. • "Notification Setting page" on page 4-22 The settings page for the item selected in the tree pane is displayed. Click this button to write the new settings to the multifunctional peripheral. Click this button to close the Application Registration window. Setup Utility for RightFax 4-8
-
 1
1 -
2
-
3
-
4
-
5
-
6
-
7
-
8
-
9
-
10
-
11
-
12
-
13
-
14
-
15
-
16
-
 17
17 -
 18
18 -
 19
19 -
 20
20 -
 21
21 -
 22
22 -
 23
23 -
 24
24 -
 25
25 -
 26
26 -
 27
27 -
28
-
29
-
30
-
31
-
32
-
33
-
34
-
35
-
36
-
37
-
38
-
39
-
40
-
41
-
42
-
43
-
44
-
45
-
46
-
47
-
48
-
49
-
50
-
51
-
52
-
53
-
54
-
55
-
56
-
57
-
58
-
59
-
60
-
61
-
62
-
63
-
64
-
65
 |
 |
