Konica Minolta bizhub PRESS C71hc FD-9 Auto Scan Spectrophotometer User Guide - Page 22
Setting Network Settings for Connecting FD-9 to Computer via a LAN, Setting network settings directly
 |
View all Konica Minolta bizhub PRESS C71hc manuals
Add to My Manuals
Save this manual to your list of manuals |
Page 22 highlights
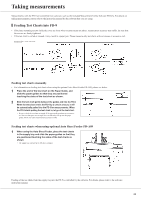
Connecting FD-9 to Computer ❙❙Setting Network Settings for Connecting FD-9 to Computer via a LAN The FD-9 can be connected to a LAN and shared by multiple computers. When connecting the FD-9 to a LAN, network settings can be performed directly or DHCP (Dynamic Host Configuration Protocol) can be used. • Network settings can also be performed from Measurement Utility Software FD-S2w when the FD-9 is connected via USB. Setting network settings directly The IP address, subnet mask, and default gateway can be set directly in the settings screen. • It is not possible to set the network name directly using the FD-9 buttons. 1 Press to open the settings screen. 2 Press or repeatedly to select "IP address" and press . The first number of the IP address will be highlighted. • "IP address" will be disabled if "DHCP" is set to "ON". To change the setting to "OFF", see p. 22. 3 Press or number. repeatedly to set the desired value for the first • Holding or pressed will cause the value to change continually. • Values between 0 and 255 can be set. If or is pressed again when the lowest or highest value has been reached, the number will change to the highest or lowest value. 4 Press to move to the next number. 5 Repeat steps 3 and 4 until all numbers have been set for the IP address. 6 Press to select "Subnet mask" and press the subnet mask will be highlighted. . The first number of 7 Press or number. repeatedly to set the desired value for the first • Holding or pressed will cause the value to change continually. • Values between 0 and 255 can be set. If or is pressed again when the lowest or highest value has been reached, the number will change to the highest or lowest value. 8 Press to move to the next number. 9 Repeat steps 3 and 4 until all numbers have been set for the subnet mask. 20
-
 1
1 -
2
-
3
-
4
-
5
-
6
-
7
-
8
-
9
-
10
-
11
-
12
-
13
-
14
-
15
-
16
-
 17
17 -
 18
18 -
 19
19 -
 20
20 -
 21
21 -
 22
22 -
 23
23 -
 24
24 -
 25
25 -
 26
26 -
 27
27 -
28
-
29
-
30
-
31
-
32
-
33
-
34
-
35
-
36
 |
 |
