LG ARUB115BT2 Installation Manual - Page 12
Installation Process
 |
View all LG ARUB115BT2 manuals
Add to My Manuals
Save this manual to your list of manuals |
Page 12 highlights
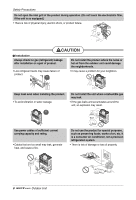
Installation Process Installation Process Determination of division work Preparation of contract drawings Indicate clearly who is to be responsible for switch settings Make relationship between outdoor, indoor, remote controller, and option connections clear. (Prepare control circuit diagram) Sleeve and insert work Installation of indoor unit and HR unit Refrigerant piping work Take account of gradient of drain piping Check model name to make sure the fitting is made correctly Special attention to dryness, cleanness and tightness Drain pipe work Adjust to downward gradient Outdoor unit foundation work The foundation must be level Installation of outdoor unit Avoid short circuits and ensure sufficient space is allowed for service Duct work Make sure airflow is sufficient Heat insulation work Make sure no gaps are left where the insulating materials are joined Electrical work (connection circuits and drive circuits) Multiple core cable must not be used. (suitable cable shouldbe selected) Airtight Test In the final check for 24hours at 3.80 MPa(38.7 kgf/cm2) there must be no drop in pressure. Vacuum drying The vacuum pump used must have a capacity of reaching at least 5 Torr, more than 1 hour. Additional charge of refrigerant Recharge correctly as calculated in this manual and record the amount of added refrigerant Automatic addressing for Indoor units and pipe detection Fit facing panels Refer to automatic addressing for Indoor units and pipe detection. Preheat the crank case with the electrical heater for more than 6 hours. (In case of the outdoor temperature below 10°C(50˚F)) Make sure there are no gaps left between the facing materials used on the ceiling Test run adjustment Run each indoor unit in turn to make sure the pipe work has been fitted correctly Transfer to customer with explanation Explain the proper use of the system as clearly as possible to your customer and make sure all relevant documentations are in order. CAUTION: The above list indicates the order in which the individual work operations are normally carried out but this order may be varied where local conditions warrants such change. Make sure additional charge the refrigerant before automatic addressing of indoor and pipe searching. 12 Outdoor Unit
-
 1
1 -
2
-
3
-
4
-
5
-
6
-
 7
7 -
 8
8 -
 9
9 -
 10
10 -
 11
11 -
 12
12 -
 13
13 -
 14
14 -
 15
15 -
 16
16 -
 17
17 -
18
-
19
-
20
-
21
-
22
-
23
-
24
-
25
-
26
-
27
-
28
-
29
-
30
-
31
-
32
-
33
-
34
-
35
-
36
-
37
-
38
-
39
-
40
-
41
-
42
-
43
-
44
-
45
-
46
-
47
-
48
-
49
-
50
-
51
-
52
-
53
-
54
-
55
-
56
-
57
-
58
-
59
-
60
-
61
-
62
-
63
-
64
-
65
-
66
-
67
-
68
-
69
-
70
-
71
-
72
-
73
-
74
-
75
-
76
-
77
-
78
-
79
-
80
-
81
-
82
-
83
 |
 |
