LG ARUB115BT2 Installation Manual - Page 69
Sensor Checking Function
 |
View all LG ARUB115BT2 manuals
Add to My Manuals
Save this manual to your list of manuals |
Page 69 highlights
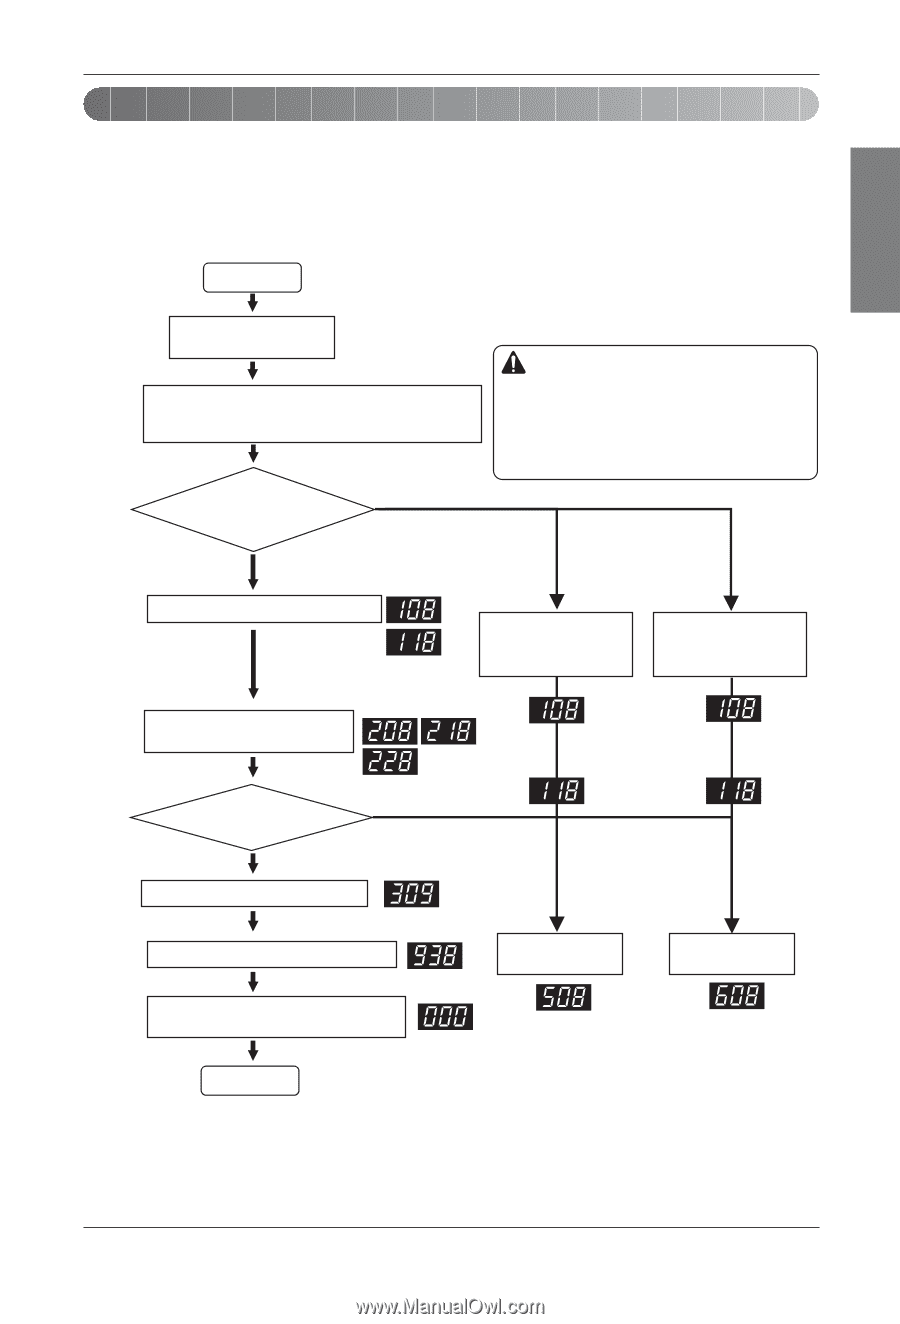
ENGLISH Test Run Sensor Checking Function Note 1) Sensor checking function judges whether the current temperature of indoor and outdoor unit sensors is right or not. -3 indoor temperature sensors, 9 outdoor temperature sensors, 2 outdoor pressure sensors. It is used for judging sensor abnormality. Note 2) Start Main PCB SW01S Wait for 3 min. after power reset Main PCB Set the dip S/W according to the function SW01B Sensor Checking ➠ Refrigerant Auto Charging : 1,2,7 ON SW02B Sensor Checking ➠ Refrigerant Checking : 1,2,7,14 ON Note 1. Sensor checking function is used with Refrigerant Checking and Refrigerant Auto Charging. 2. Check abnormal sensor 3. It is displayed at the LED on the main PCB at each step. 4. Refer to the next page for sensor error code part Caution 1. Confirm auto addressing has been performed (Check installed number of IDU). 2. The error can be displayed even if the sensor is normal according to installation and temperature condition. If error occurs, check the sensor and judge abnormality. Would you perform the Sensor checking? Don't Perform Sensor Checking No Yes Note 3) Main PCB SW01V Press the black button for 2 sec. on main PCB. Refrigerant Auto Charging Press the black button until '508' is displayed Refrigerant Checking Press the black button until '608' is displayed. Indoor/Outdoor units operate with air circulation mode Main pcb LED Judging sensor normality No Error Display Yes Note 4) Main PCB Press the black button on the main PCB for 2 sec. SW01V Press the black button for 2 sec. after turning off all of dip S/W. Completed. Refrigerant Auto Charging Refrigerant Checking Installation Manual 69
-
 1
1 -
2
-
3
-
4
-
5
-
6
-
7
-
8
-
9
-
10
-
11
-
12
-
13
-
14
-
15
-
16
-
17
-
18
-
19
-
20
-
21
-
22
-
23
-
24
-
25
-
26
-
27
-
28
-
29
-
30
-
31
-
32
-
33
-
34
-
35
-
36
-
37
-
38
-
39
-
40
-
41
-
42
-
43
-
44
-
45
-
46
-
47
-
48
-
49
-
50
-
51
-
52
-
53
-
54
-
55
-
56
-
57
-
58
-
59
-
60
-
61
-
62
-
63
-
 64
64 -
 65
65 -
 66
66 -
 67
67 -
 68
68 -
 69
69 -
 70
70 -
 71
71 -
 72
72 -
 73
73 -
 74
74 -
75
-
76
-
77
-
78
-
79
-
80
-
81
-
82
-
83
 |
 |