LG S5100 User Manual - Page 75
Notes on Panorama Assist, Indicator, Panorama Maker 5, More Information, Press
 |
View all LG S5100 manuals
Add to My Manuals
Save this manual to your list of manuals |
Page 75 highlights
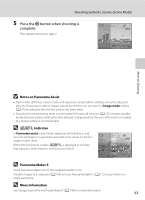
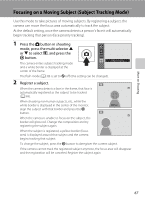
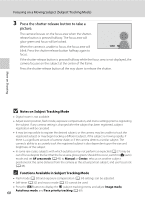
Shooting Suited to Scenes (Scene Mode) 5 Press the k button when shooting is complete. The camera returns to step 2. End 6 More on Shooting B Notes on Panorama Assist • Flash mode, self-timer, macro mode, and exposure compensation settings cannot be adjusted after the first picture is taken. Images cannot be deleted, nor can zoom or Image mode setting (A 37) be adjusted after the first picture has been taken. • Shooting for the panorama series is terminated if the auto off function (A 133) initiates standby mode during shooting. Setting the time allowed to elapse before the auto off function is enabled to a longer setting is recommended. D R Indicator In Panorama assist scene mode, exposure, white balance, and focus for all images in a panorama are fixed at the values for the first image in each series. When the first picture is taken, R is displayed to indicate that exposure, white balance, and focus are locked. End 8 D Panorama Maker 5 Install Panorama Maker 5 from the supplied ViewNX 2 CD. Transfer images to a computer (A 108) and use Panorama Maker 5 (A 112) to join them in a single panorama. D More Information See "Image/Sound File and Folder Names" (A 146) for more information. 63
-
 1
1 -
2
-
3
-
4
-
5
-
6
-
7
-
8
-
9
-
10
-
11
-
12
-
13
-
14
-
15
-
16
-
17
-
18
-
19
-
20
-
21
-
22
-
23
-
24
-
25
-
26
-
27
-
28
-
29
-
30
-
31
-
32
-
33
-
34
-
35
-
36
-
37
-
38
-
39
-
40
-
41
-
42
-
43
-
44
-
45
-
46
-
47
-
48
-
49
-
50
-
51
-
52
-
53
-
54
-
55
-
56
-
57
-
58
-
59
-
60
-
61
-
62
-
63
-
64
-
65
-
66
-
67
-
68
-
69
-
 70
70 -
 71
71 -
 72
72 -
 73
73 -
 74
74 -
 75
75 -
 76
76 -
 77
77 -
 78
78 -
 79
79 -
 80
80 -
81
-
82
-
83
-
84
-
85
-
86
-
87
-
88
-
89
-
90
-
91
-
92
-
93
-
94
-
95
-
96
-
97
-
98
-
99
-
100
-
101
-
102
-
103
-
104
-
105
-
106
-
107
-
108
-
109
-
110
-
111
-
112
-
113
-
114
-
115
-
116
-
117
-
118
-
119
-
120
-
121
-
122
-
123
-
124
-
125
-
126
-
127
-
128
-
129
-
130
-
131
-
132
-
133
-
134
-
135
-
136
-
137
-
138
-
139
-
140
-
141
-
142
-
143
-
144
-
145
-
146
-
147
-
148
-
149
-
150
-
151
-
152
-
153
-
154
-
155
-
156
-
157
-
158
-
159
-
160
-
161
-
162
-
163
-
164
-
165
-
166
-
167
-
168
-
169
-
170
-
171
-
172
-
173
-
174
-
175
-
176
-
177
-
178
-
179
-
180
 |
 |
