Lexmark 34S0709 User Guide - Page 124
Identifying jams in the paper path, Understanding jam messages and locations
 |
UPC - 734646084505
View all Lexmark 34S0709 manuals
Add to My Manuals
Save this manual to your list of manuals |
Page 124 highlights
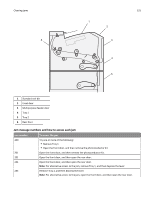
Clearing jams 124 Identifying jams in the paper path The following illustration shows the path that paper travels through the printer. The path varies depending on the input source (tray or feeder) and depending on whether a duplex (two‑sided) print job is being sent. When a jam occurs, a jam message appears, indicating the region of the jam or the number of jammed sheets. The three‑digit jam prefix numbers are given in the following illustration to show where each jam occurs. 235 202 231 234 201 200 251 233, 234, 24x 24x Understanding jam messages and locations Note: To resolve any message, all paper or specialty media must be cleared from the entire paper path. Open doors and covers, and remove trays to access jam locations. The following illustration and table indicate these locations. See "Jam message numbers and how to access each jam" on page 125 for a list of jam numbers and instructions for how to access each jam.
-
 1
1 -
2
-
3
-
4
-
5
-
6
-
7
-
8
-
9
-
10
-
11
-
12
-
13
-
14
-
15
-
16
-
17
-
18
-
19
-
20
-
21
-
22
-
23
-
24
-
25
-
26
-
27
-
28
-
29
-
30
-
31
-
32
-
33
-
34
-
35
-
36
-
37
-
38
-
39
-
40
-
41
-
42
-
43
-
44
-
45
-
46
-
47
-
48
-
49
-
50
-
51
-
52
-
53
-
54
-
55
-
56
-
57
-
58
-
59
-
60
-
61
-
62
-
63
-
64
-
65
-
66
-
67
-
68
-
69
-
70
-
71
-
72
-
73
-
74
-
75
-
76
-
77
-
78
-
79
-
80
-
81
-
82
-
83
-
84
-
85
-
86
-
87
-
88
-
89
-
90
-
91
-
92
-
93
-
94
-
95
-
96
-
97
-
98
-
99
-
100
-
101
-
102
-
103
-
104
-
105
-
106
-
107
-
108
-
109
-
110
-
111
-
112
-
113
-
114
-
115
-
116
-
117
-
118
-
 119
119 -
 120
120 -
 121
121 -
 122
122 -
 123
123 -
 124
124 -
 125
125 -
 126
126 -
 127
127 -
 128
128 -
 129
129 -
130
-
131
-
132
-
133
-
134
-
135
-
136
-
137
-
138
-
139
-
140
-
141
-
142
-
143
-
144
-
145
-
146
-
147
-
148
-
149
-
150
-
151
-
152
-
153
-
154
-
155
-
156
-
157
-
158
-
159
-
160
-
161
-
162
-
163
-
164
-
165
-
166
-
167
-
168
-
169
-
170
-
171
-
172
-
173
-
174
-
175
-
176
-
177
-
178
-
179
-
180
-
181
 |
 |
