Lexmark Multifunction Laser C78x - Setup Guide - Page 28
Step 13: Attaching cables to the printer and the scanner
 |
View all Lexmark Multifunction Laser manuals
Add to My Manuals
Save this manual to your list of manuals |
Page 28 highlights
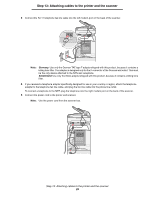
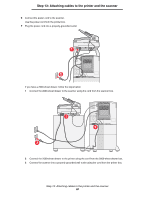
Step 13: Attaching cables to the printer and the scanner Step 13: Attaching cables to the printer and the scanner CAUTION: Do not use the fax feature during a lightning storm. Do not set up this product or make any electrical or cabling connections, such as the power cord or telephone, during a lightning storm. CAUTION:Connect the power cord to a properly grounded electrical outlet that is near the product and easily accessible. 1 Connect the scanner cable to the scanner and printer. Note: To prevent errors and scanner malfunction, make sure the scanner cable thumbscrews are tightened securely. 2 Connect the printer to a LAN drop or hub using standard cabling that is compatible with your network. Step 13: Attaching cables to the printer and the scanner 28
-
 1
1 -
2
-
3
-
4
-
5
-
6
-
7
-
8
-
9
-
10
-
11
-
12
-
13
-
14
-
15
-
16
-
17
-
18
-
19
-
20
-
21
-
22
-
 23
23 -
 24
24 -
 25
25 -
 26
26 -
 27
27 -
 28
28 -
 29
29 -
 30
30 -
 31
31 -
 32
32 -
 33
33 -
34
-
35
-
36
-
37
 |
 |
